My notes on these bras are so scattered and useless that I decided to make all remarks about the jersey that at long last I'm going to be able to start making -- right after the Fourth of July festivities settle down -- in a separate file. My first thought was to append the diary to linjersy.htm, then I realized that it would be better to add a link to LINJERSY.HTM pointing to a proper ROUGHnn.HTM file with its own folder of photographs.
And I could make it on the Linux DOSBOX, making it quick and easy to add remarks. A big crummy deal to make a back-up file and upload to the Web, but no inhibitions on taking notes. (Followed by an itch until I get a copy sneakernetted to another disk.)
Perhaps I should call that "swivelchairnetted"; I don't have to put my weight on my feet to move a USB stick from Linux to JOYXP.
But my computers are still too crippled for an ed.dir file to be of any use, and ed.dir is vital to managing a folder of photographs.
I'll worry about that after taking some photographs.
The check list from making the yellow-linen jersey:
***
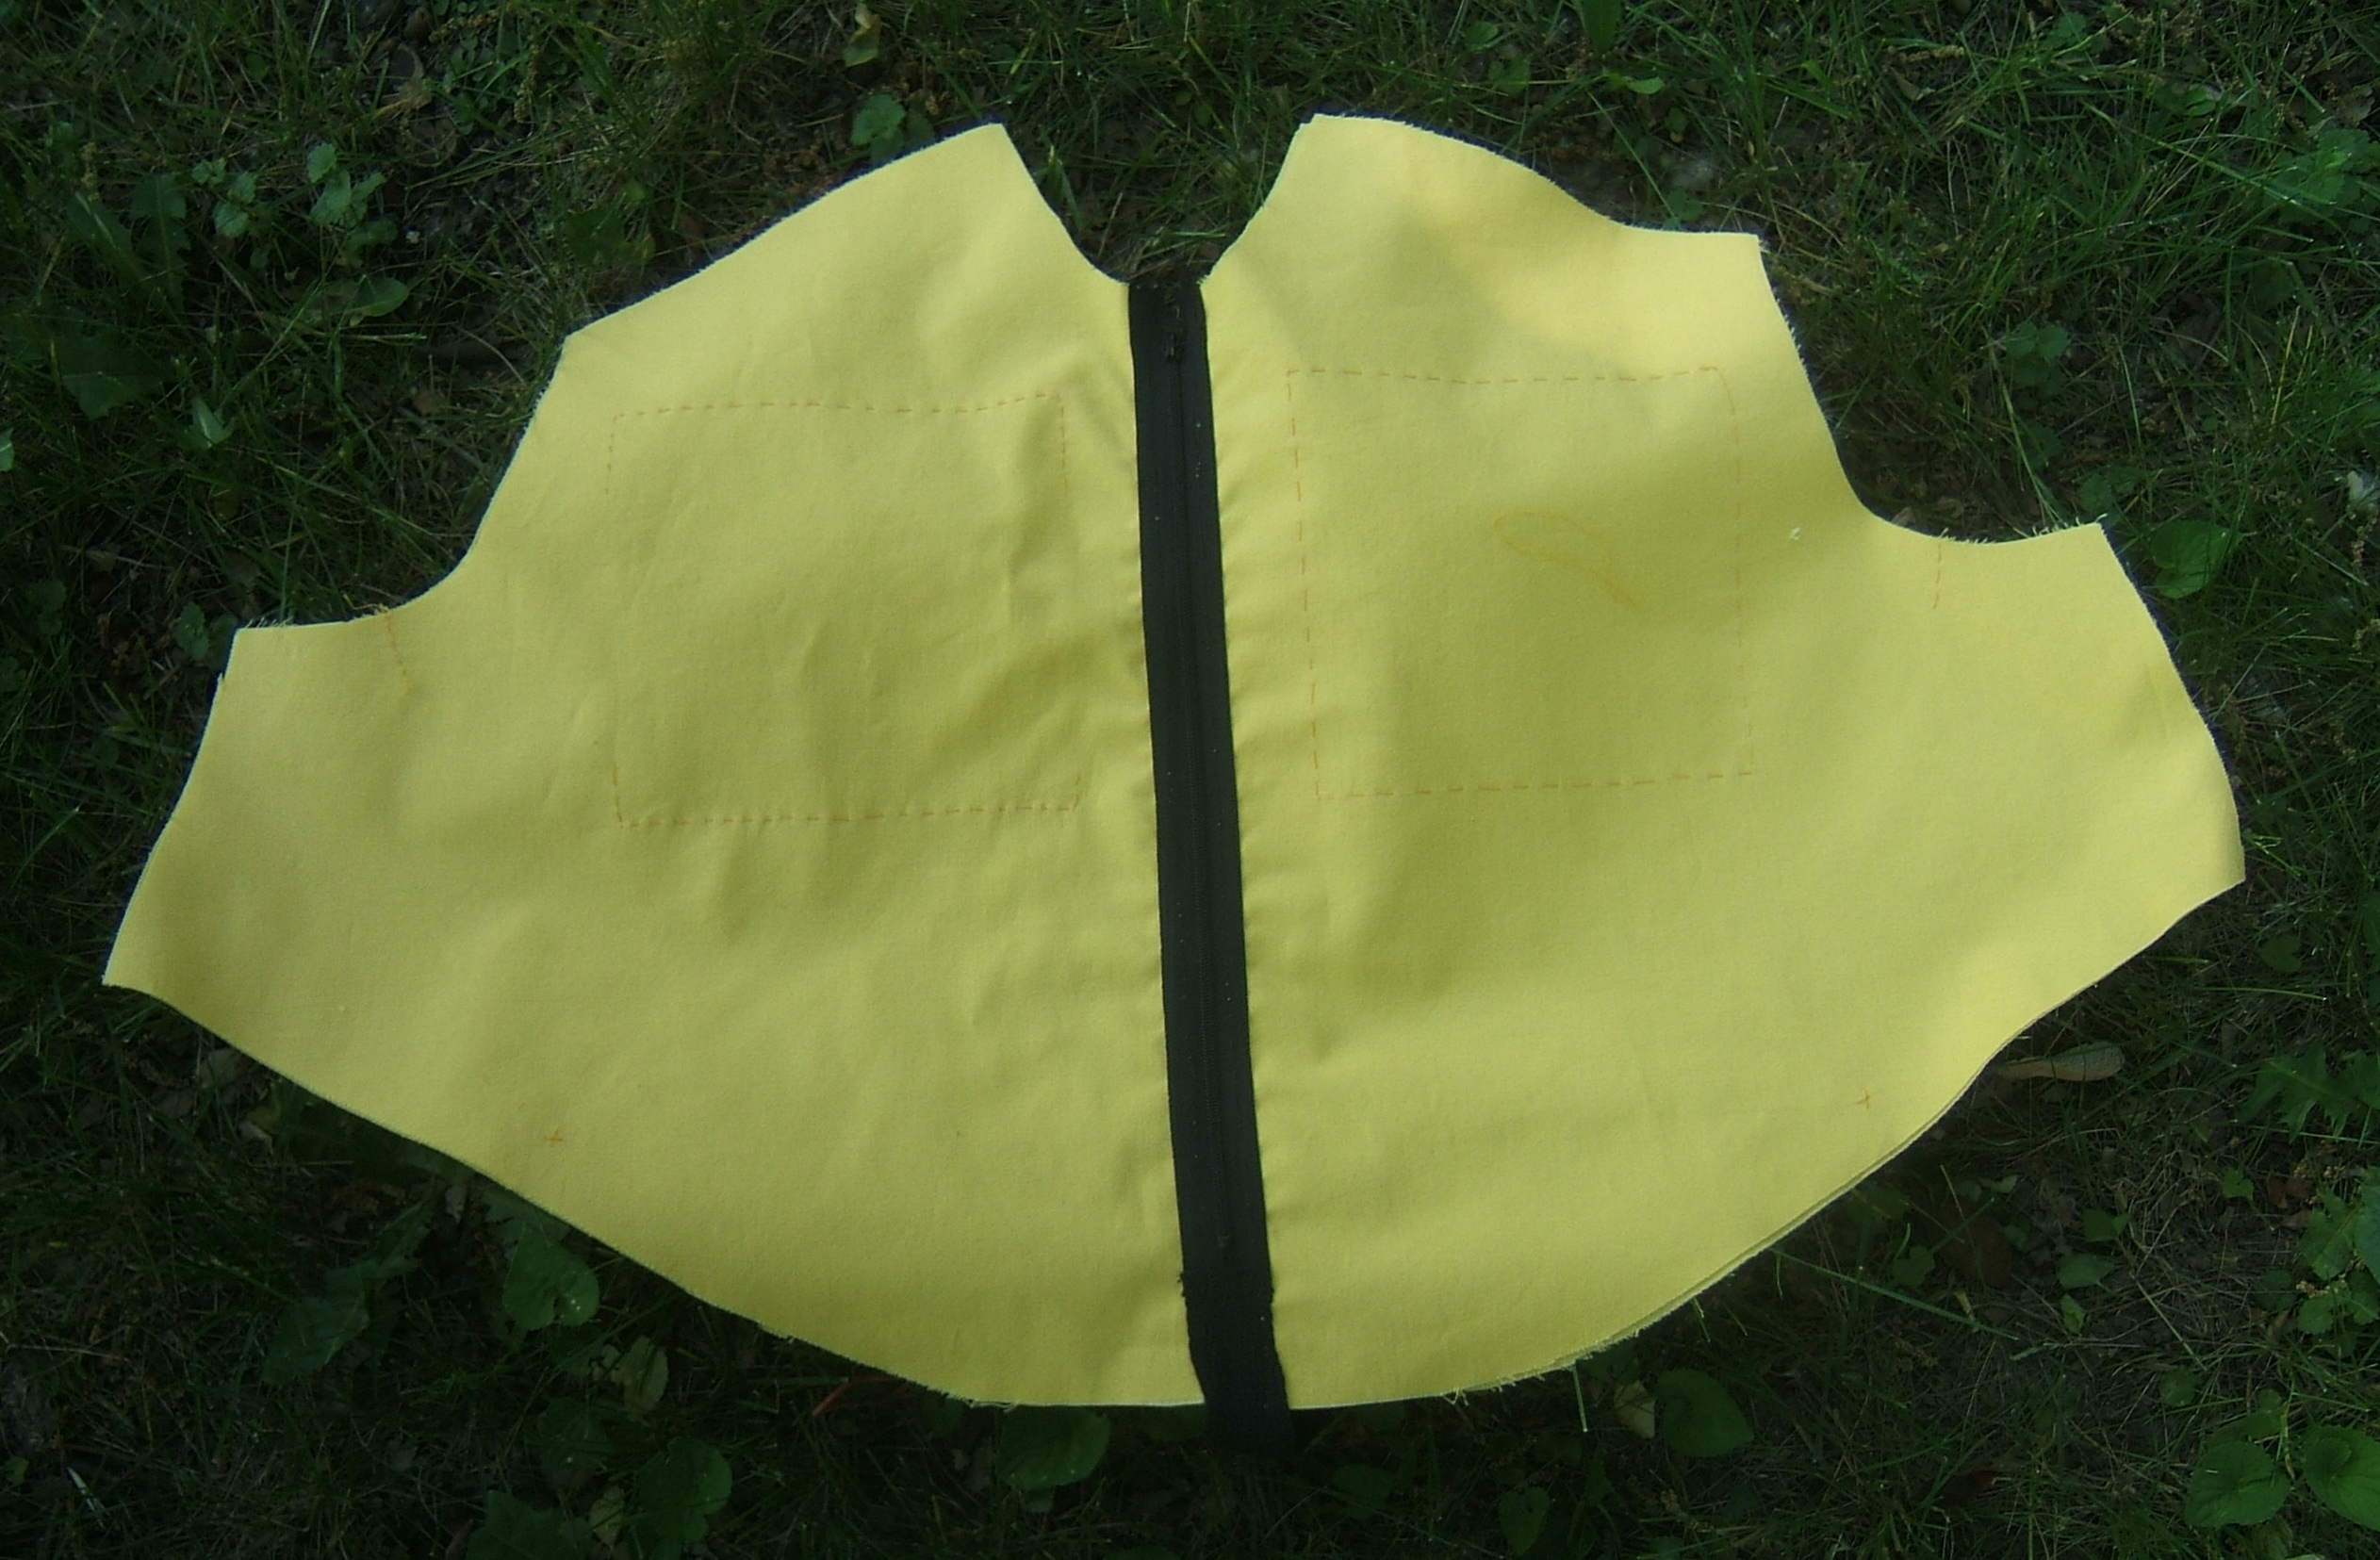
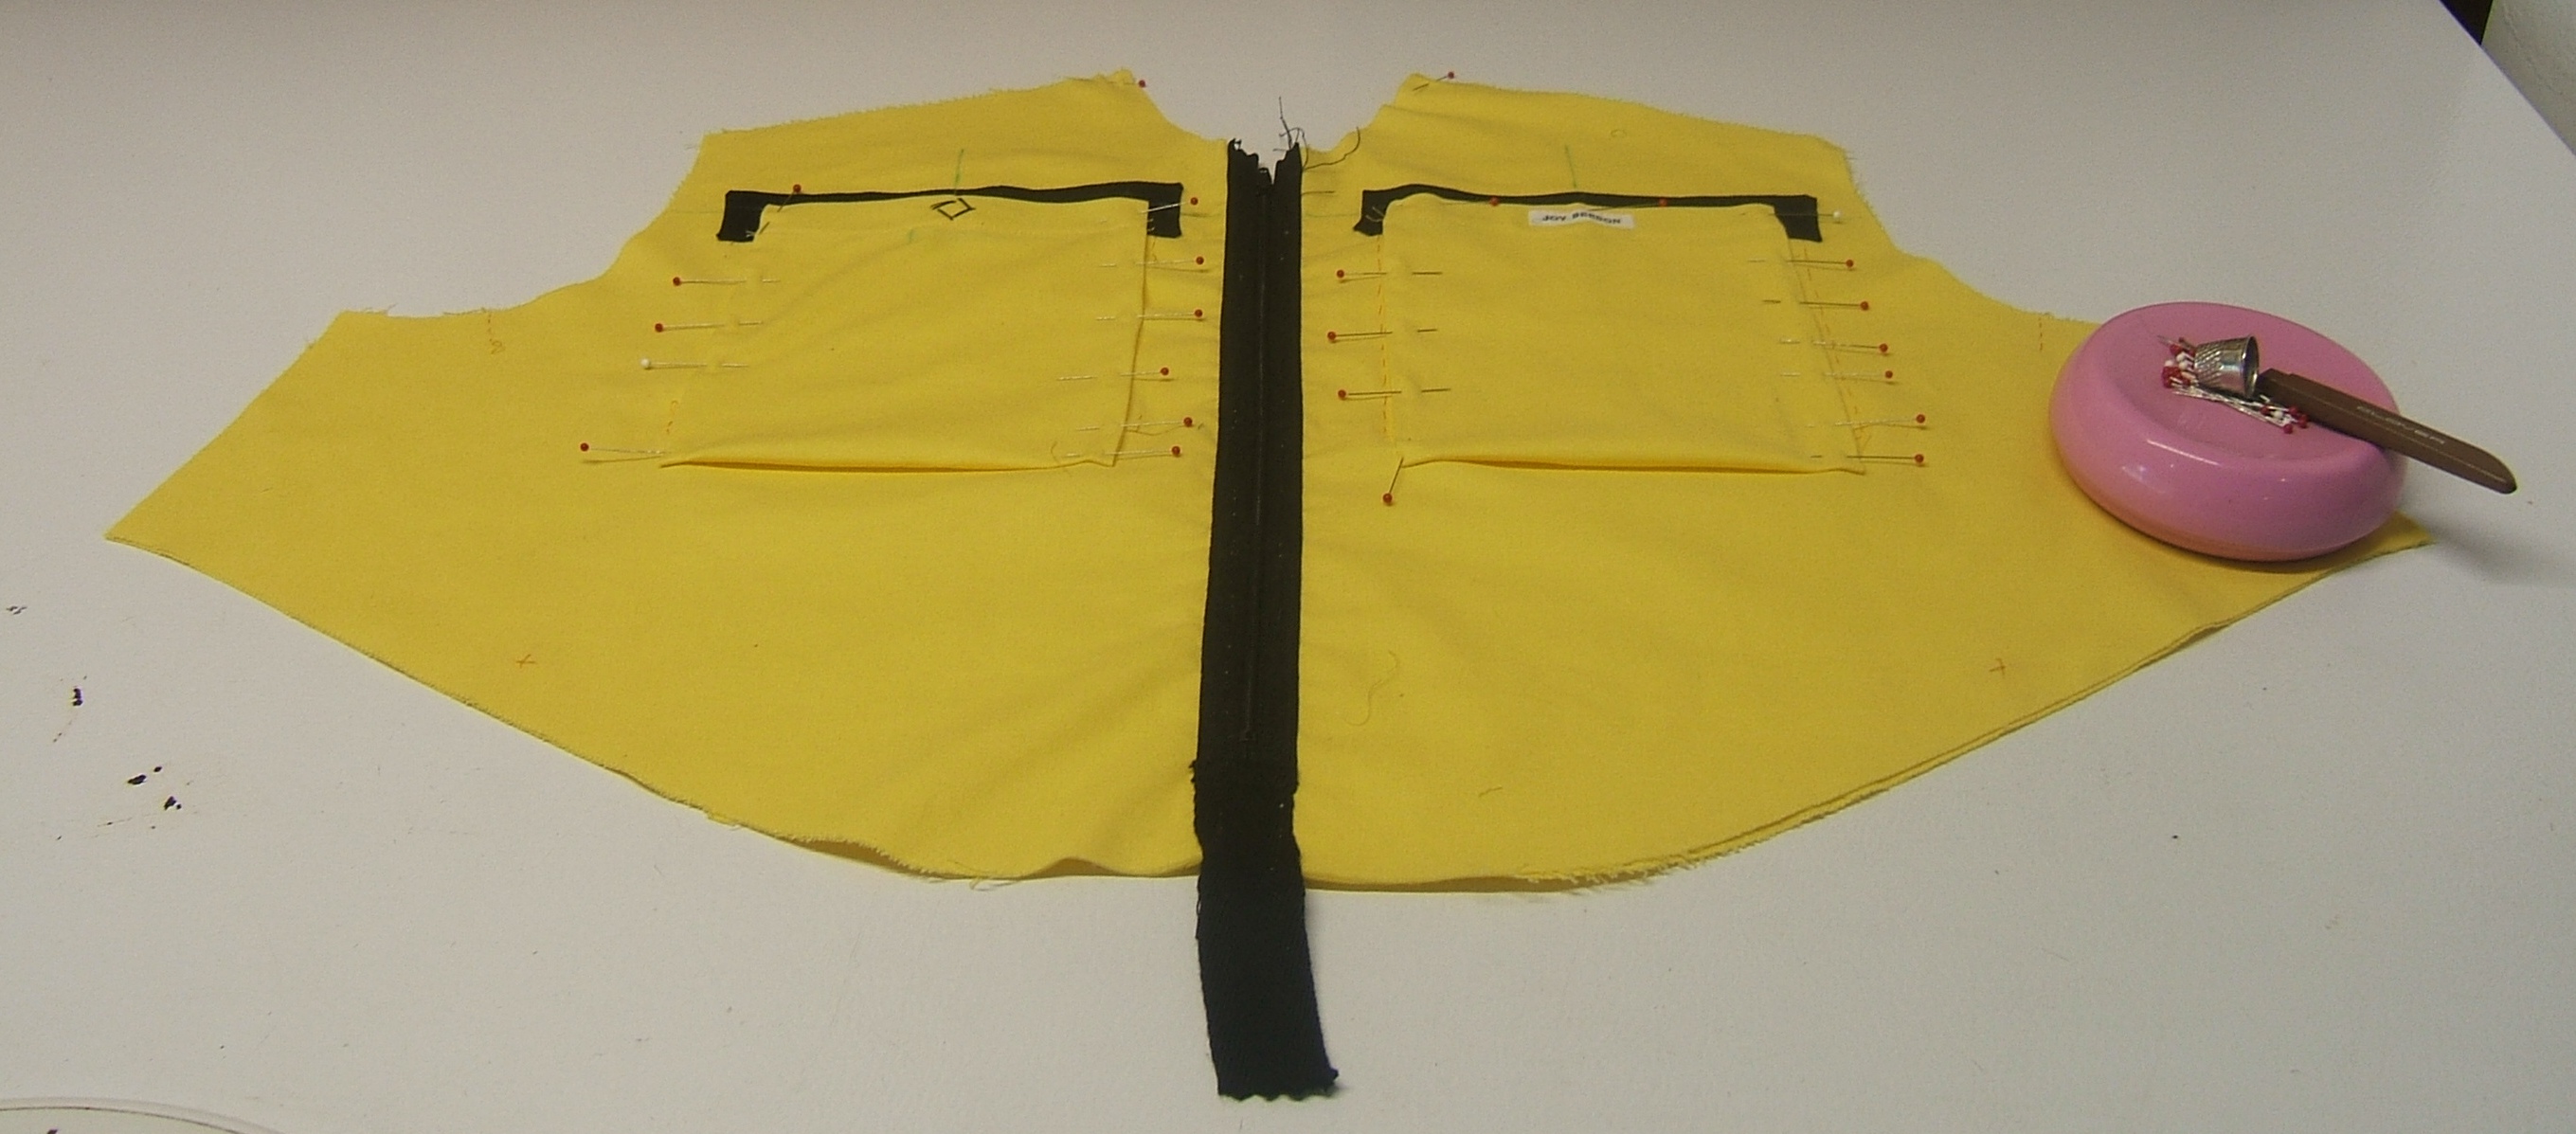
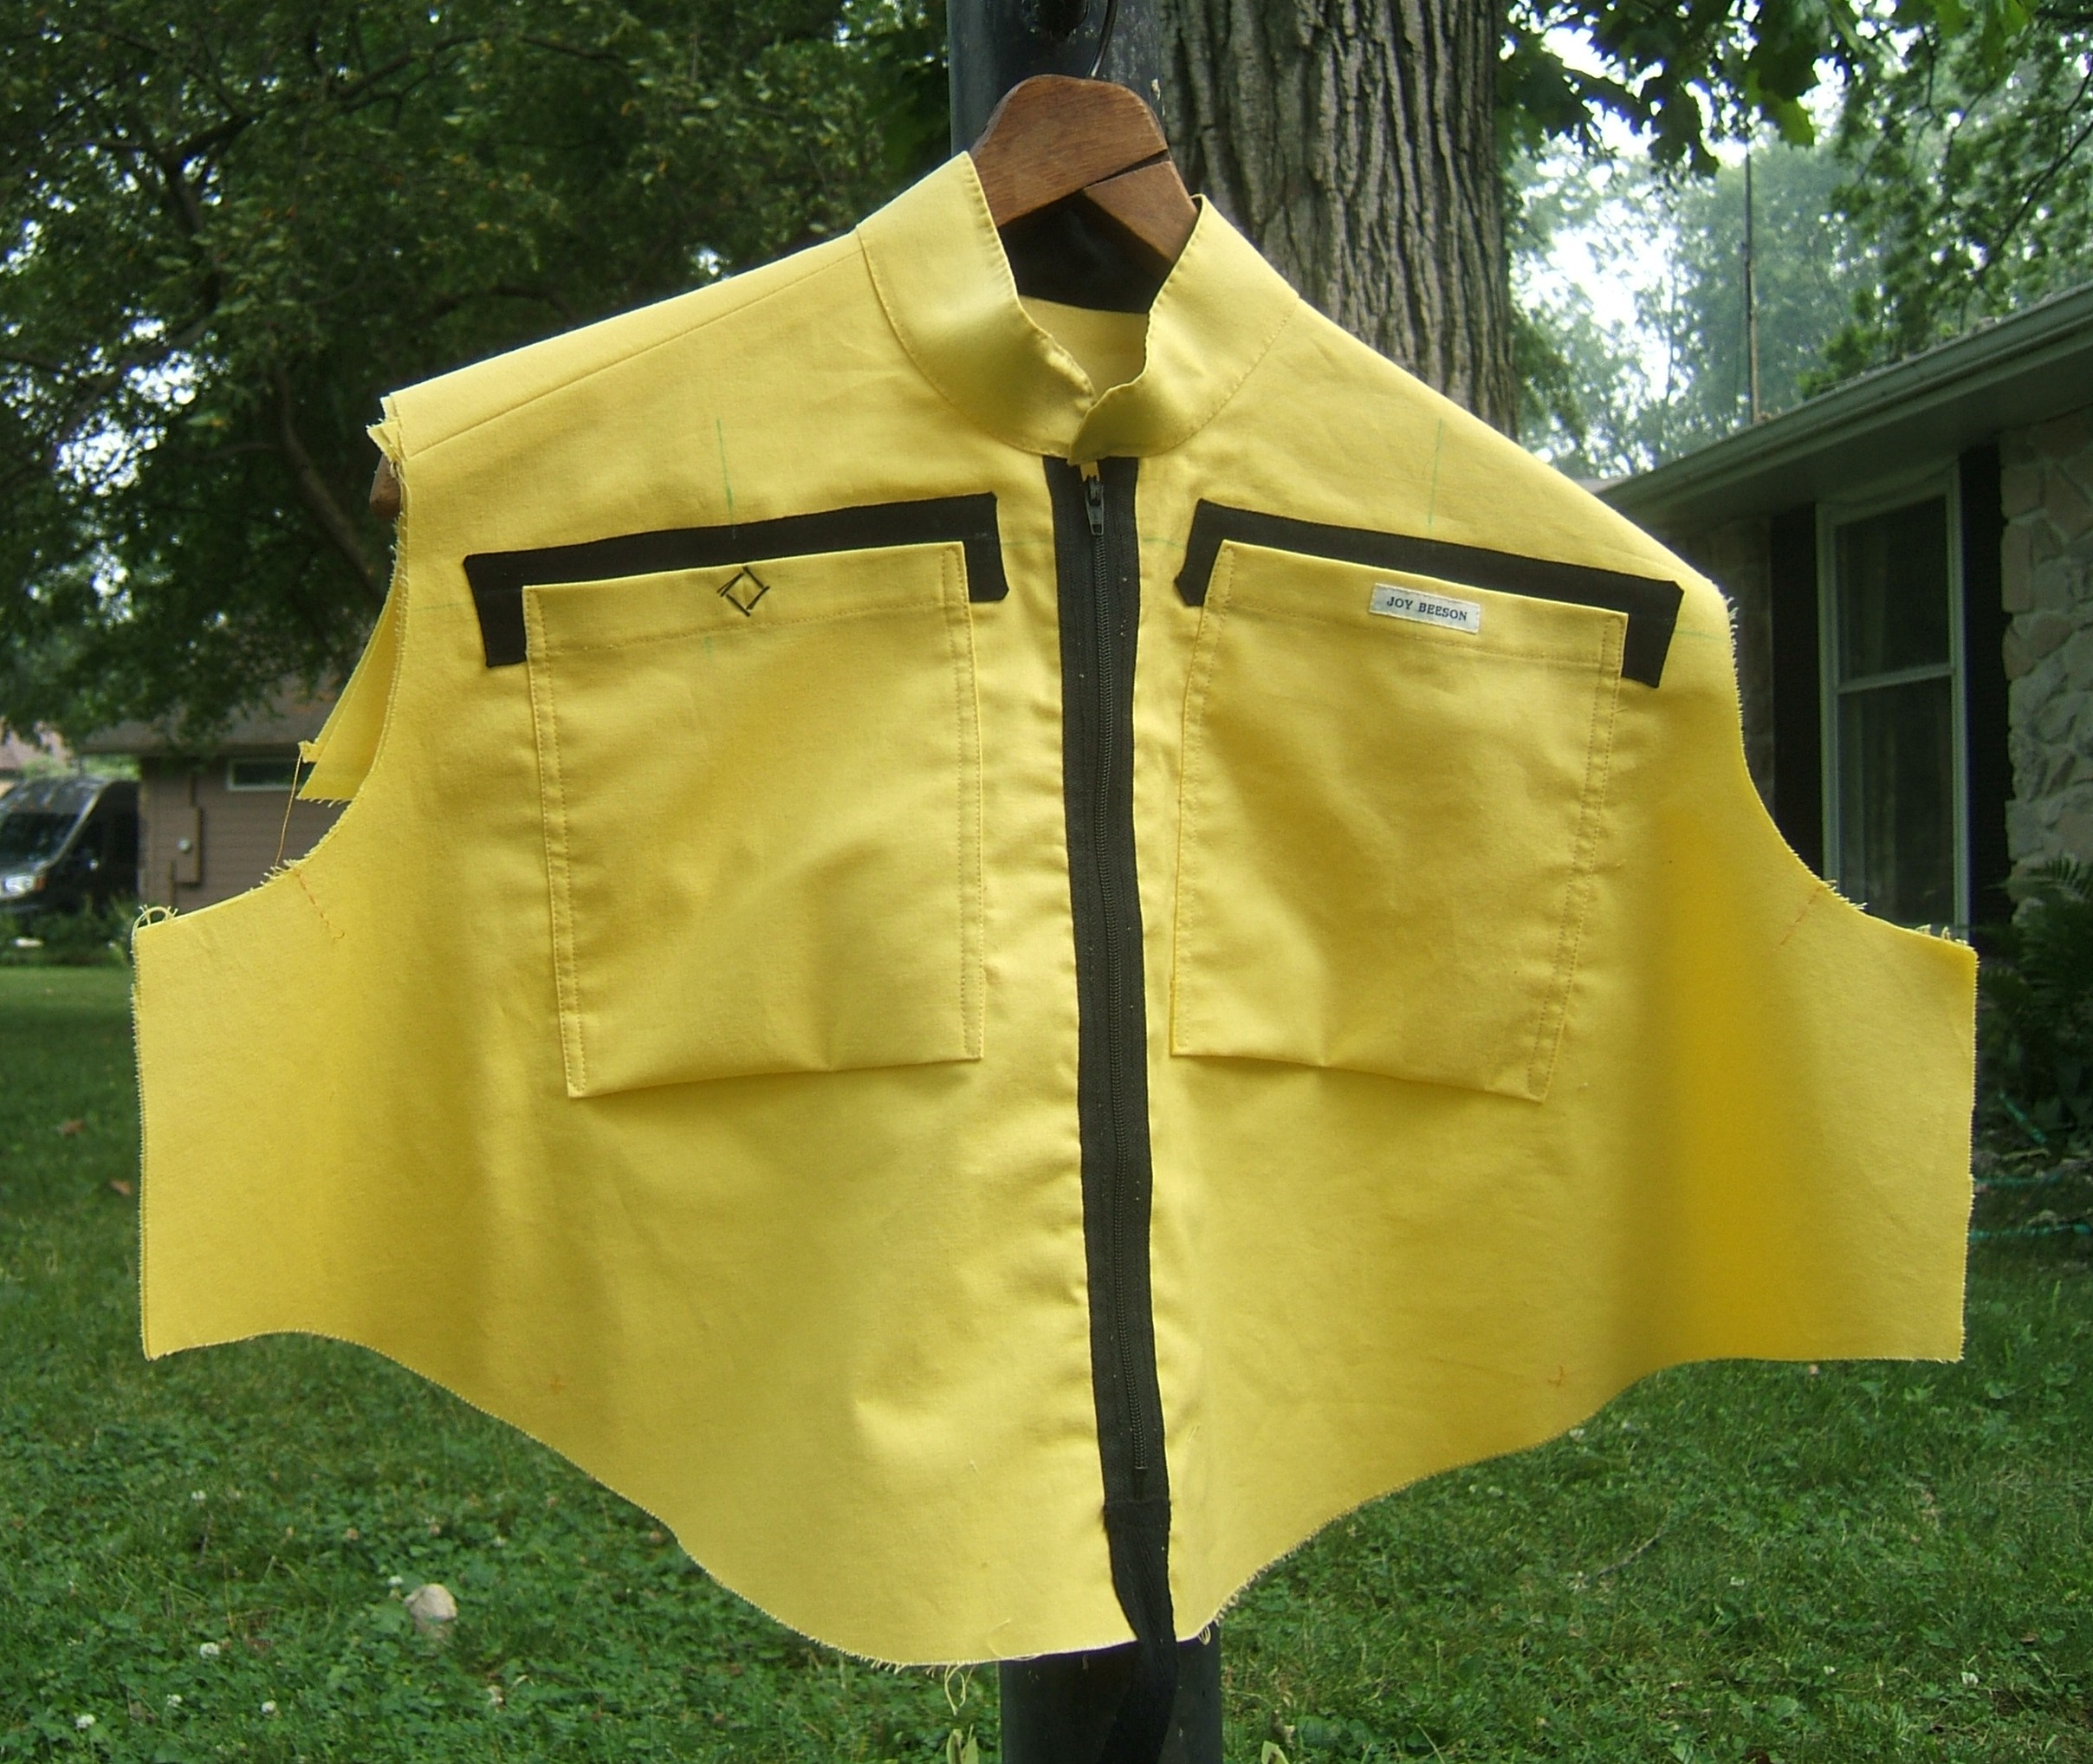
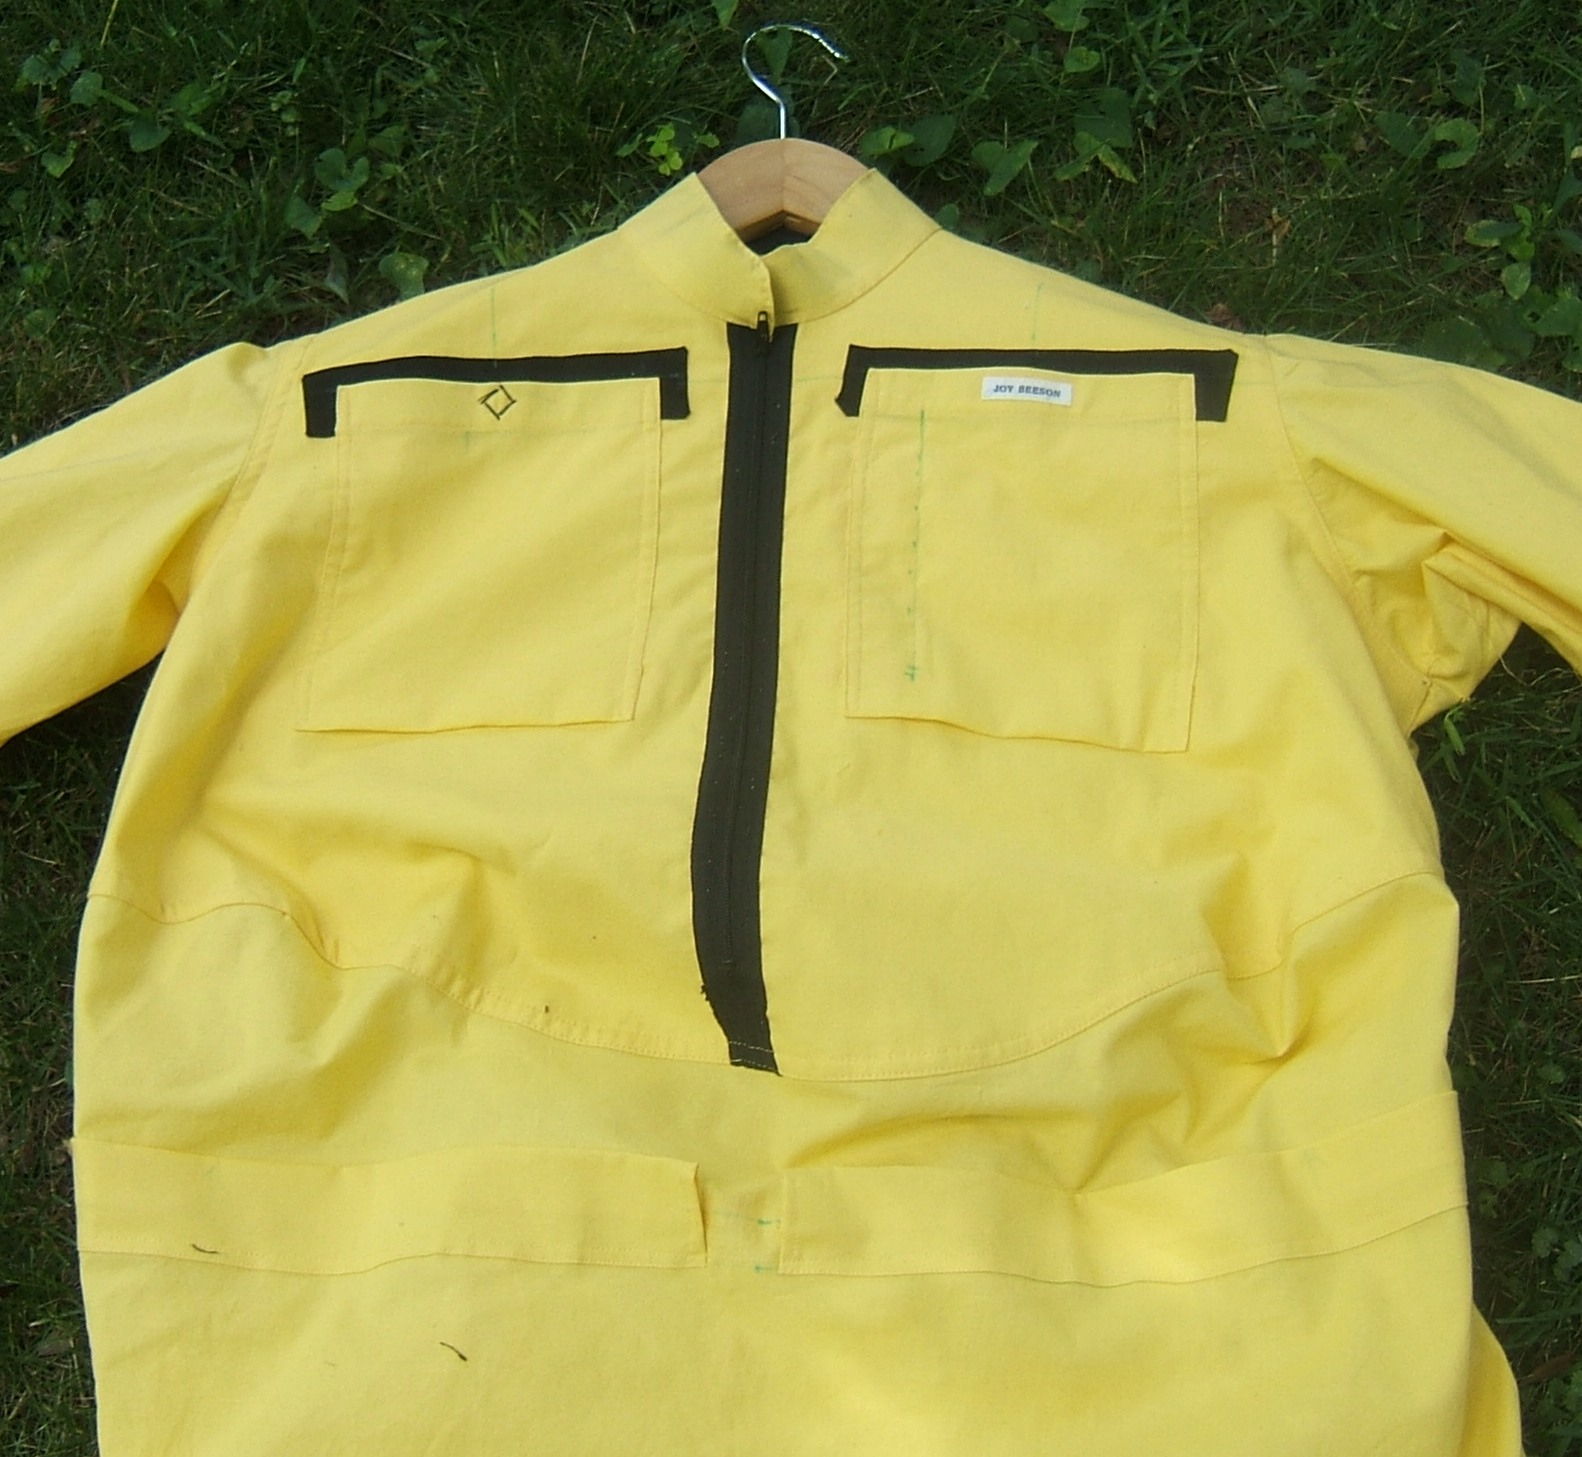
I plan to use a zipper instead of hook tape, and appliqué it to the outside of the yoke. I'll cut a quarter-inch strip from the middle of the yoke pattern, then top-stitch the folds to the back of the zipper a quarter-inch apart. This will eliminate the -- what's the word? I'll say "laps" instead -- that get caught in the zipper. If I needed to block ventilation, I would put very stiff interfacing inside the fold.
I'd better buy the zipper before deciding how much to cut out of the front-yoke pattern.
⁂ ⁂ ⁂ ⁂ ⁂
7:45 PM 3/18/2023
Browsed zippers today. Couldn't find any black among the nine-inch zippers, but there is black ribbon that is probably a good cover-up for the end of a zipper. Duh. I measured the yoke on the worn-out jersey, and I can use up to a thirteen-inch zipper. I don't remember seeing black among the longer zippers, but I wasn't looking.
I have to go back to look for cord elastic anyway.
After months of dithering between yellow quilting cotton and petal pink linen-cotton blend, I've put the yellow cotton into the hamper to be washed tomorrow. I'm pretty sure I've washed it before, but not absolutely sure.
11:30 AM 3/22/2023
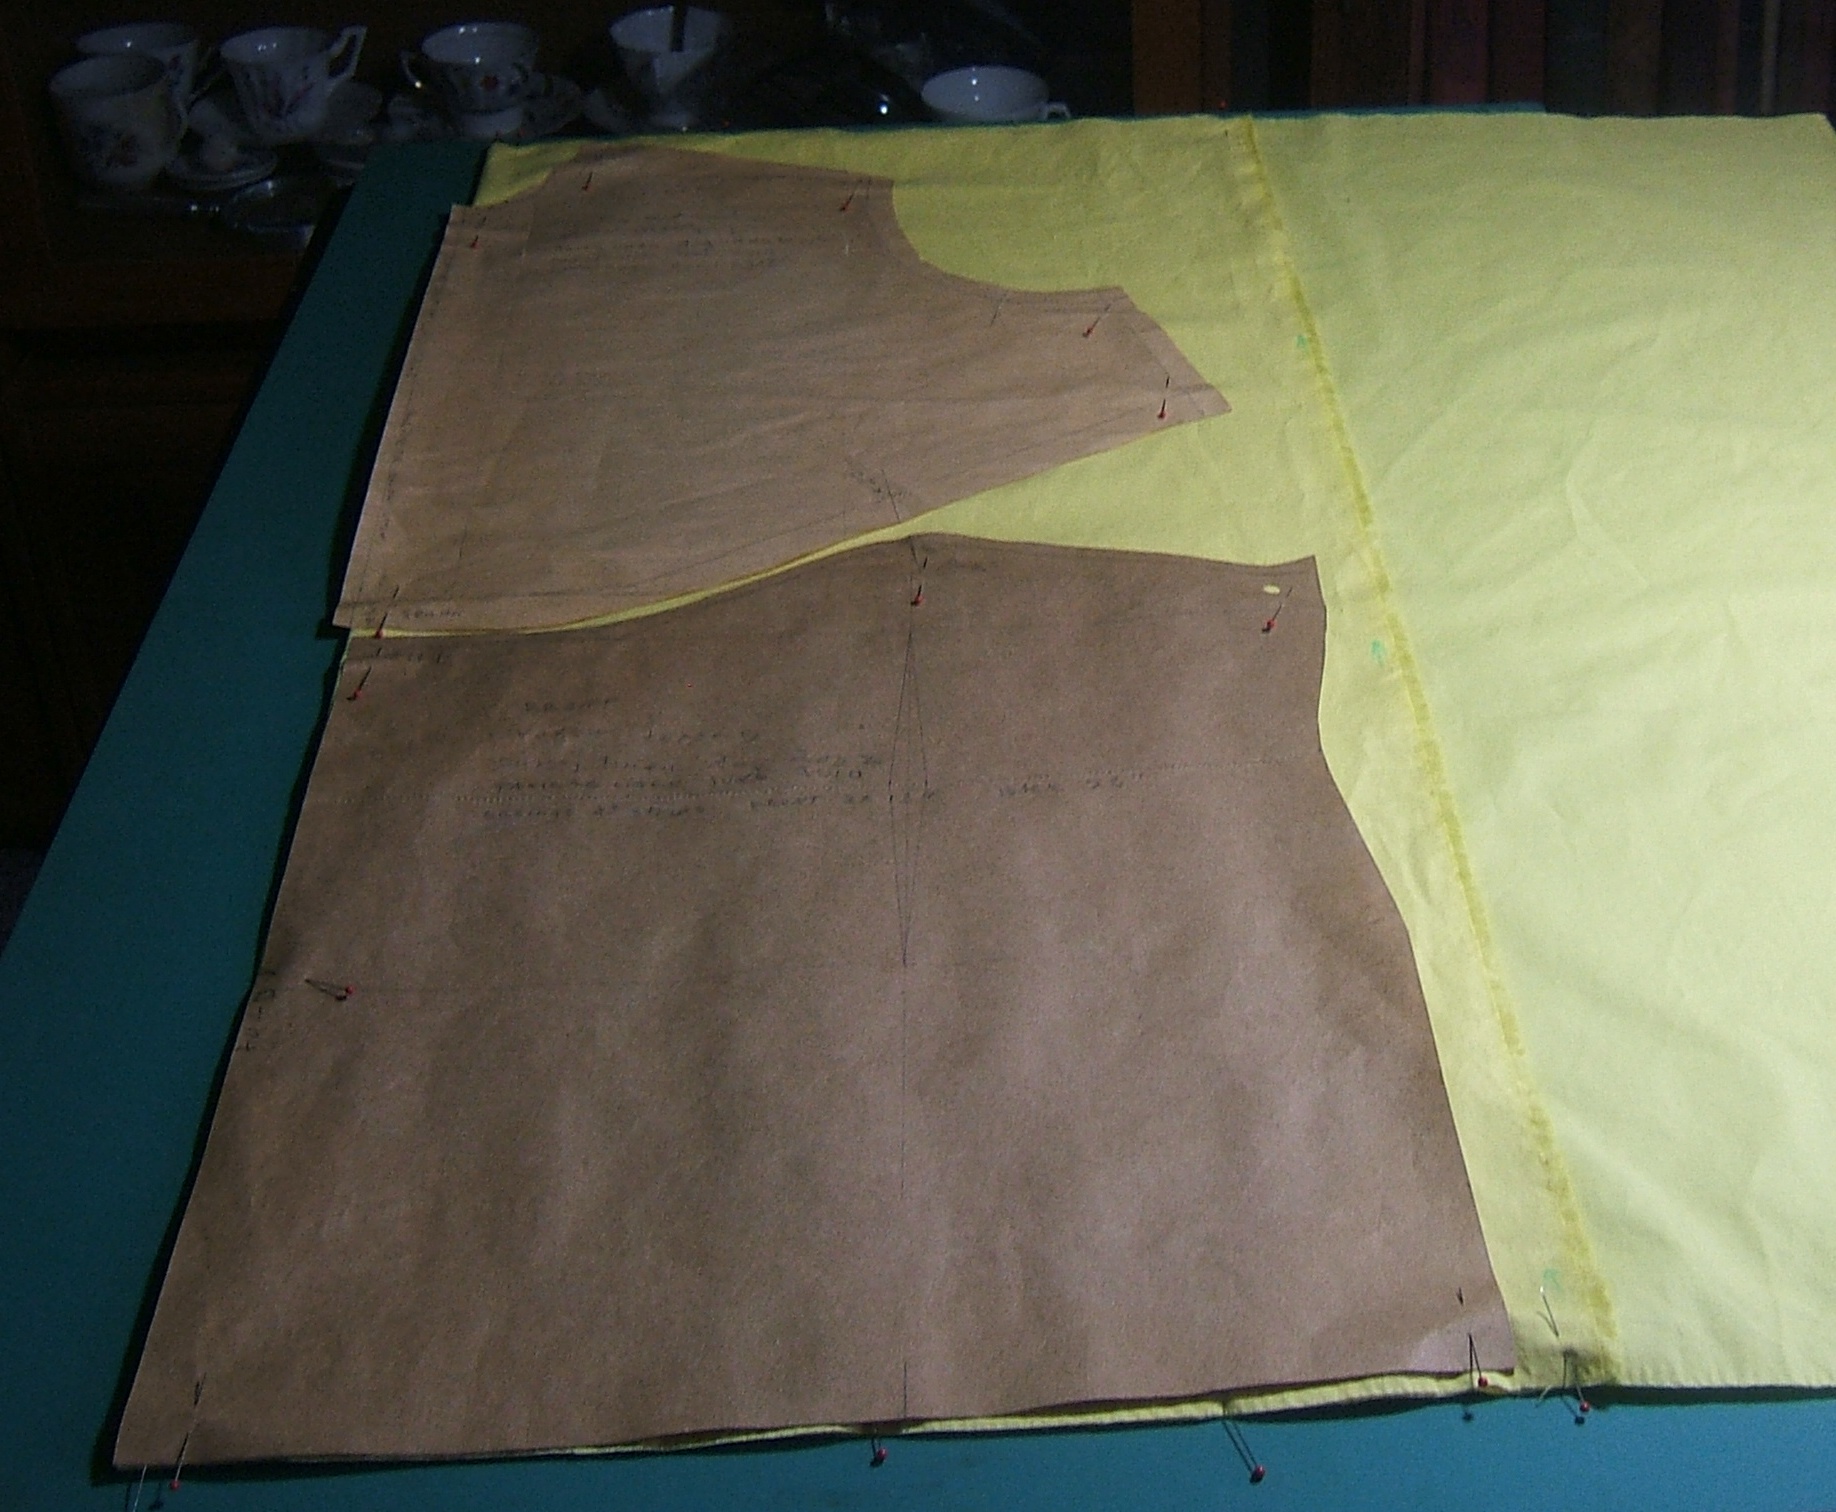
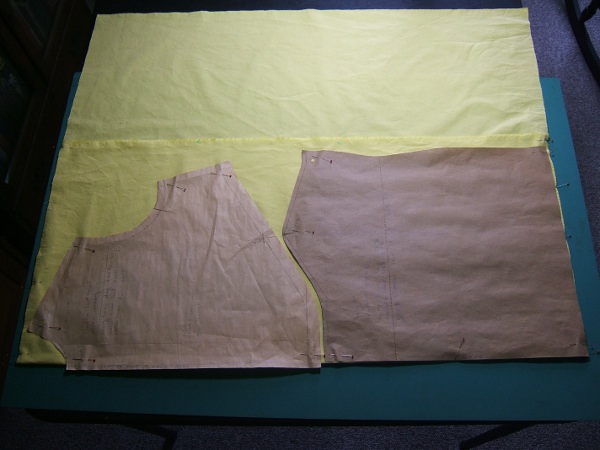
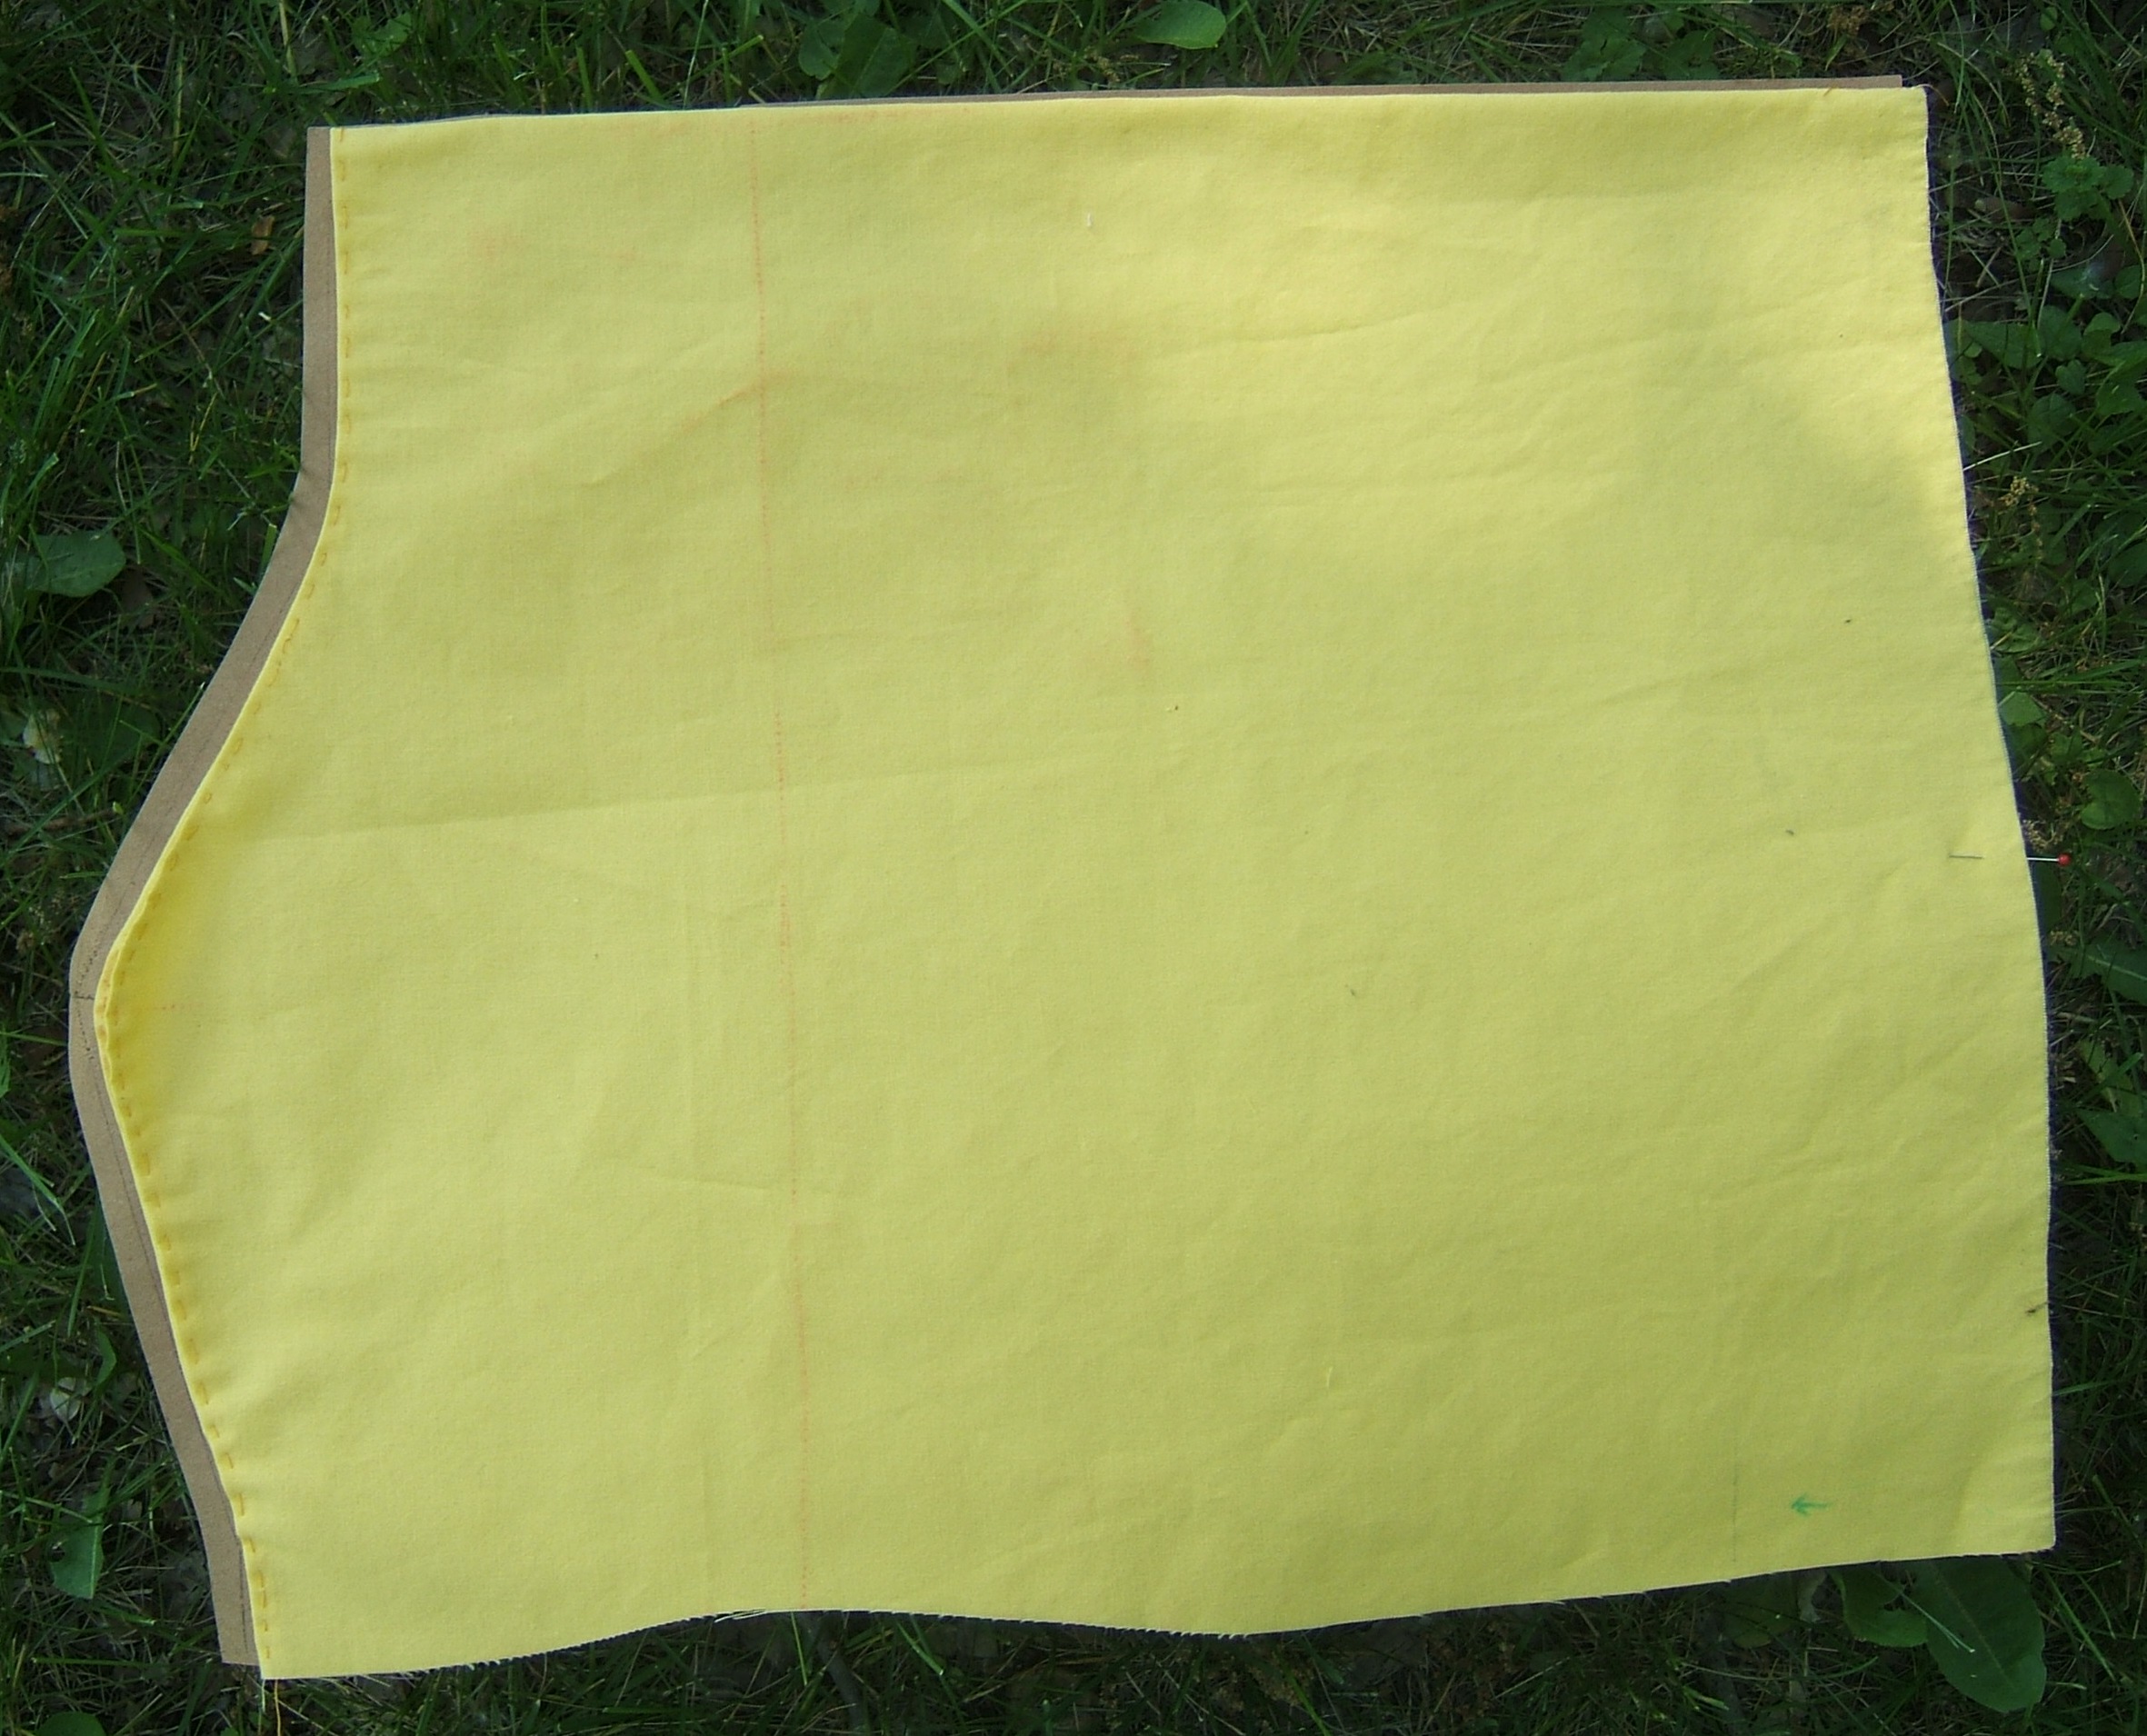
I've sorted out all the pattern pieces and hung them on a nail. I need to modify the front-yoke pattern before I can start cutting, but I can do that just by folding the center line. Or, since it is to be cut on a fold, I need only mark a new center line.
Perhaps it would be better to make a new pattern that need not be cut on a fold.
I must also find the black linen that I plan to use for facings etc. that get dirty.
And the yellow cotton must be ironed.
Time to get serious about buying a zipper.
copied from 2023SEW1.HTM:
Put #9 into the drawer yesterday and started pinning #10 after my nap today. Since I didn't want to machine while hungry, I started the other leg before turning back into a cook. There appear to be plenty of pins to finish the job.
This morning, I sorted out the pattern pieces for my cotton jersey, and neatened the patterns west of the drop cord in the process.
Then in the middle of typing this, I dug out the scraps of black linen I used for the yellow linen jersey, and disarranged all the pattern pieces without actually trying them on the black scraps. In putting them back, I hunted all over for #9, finally went to the freezer to find out what it looked like (I'd left the list on the freezer after determining that all the black pieces were rectangles -- and failing to note that not all of the rectangles had their measurments on the list.)
It was the back pocket, and I'd already hung it on the nail.
I'm pretty sure the largest scrap is long enough to cut the facing for the back pocket -- or should I call it a binding, since it covers both sides? That means that it is also long enough to cut the back casing.
The sleeve casings willl be narrower than the old pattern, since I have determined that putting in more than one round of elastic makes the wrists too warm.
I can cut out all the black pieces before ironing the yellow cotton. 1:49 PM 3/29/2023
6:55 PM 3/28/2023
I've set up the card tables in the parlor, and the yellow cotton (still not ironed) is on it.
1:49 PM 3/29/2023
The yellow cotton is ironed and draped over the ironing board
I think maybe I'll lay out the pattern on the floor, then move it to the card tables for cutting
11:51 AM 3/31/2023
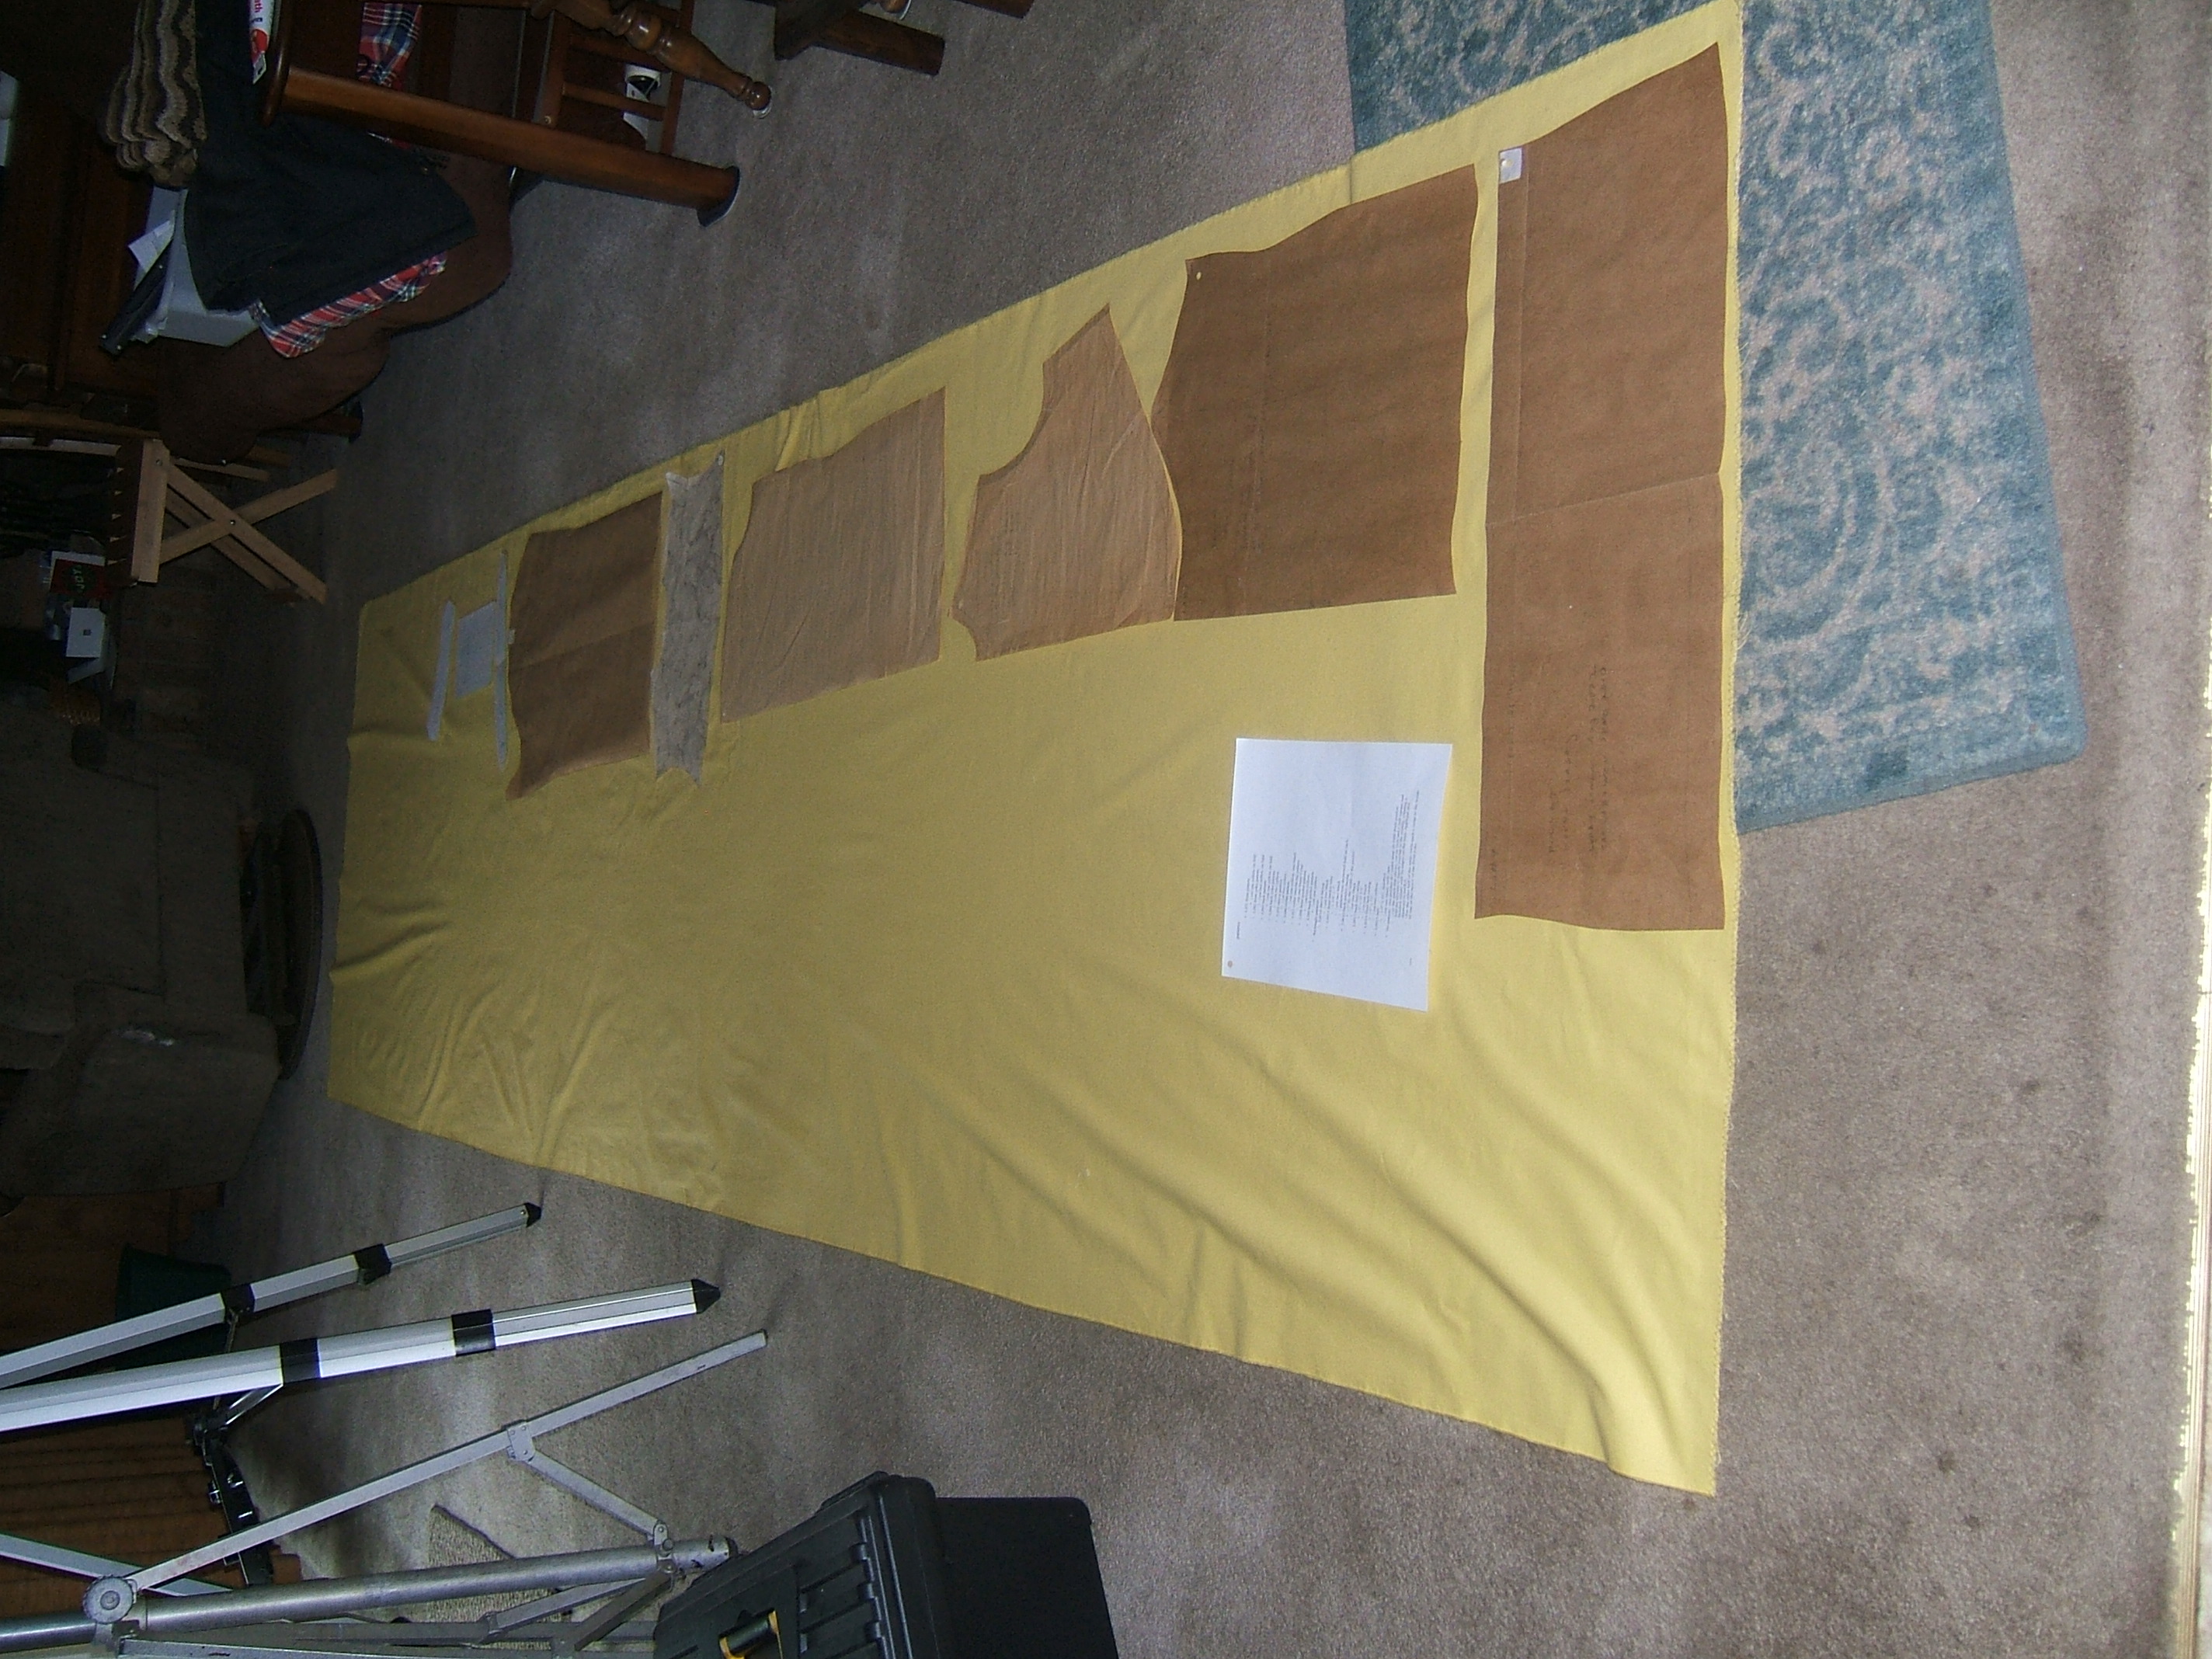
Checking that four yards of 42" fabric are enough.
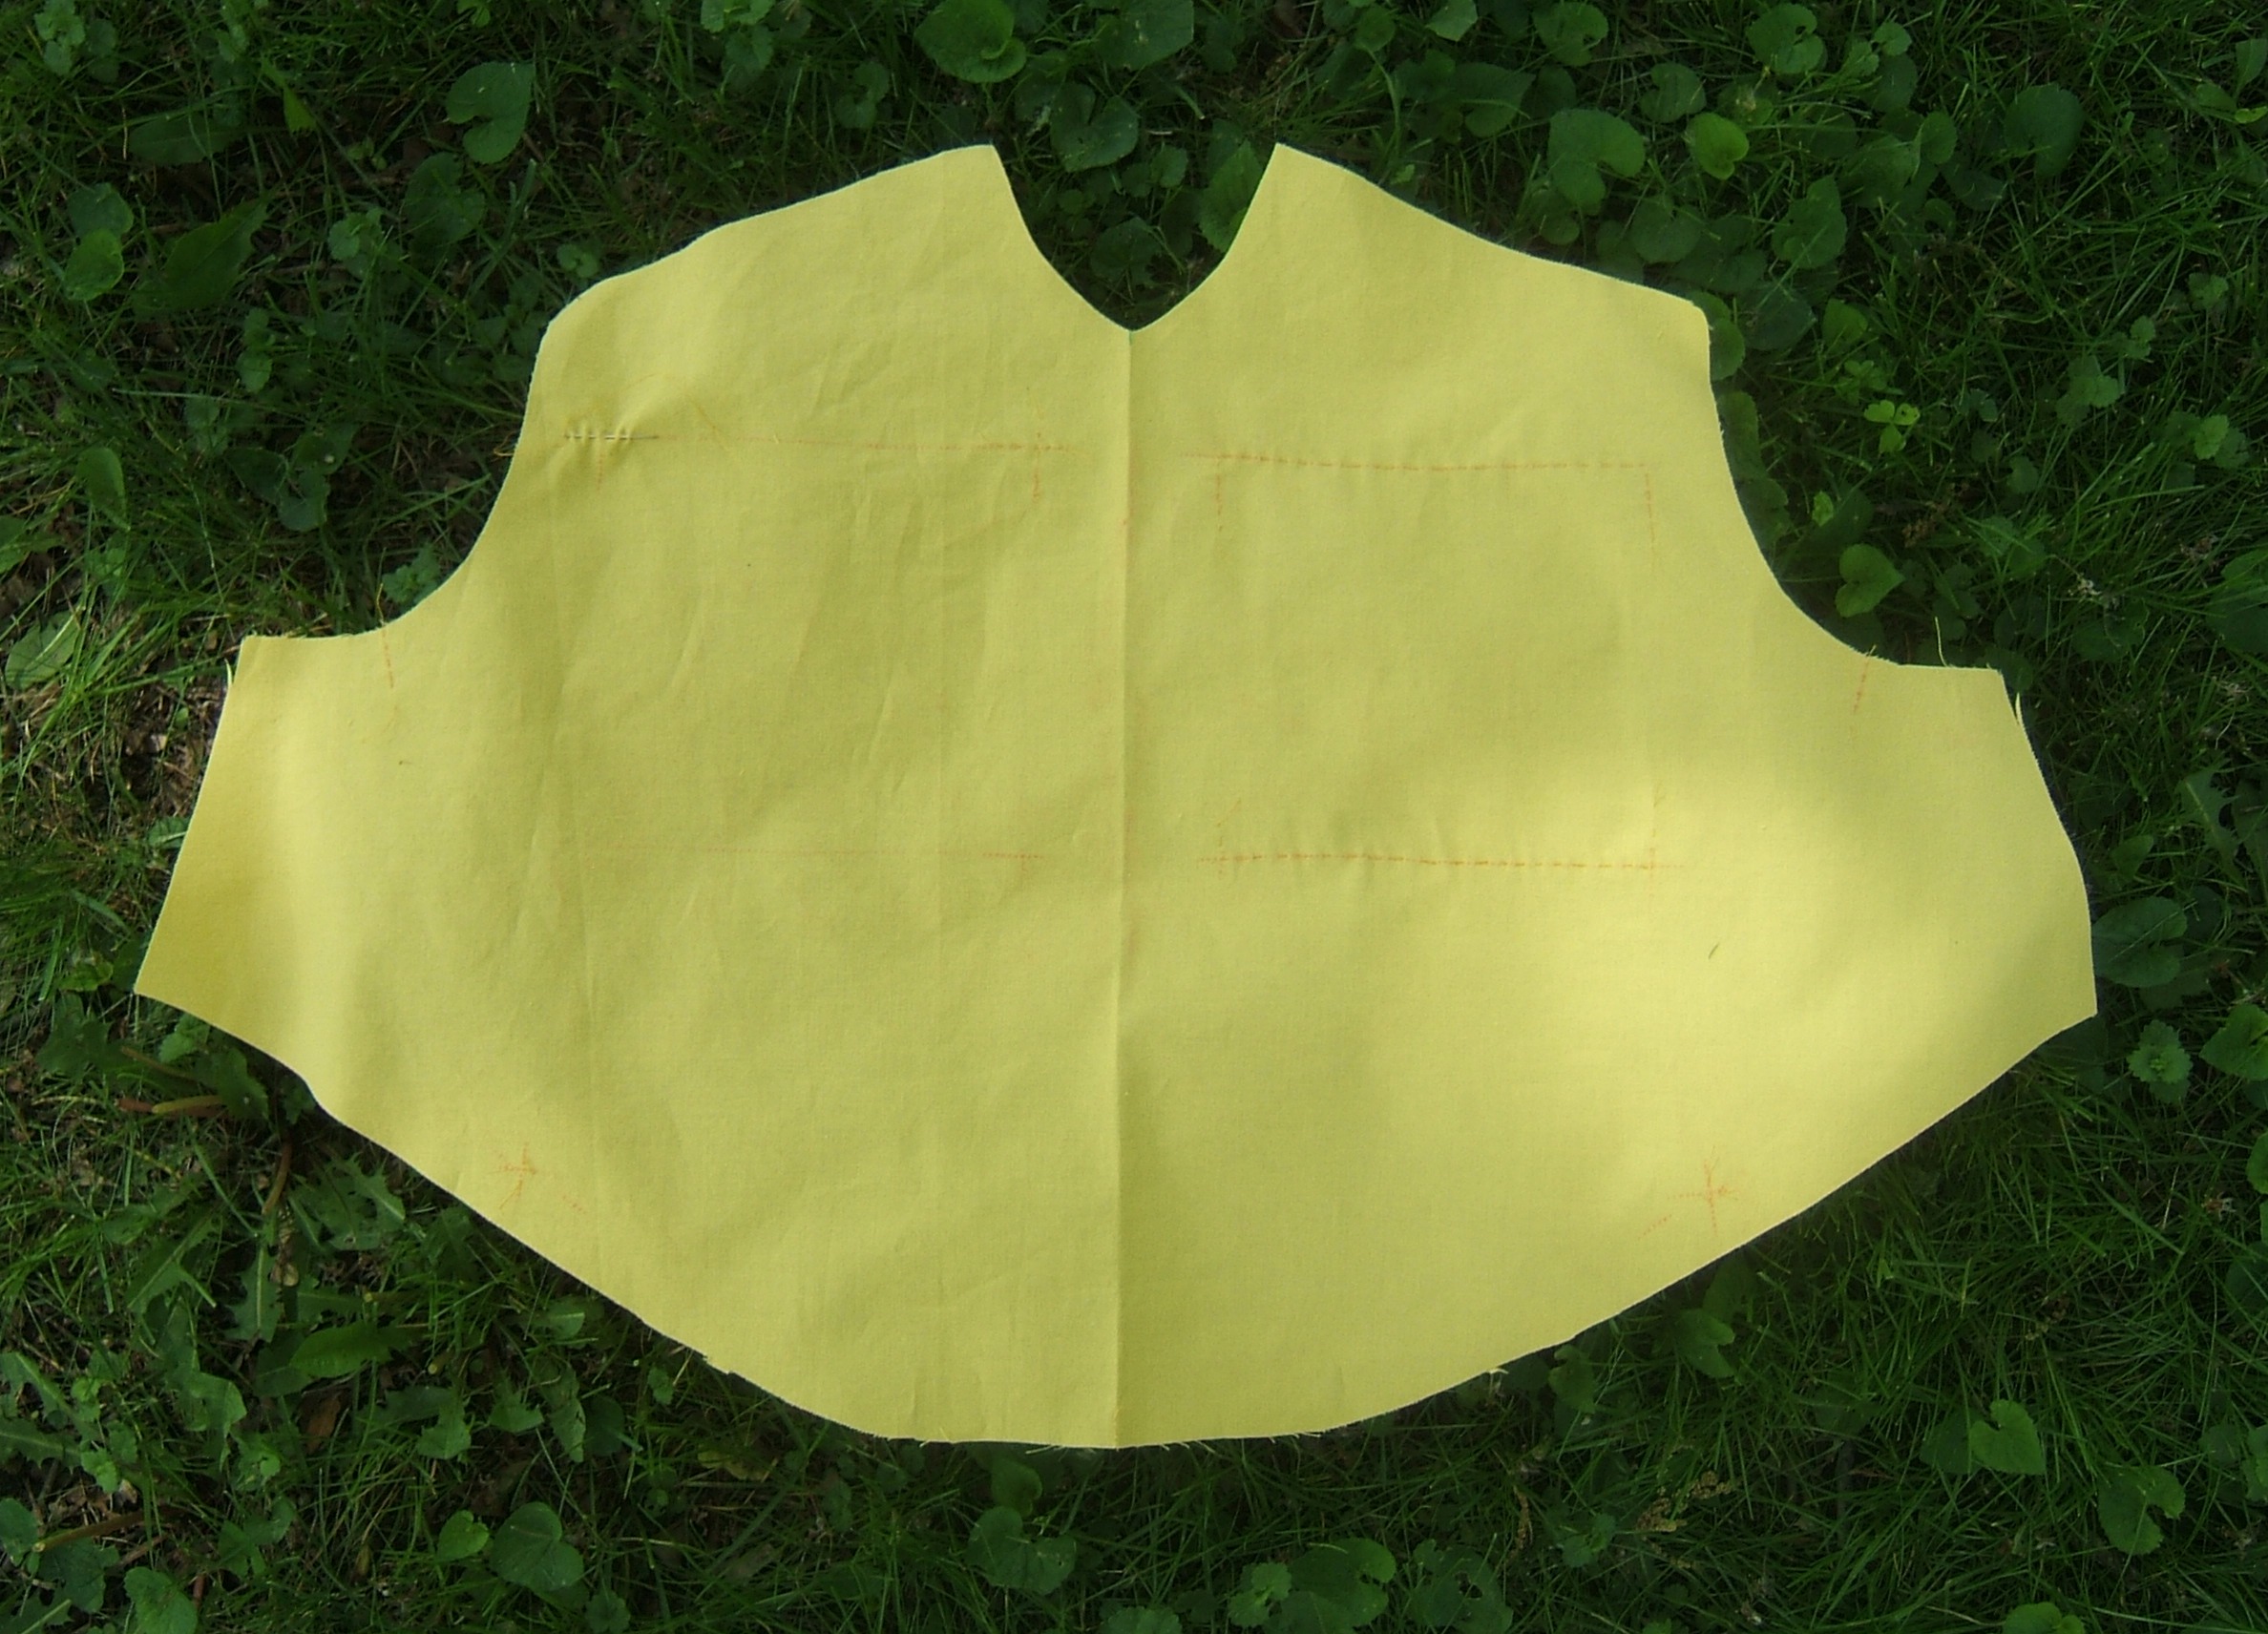
Note the huge dart concealed in the seam joining the front and the front yoke.
1:46 PM 3/31/2023
I'll cut the back and the back pocket from the same rectangle, since they are the same width and are thread-straight at key points. The width is twenty-five inches, which leaves seventeen. This is too narrow for the back yoke (19"), but the collar and the front pockets will fit easily. I won't decide to cut them there until after I see how the sleeves and the front work out, but I can draw threads for the rectangle as soon as I've had my nap.
I checked: the widest point of the sleeve is 18", so two will fit easily on 42" fabric.
Awk, scrickle! I forgot that I need two copies of the front yoke. At 28" it can't be cut side-by-side. But I did allow length for the collar and front pockets, which won't be needed, and there was some fabric left over. Pity I didn't take the picture from the other end, so as to show more detail. (Taking it from the side was impossible.) Also, the patterns were placed farther apart than they will be when I cut, and only an inch was lost to straightening the end.
1:24 PM 4/1/2023

Where did all that extra fabric come from? I checked the pieces against the list twice.
Taking the picture from the other end proved equally impossible.
I've started drawing threads to remove the rectangle from which the back and back pocket will be cut. I plan next to take a 3" strip the full width for the belt casings, and cut the sleeves on the resulting full-width straight end.
12:52 PM 4/4/2023
Today I cut out the back pocket and started drawing a thread to cut off the belt casings
1:16 PM 4/6/2023
The back pocket is cut out. Drawing threads for back and belt casings.
11:08 PM 4/6/2023
The lower thread drawn for the belt casings has been cut across, which will make drawing the thread separateing the back rectangle from the scrap destined for small parts easier, and also make it easier to draw the other thread defining the belt casings.
Lessee, two belt casings at thirteen inches cut from 42" fabric leaves sixteen inches.
8:45 AM 4/10/2023
Finished drawing thread to separate back rectangle.
7:51 PM 4/13/2023
Drew the thread that separates the waist casings from the main fabric. I'm too stupid to cut on either thread tonight.
Drew a thread to cut off a rectangle for the sleeves. This was not facilitated by recieving three very important phone calls while doing it.
6:59 PM 4/21/2023
In the afternoon, I cut along the thread that I'd drawn in the morning, then pinned the edges in preparation for machine basting. I think that this piece will be more amenable to lying flat.
I have two pieces of 3/4" elastic, each more than 16" long. Precisely how long it should be depends on how much it stretches, so I won't cut the back-pocket elastic until I'm about to install it.
I have a whole reel of suitably-thin white cotton 3/4" tape. I need two two-inch pieces, so I cut off five inches and boiled it.
A slip of paper in the bag with my reel of 1" black cotton twill tape says "Boiled/17 September/2014". Can't say I don't think ahead! I wrapped the zipper around it and put it back into the bag. Then, remembering that I'm forgetful, I wrote "ZIPPER" on a slip of paper and put it into the bag too.
Upon taking the bag back to the card table, I noticed that there is room in the bag for the two pieces of 3/4" elastic. Tomorrow I'll add the five inches (possibly less now) of white 3/4" white twill tape that are cooling on the stove.
I'll leave the belt on the reel until the last moment.
I have suitably-large snaps in both black and silver.
I have just decided to mark "x" on pieces that have been cut and are on the pattern trunk, and items sorted out and on the card table, and "o" on items that I've looked in the box and am sure I have.
Machine basted the edges of the sleeve rectangle. It doesn't quite lie flat, but I stroked all the wrinkles over to the fold that I'm not going to cut on.
I used the longest stitch and widest zig-zag to facilitate removal. Double-wound bobbin still ample; for the top, I chose a pink garage-sale thread that needs to have the sun-damaged top layer wound off. It's Bel-Waxed mercerized; after this, I'll put it into the cotton-thread drawer.
Gone be a heap of pins on the Grabbit when I've sewn all these pieces together. I frequently think of the nineteenth-century habit of arranging pins into a design or motto on the pincushion as a way to be sure that one had found every last precious pin.
This is the first time I've gotten out the larger cutting mat for this project. Previous cuts have been made on my12" x 18" drawn-thread mat.
12:08 PM 4/22/2023
Oops, I want to open the pattern trunk to get the dustpaper to mark the notches on the sleeves. DH's little folding table is just the right size and shape to pile pattern pieces on, and he isn't going to use it for a few days.
4:37 PM 4/22/2023
I used my big red drafting triangle (which was also in the pattern trunk) to mark the place to draw a thread for the front/front yoke rectangle.
I took the thread out in three-inch pieces (mostly), if I poked at the thread and didn't catch it I immediately moved to a new location, and I made no effort to leave the cut end long enough that I didn't need tweezers to pull it out. Things went much better than with the previous threads!
5:07 PM 4/22/2023
With the front and fronk yoke taken off, there are four feet and four inches of fabric left.
I will get only one copy of the front yoke out of this piece.
6:38 PM 4/23/2023
This piece proved more amenable to lying flat.
It's still a teensy bit diamond shaped. I decided it could be a quarter inch longer at the side than in the middle.
Note the front yoke hanging over the fold by a quarter inch, to allow a half-inch gap for the zipper.
6:57 PM 4/23/2023 -- it's a bit sleepy out, so I won't cut until tomorrow.
A pair of sleeves, another front yoke, and all the big pieces will be cut.
6:36 PM 4/24/2023
I freaked a bit when I couldn't find the sleeve pattern. It's been cut out and is on the little table I snitched from DH.
I've decided to use a convention from the old Big Knitlist, the one that originated "frogging". "D" followed by a capital letter meant "Person I know well enough to knit for and you don't care about in the least." "D" stood for "dear" or "dratted", depending on context. "DH" was "husband", "DW" was "wife", "DF" was "friend", "DSis", "DNiece" etc. were made up as required.
I was *sure* that my name tags were in the drawer of the Necchi table.
They aren't in any of the drawers of the White; I just frisked them all in search of universal needles to get rid of. The worst that can happen when using a knit needle on a woven is that an occasional stitch is half the width of a thread out of line. Using a woven needle on a knit makes it tear along the dotted line.
8:53 AM 4/25/2023
I cut the front and one copy of the front yoke last night, but didn't feel bright enough to mark them.
6:49 PM 4/26/2023
Yay! The two copies of the back yoke can be cut side-by-side.
I have snipped to mark off a strip eight and three-quarters inches wide for the back yoke. That will leave a yard plus seven-and-a-half inches of fabric.
The other front yoke will require seventeen and a half inches.
All the other parts will fit on the left-overs of previously-cut strips.
Dots and notches marked on front and half of front yoke. Still don't know where my name tags are. I must have put them some place where they would be easy to find.
6:09 PM 4/27/2023
Drew the thread that marks off the back-yoke strip. I'm planning to cut the remaining front yoke without cutting off a rectangle first.
Got a much-needed porch sit, and drawing went well. I changed my attitude: I'm not drawing this thread out, I'm marking it to a good place to cut it, and three or four inches are worlds better than half a foot. Also, immediately after cutting the thread, I used the seam ripper to pluck out a centimeter or so of the long end. And, when pulling out the short end, I moved ripples to the cut end until the thread slipped out by itself. Thinking about pulling it out invariably results in a broken thread that requires an inch or more to be plucked out with the point of the seam ripper.
6:29 PM 4/27/2023 Too late at night to do anything that requires thinkum.
11:00 AM 4/28/2023
Cut off strip for back yoke, then folded over thirteen and a half inches of the remaining fabric and cut out and marked the other half of the front yoke.
Then I folded up the main piece for putting away. I should un-fold and measure it sometime.
12:22 PM 4/28/2023
The back yoke is pinned, but I thought it wiser to have lunch and a nap before cutting.
4:00 PM 4/28/2023
That is somewhat amusing. When I began to cut, I found that the corner of the pattern is exactly on a blue dot I made while determining that it would fit on the fabric before drawing the thread.
4:22 PM 4/28/2023

done and dustpapered
4:52 PM 4/28/2023
Sorting scraps: only the front pockets and the collar remain to be cut in yellow
These notes are far from organized, but at least they aren't scattered among other topics.
6:10 PM 4/28/2023
I'm putting the scraps from the cotton jersey into the yellow-linen box; there seems to be plenty of room. After making a "yellow cotton" label to stick on it, I made a "linen bias" label, since there is some pre-cut from making the bras, and I think there is also some bias-edge scrap.
6:25 PM 4/28/2023
Twenty-five inches of full-width fabric left over. The long side measures one yard and almost seven and a half inches; I think I'll call it three and a half feet.
6:35 PM 4/28/2023
Neat! The scrap from cutting the front belt casings is exactly the size and shape to cut out a collar (only one, since I'm lining it with black), and the scrap from cutting the front and front yoke is exactly wide enough to cut two front pockets.
2:03 PM 4/29/2023
The black scraps are pretty scrappy, but there is one that I can cut three three-inch strips from that will probably be long enough that I can get the back-pocket facing, the back belt casing, and two sleeve facings out of them.
I spent the morning shopping.
2:14 AM 5/1/2023
Entirely new strategy needed for drawing threads in black linen. Black on black makes it *very* difficult to pick up a thread to cut it, and the linen thread is stronger -- a bit of a surprise, since linen is cut to cotton lengths, and is slicker than cotton -- so I can draw longer pieces.
But the drawn thread becomes quite invisible when pressed against a green cutting mat. Drawing a second thread was harder than I expected, and didn't help much. I need a light table!
Putting a sheet of white paper under the "Two-Sided Craft Mat" made the cut possible, but it isn't as straight as I would like. Stretching the fabric from both sides of the proposed cut helps, and will be easier when I make the second cut.
When tracing before I acquired tracing paper, I used windows as light tables, but I don't think I can cut on a vertical surface.
In the morning, I got a much-needed porch sit while drawing a thread to cut a three-inch-wide strip off the black linen. It was possible, but not easy, to pick up a thread by holding the work in the shade over sunlit concrete while selecting a hole to put the point of the seam ripper into, then moving it into bright sunlight while picking up a single thread.
Then there was the problem of cutting along the line. Putting a sheet of white paper under the translucent two-sided craft mat didn't help in the least, despite a very bright lamp. After spending some time muttering about light tables and how I couldn't drafting-tape a cutting mat to a window the way I used to do when I was tracing embroidery patterns, inspiration struck and I tried balancing the two-sided mat on the crossbar of the parlor window -- where the top bar of the lower pane lies over the bottom bar of the upper pane -- and it stayed put nicely. I held and stretched the fabric with one hand and held the rotary cutter in the other, and cut it very neatly.
Then I Froogled light tables. After that, translucent folding tables. One of the images that came up in that search looked very like the little table I snitched to hold cut pieces while I was cutting out the yellow cotton, so I put a flashlight under it, and I *could* see the light through it. A bright lamp under that table might be just the ticket, and nothing to stash away and forget where I put it.
The flashlight didn't show at all when held under my green cutting mat, but the translucent mat is bigger than required for cutting along threads.
In the afternoon, I sat with my back to the westering sun, and found it very easy to see the threads, so I cut whenever I noticed that the thread was particularly visible, and got two more threads drawn with little trouble. That makes four strips, and the last one just might be long enough to cut two sleeve facings, so I may have one left over.
I cut the collar interfacing out of Shirt Crisp. I may interface the front-pocket hems with it too.
Then out to the picnic table to draw threads to separate the front pockets. I tried to draw the first one out all in one piece; the second one was easier.
I can't remember how I did the front pockets. Perhaps I should read "she wore her new jersey" before proceeding much farther.
[time wasted on computer]
It appears that I used fold-bottom front pockets for the first time on the yellow-linen jersey, which doesn't have a separate file.
But I have the jersey to study.
3:55 AM 5/6/2023
I cut two 5 1/2" x 3/4" strips of Shirt Crisp for the pocket hems.
I want the seam allowance a trifle wider at the edge than at the fold, to make the seam roll under, so the next time I can sew, I'll shave a triangle off each end of each strip, then iron them to the pockets to keep them from getting lost.
I also intend to start attaching the black bits before I finish cutting out, for the same reason.
9:44 PM 5/8/2023
Shocked to realize that the strips of interfacing didn't quite fit, then realized that I'd cut them the full width of the fabric, which was a trifle more than was wanted, then hadn't connected the marks to draw the transverse cutting line. So I shortened the strips in the act of shaving off triangles.
I drew the marks with a graphite pencil, which makes finer lines than a removable marker. All the marks would be cut along, and the Shirt Crisp will be fully enclosed.
The strips are now ironed onto the wrong side of the pockets -- I checked several times to be sure of it -- and I folded the quarter-inch extending beyond the interfacing back over it and dampened the pressing cloth at least twice while making sure it would stay folded.
But I didn't get any farther toward folding the hem to the right side and stitching the ends than taking the kakhi thread out of the machine -- and I realized that I wanted to make one more inch of kakhi stitching soon after that, but didn't put the thread back.
While the iron was hot, I pressed all the black linen. By which I mean that I ironed it without dampening it or using steam, which was what "pressing" meant when I was a child. One "ironed" freshly-laundered clothing, and "pressed" it when it needed touching up.
It those days dime stores sold oilcloth liners for bushel baskets, to be used in dampening clothes for ironing. One sprinkled a garment, rolled it into a ball, and put it into the basket. Then you'd put a damp towel over all and leave it until morning.
I haven't finished cutting out, but assembly has begun! And I might even be able to sew tomorrow. I had all day today, but somehow didn't do anything in the morning that didn't have to be undone. But clearing off the ironing board got everything that I put back on onto my leg board, so it was easy to take it off again after I had to put it back to clear off the bed where I'd put it. It's now on one of the card tables in the parlor. I think I can fold one of them up Real Soon Now.
And I didn't undo unthreading the Necchi.
11:36 AM 5/9/2023
Sat down to thread the Necchi, and discovered that I'd sewn all those briefs with thread I bought for the jersey. Fortuneately, there is most of a spool left, since I had to buy another. So I took the scissors, needle, and thimble out of the waiting-room kit (There is still handwork to be done on one pair, which I'm saving for times when I can't do anything else.) and put them into the bag with the brighter-yellow thread. And put them right back into my go bag, since we have an appointment for this afternoon.
On the bright side, now I don't have to wind a bobbin. I think the paler-yellow is better for the briefs anyway; the cotton jersey fades rather quickly.
It was eleven before I finished breakfast, but I did finish separating the three three-inch strips.
Not easy working on a window that was just a bit too high, and I took several time outs, but clear half an inch, cut half an inch moved along reasonably fast.
I was puzzled that I'd thought there were four, but when finished, I found that there *was* enough to cut another strip, but it would be only fourteen inches long, and the shortest strip I require is fifteen and a half.
I suspect that I'll have to piece one of the sleeve facings. Too sleepy to make decisions now.
12:28 AM 5/15/2023
Lying awake and unable to sleep, I realized that two inches would have been an ample width for sleeve facings to make a half-inch channel.
Since I've already cut them, I figured out a way to use the width to cover the channel on both sides.
If I match the raw edge of the facing to a line three-fourths of an inch from the raw edge of the sleeve, I'll have a covered strip one inch wide, and an inch and three quarters to turn to the inside. That will cover an inch and a half of the inside. So there will be a quarter inch between the doubled fabric on the back and the doubled fabric on the front. Stitching a quarter inch from each side of the facing on the front will make the desired half-inch channel.
I think I'll sew in the fold on the outside, fold to the inside, stitch the casing, then stitch a quarter inch from the fold of the inside end, then edge stitch.
I hope all this makes sense in the morning.
Tomorrow morning, that is. This morning I'm planning to take a long (for my present condition) ride. I really, really wish I had this jersey to wear. My cotton-jersey jersey supports my heavy wallet on the front of my neck.
11:45 AM 5/17/2023
Pressing: front pockets press both sides but not bottom. Belt casings and back-pocket facing, press to wrong side at bottom. Sleeve facings, press to wrong side at top.
1:32 PM 5/17/2023
I believe that I've now cut out everything but the collar, and that is pinned to suitable pieces of black linen and yellow cotton. (So *now* I'm ready to press.) (As soon as I decide which 3" strip is which.)
I think that one of the pieces I cut a pocket trim from had had a pocket trim cut from it before, which was convenient. But it wasn't quite wide enough to cut two. The most-suitable piece for cutting the other had not been arrowed, but one edge had been washed with zig-zagging over it, and there were a couple of chalk lines that had extended into the scrap, so I was pretty sure of the cross grain and the wrong side. I drew an abitrary arrow for the nap.
I still have no clue as to where I put the name tags.
1:44 PM 5/17/2023 feeling stupid; time for a nap
4:47 PM 5/17/2023 -- perhaps I'll feel up to cutting when I've eaten
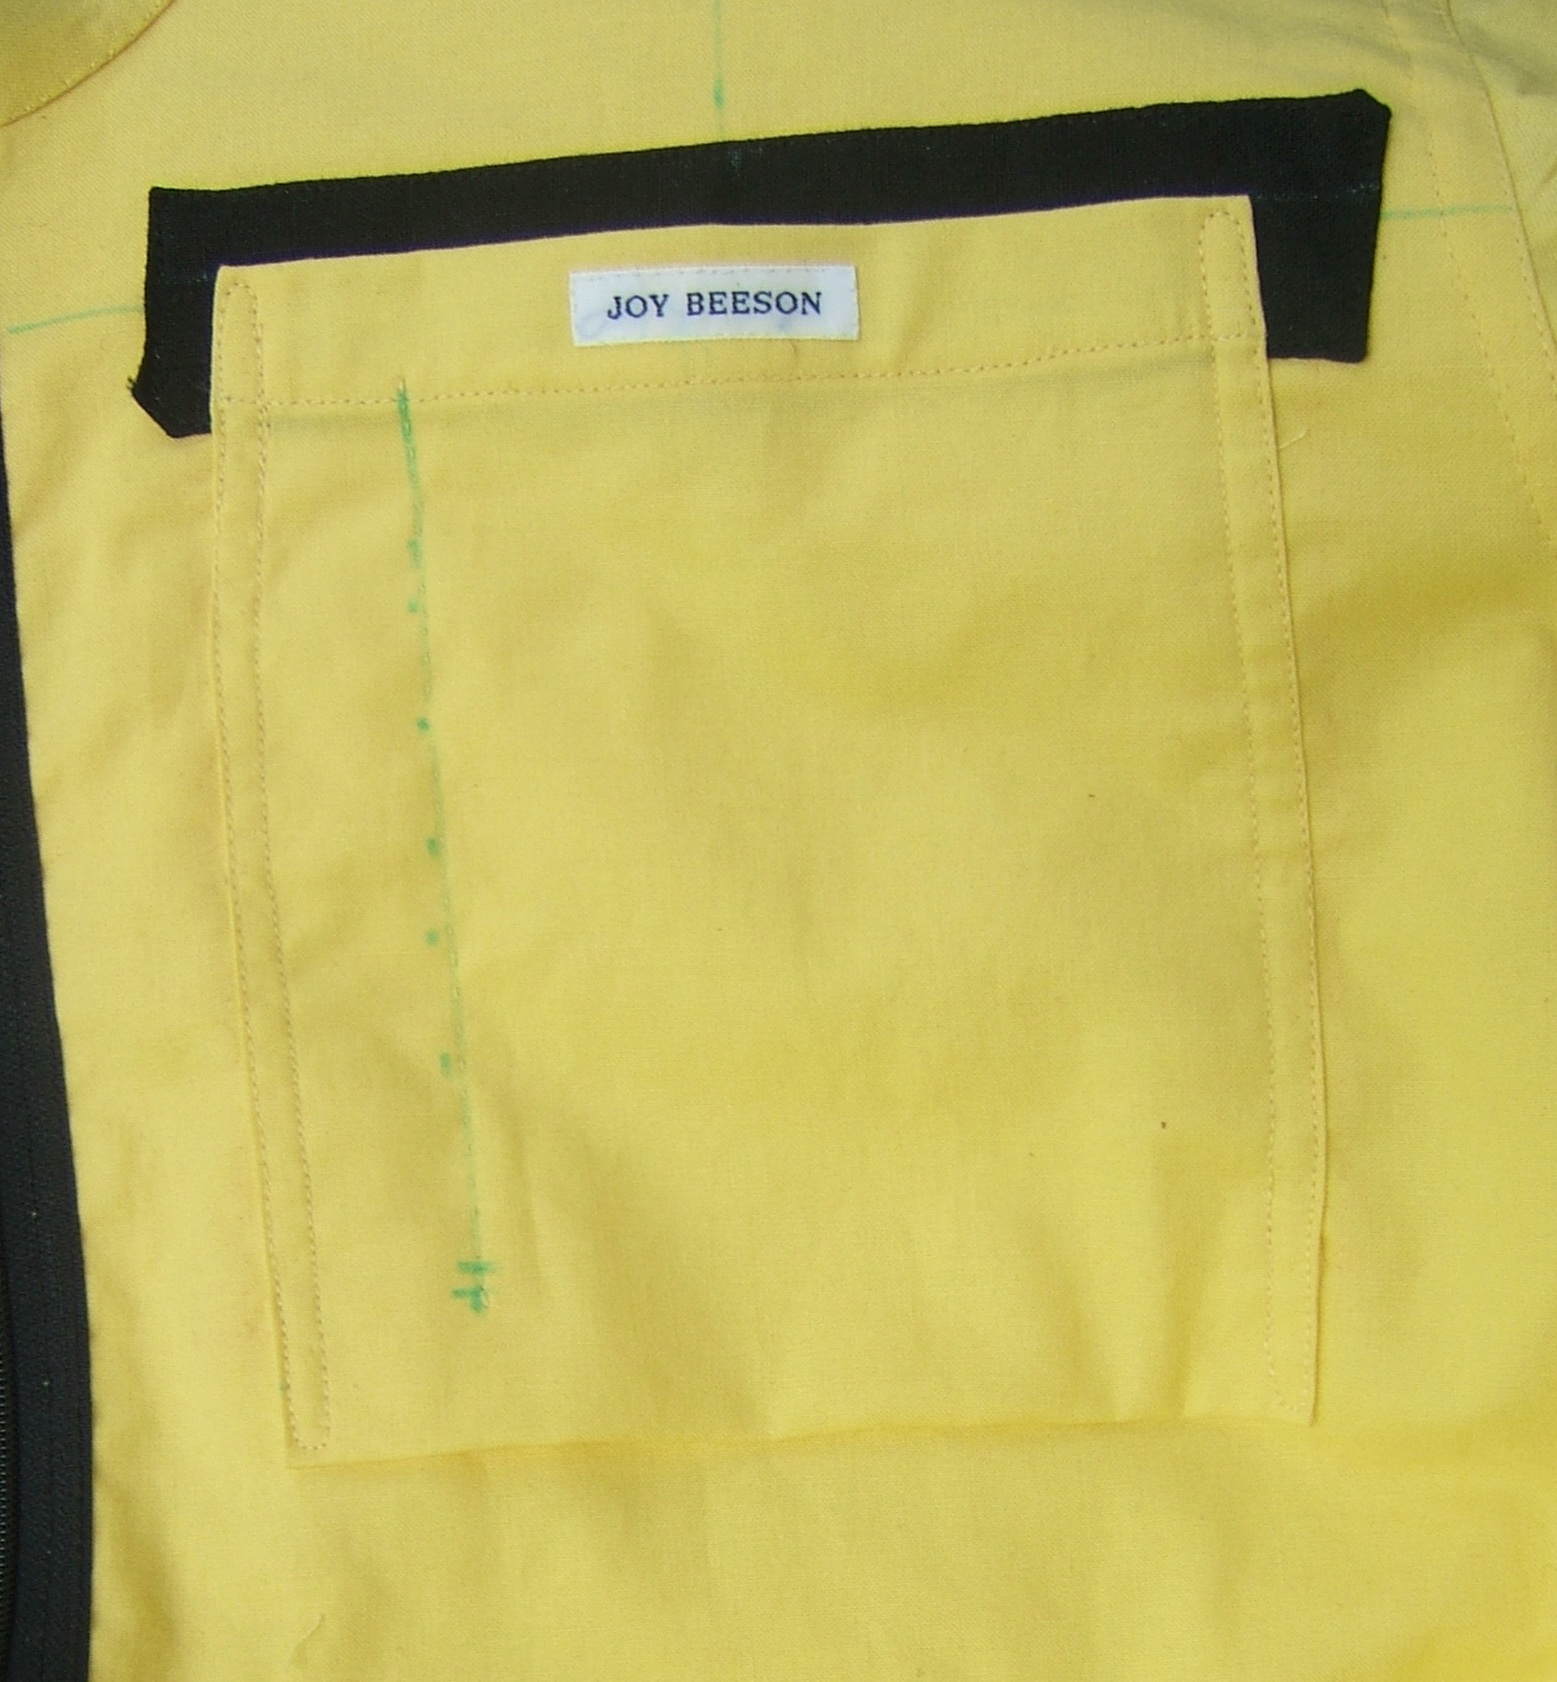
The hems of the front pockets look so nice that I'm wondering whether I should also put Shirt Crisp inside the pocket trims. It would provide reinforcement for the snap on the right pocket.
"Pocket trims" is what I'm calling the black patches that camouflage the pencil marks. I put them on both sides so it won't be obvious, and it strengthens the spot where I sew a snap on the right pocket.
I think I can skip the "sorta quilt" patch between the layers. The yoke is double, and the trim is a third layer, and I've about talked myself into adding a layer of Shirt Crisp.
12:32 AM 5/18/2023
Un uh-oh.
Lying awake, I realized that if I take half an inch out of the neckline, I have to take half an inch out of the collar.
Then, while congratualting myself on my good fortune at not having yet cut the collar, I envisioned leaving the extra half inch sticking out as two quarter-inch tabs and realized that the missing half inch is filled in by the zipper, and I need the full length of the collar to conceal the ends of the zipper tape.
I Dr. Brookered there: I thought I'd made a mistake, and I hadn't.
I think maybe I need a snap reinforcement on the outside of the right pocket after all -- to camouflage the stitches that hold the snap on. But a diamond would have a corner sticking up above the pocket -- and blending in with the pocket trim.
12:42 AM 5/18/2023
10:59 AM 5/18/2023
I was alarmed when I realized that my hip hurts so bad that I can't work standing up, but I can lower the ironing board and work in my secretary chair.
Now: am I smart enough to decide where to cut the three-inch strips?
I think I'll thread-mark the pocket marks to the right side of the front yoke first
12:43 PM 5/18/2023

Checking to make sure I marked a pair, rather than two lefts or two rights. While I was at it, I thread marked the notches and dots. Before taking the picture, I turned up corners to show the right sides of one notch and one dot.
7:14 PM 5/18/2023
I also need to transfer the upper corners of the pocket-placement marks on the yoke lining to the visible side. These marks will be concealed when I sew on the pocket trims, so I'll need to re-mark them from the back. I think that X marks such as I used for the dots will do. Or make two intersecting lines of running stitch, then make an X tack to transfer them to the front.
Leg still hurts. I'll read funnies and Usenet the rest of the evening.
11:56 AM 5/19/2023
Marked the pocket corners on the lining, then cut interfacing for the pocket trims. Strangely reluctant to cut the three-inch strips -- and I'm hungry.
I'll need the step ladder to plug in the iron. My leg isn't hurting too much today, but balancing on the Kik-Step probably wouln't be wise.
8:17 PM 5/19/2023
Once again, the whole day is gone and practically nothing done.
11:56 AM 5/19/2023
12:15 PM 5/23/2023
I haven't the foggiest idea what I meant to say.
3:55 PM 5/24/2023 I appear to have taken a picture, but the USB port I meant to upload it with died. Will try to upload it to the Web with the other computer, then download it with Filezilla.
11:15 AM 5/30/2023 -- port resurrected as mysteriously as it died.
The picture was taken on Friday, so I still have no idea what I meant to say on Saturday.
Note needle in act of transferring the pocket-corner mark to the other side.
11:38 AM 5/23/2023
Sewed black twill tape to the zipper, then measured against the front yoke and cut the tape with a couple of inches to spare. Used pinking shears to cut even though I know I'll trim this edge off later.
Just measured. There are three inches to spare.
The tape wasn't *quite* as wide as the zipper, but it stretches. Also, I covered only a firm seam allowance of the zipper tape, instead of stitching as close to the chain as I could. It will look fine -- but I'm relying heavily on black-on-black to conceal irregularities.
Omitting indecision and whatnot, I first sewed the tape to the zipper right sides together, then folded the tape down and stitched a rectangle to hold it in place.
One of the three-inch strips is the correct length for the back-pocket facing. I pinned the pattern to it.
Now to mark the belt casing and the sleeve facings while I still can think straight.
4:04 PM 5/24/2023
When I cleared the ironing board for ironing, I put the 3/4" tape back on the card table instead of putting it into the tape box. I think it will be better for the belt than the half-inch tape.
I changed the <pre> notions list.
11:50 AM 5/25/2023
At long last I hauled the ladder in and plugged in the iron.
1:42 PM 5/25/2023 groceries put away and I hurt a whole bunch. Time for a nap.
11:43 AM 5/26/2023
I put the yokes on the cutting board and trimmed a bit off the neck hole where the pattern says to, then marked on the pattern that I had done so.
10:05 PM 5/29/2023
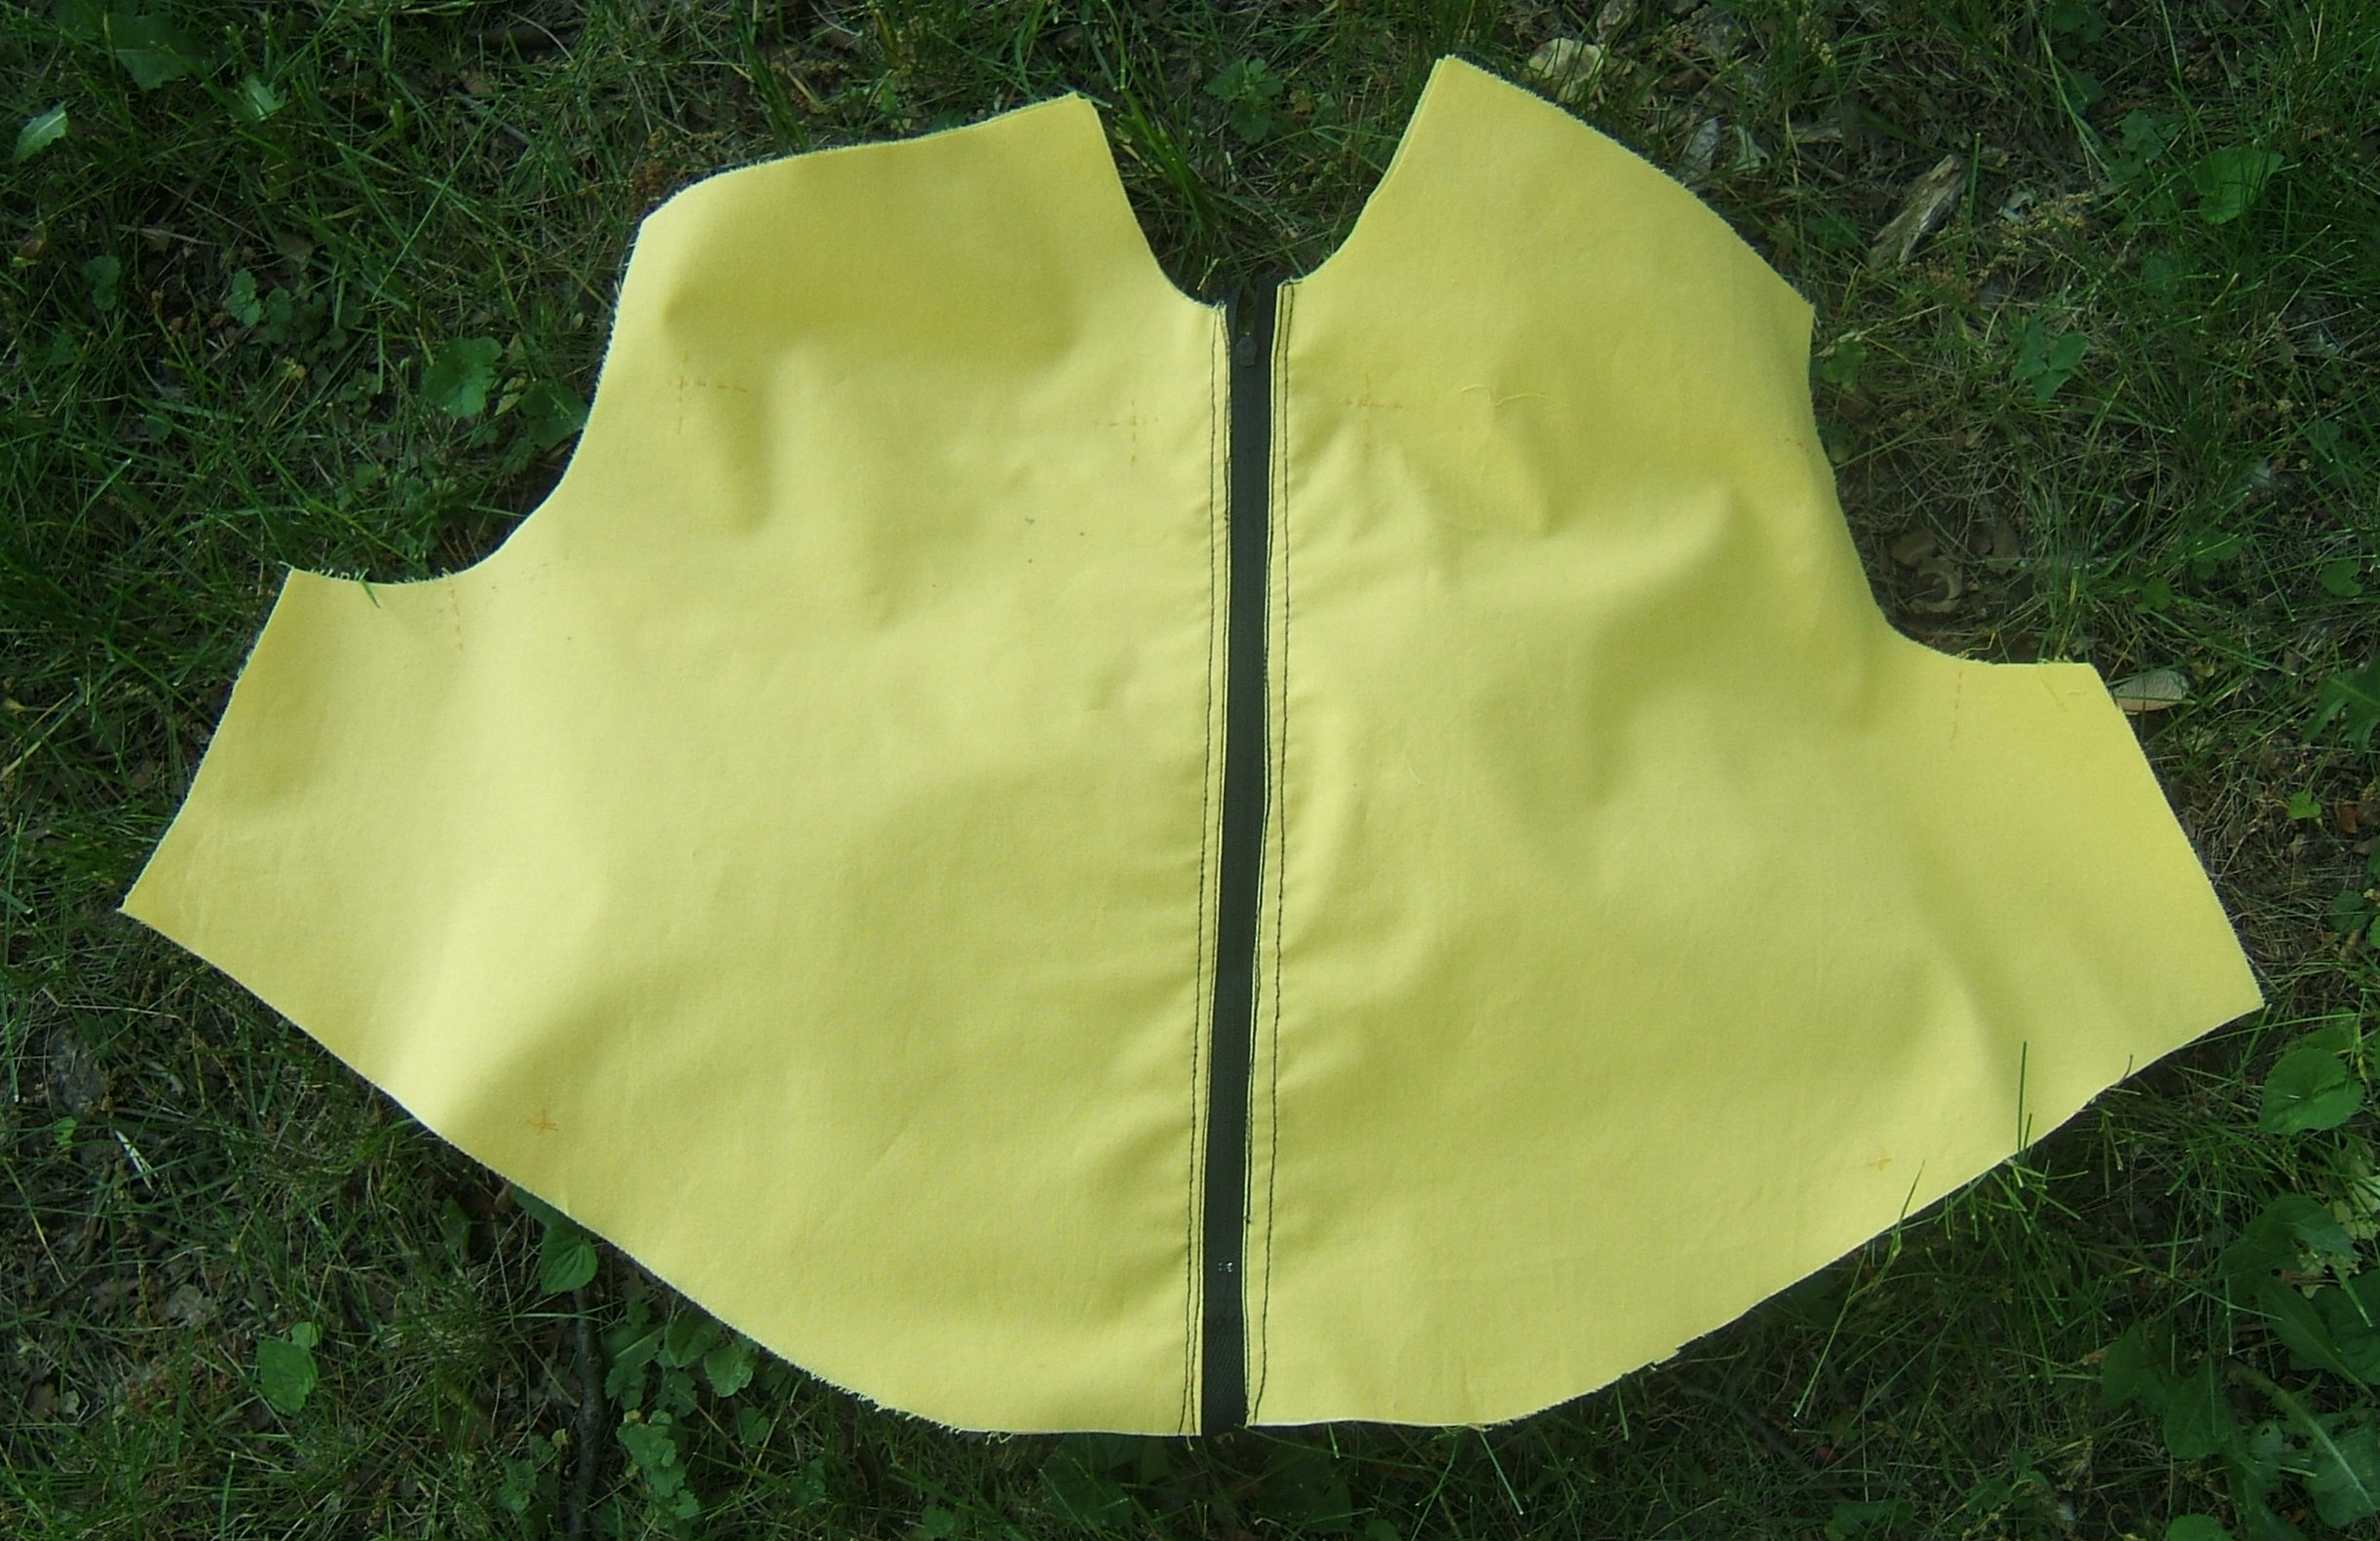
I basted the zipper to the front yokes this morning,


and in the evening I basted a quarter inch to the right side of the front.
10:13 AM 6/1/2023
Sewed the zipper on yesterday. I could do with less puckering -- and awk scrickle, I forgot to pre-wash the zipper.
10:47 AM 6/1/2023
Marking pocket trim to sew to front yoke. After carefully finding the center of the trim, I took the trim pattern off the peg and marked its center. Also made notches by folding it in half and trimming a teeny-tiny snip off the corners of the fold.
10:59 AM 6/1/2023
Pocket trims pinned place, ready for hand basting.
2:54 PM 6/1/2023
I sewed the ends of the sleeve facings together before my nap, and sewed the back-pocket facing to the back pocket afterward.
Took a lot of thinking to see how I wanted the facing to go. Finally used the centering ruler to mark a line a sun and a half from the raw edge. on the right side. Sewing the facing to the pocket right sides together with the folded edge down and the raw edge on the line caused the facing to fold up with the folded edge just a tad shy of the raw edge of the pocket, which I intend to fold under. before folding on the fold line marked on the pattern. Which is on the wrong side, of course, since I habitually make all marks on the wrong side (when not markng both sides) to save confusion. Oops, I can't include thread-marking that line in my upcoming handwork porch sit, because the mark needs to be on the *facing*, which hasn't yet been pressed into place.
10:34 PM 6/1/2023
basted pocket trims, turn-unders on back-yoke lining, sleeve caps,
11:12 PM 6/5/2023 Sewed pocket trims to front yokes
11:30 AM 6/6/2023
I *think* it's safe to use the step-stool to plug in the iron instead of dragging in the ladder.
2:05 PM 6/6/2023
Once again, I had the whole day to sew, and it got to be naptime before I'd even plugged in the iron.
I did sort out stuff to be pressed, and baste miters into the hems of the back belt casing. I used black thread and tiny stitches, and don't intend to take the basting out. I used default basting thread for the hems themselves and plan to pull it out after pressing the hems and sewing them.
7:32 PM 6/6/2023
It was safe. My spouse is selecting a stool that will be even safer.
Went to his computer to check whether it would be high enough, and found that it will be delivered Saturday.
I absent-mindedly did all the pressing standing up, and appear to have gotten away with it. But it would be wise to be extra-alert to needless standing for a while, and to start my nightly exercises right now, to be sure of getting them all in.
I pressed everything that was laid out, and put it back onto the card table, carefully letting each item properly flatten the items below. Except for the sleeve casings, which I put onto the sewing machine table because stitching those will be my next step -- *after* doing a knee-pull, back flatten, and knees pull. (There must be some way that I can find out what these standard exercises are really called.)
10:10 AM 6/7/2023
My largest black snaps and my largest silver snaps appear to be the same size, though the silver ones look bigger because of the sparkle. I looked to see whether they are the same nominal size, and couldn't find size indicated on the card anywhere. The only difference between the two cards is that the fine print in the upper right corner reads "80-4-1" on the black one and "80-4-65" on the silver. I presume that "1" and "65" are color numbers. "4" is the number of snaps on the card. In the lower left corner, each card says "SZ-T-TAM 4"
11:51 AM 6/7/2023
Sleeve facings: Yesterday, I pressed under the edges of the seam seam allowances and pressed them open. Today, I trimmed the ends and stitched them down.
12:09 PM 6/7/2023
Froogled. Dritz puts the size in the lower left corner. These snaps are Size 4. "SZ" must mean "size". "T" and "TAM"?
9:46 PM 6/7/2023
Stitched the hems of the belt casing in the afternoon.
I've decided to use a black snap on the phone pocket.
11:20 AM 6/8/2023
Duh. I didn't need to thread-mark the pocket corners on the yoke linings because I marked the pocket trims so I could line them up with the marks they conceal.
Next up: thread-mark the fold line on the back pocket casing, which will also keep the layers in place when I fold on the fold line.
1:07 PM 6/8/2023
The back-pocket elastic casing is pinned for stitching. Then it will be ready to attach to the back.
4:12 PM 6/8/2023
Back-pocket facing stitched. I plan to sew down the fold on the inside with yellow thread before installing the elastic.
I've been studying the seam attaching the back to the yoke in the yellow-linen jersey. It looks as though I folded under the entire seam allowance on the lining, then shifted the allowances of the yoke and back to make the seam a quarter inch higher (also grading the seam), and top stitched along the fold of the outer seam, which went down the middle of the allowance on the lining.
Since I've already turned a quarter inch to the wrong side, I think I'll use that piece on the outside, pin the lining with the raw edges offset by an eighth, and sew a 5/8 seam. If I make the 3/8 side of the seam on the yoke, the seam will be an eighth of an inch lower, with the fold of the outer piece an eighth of an inch below that. Stitching along the folded edge, then again a toe's width higher will look like a flat-felled seam on the outside.
I think.
10:25 AM 6/9/2023
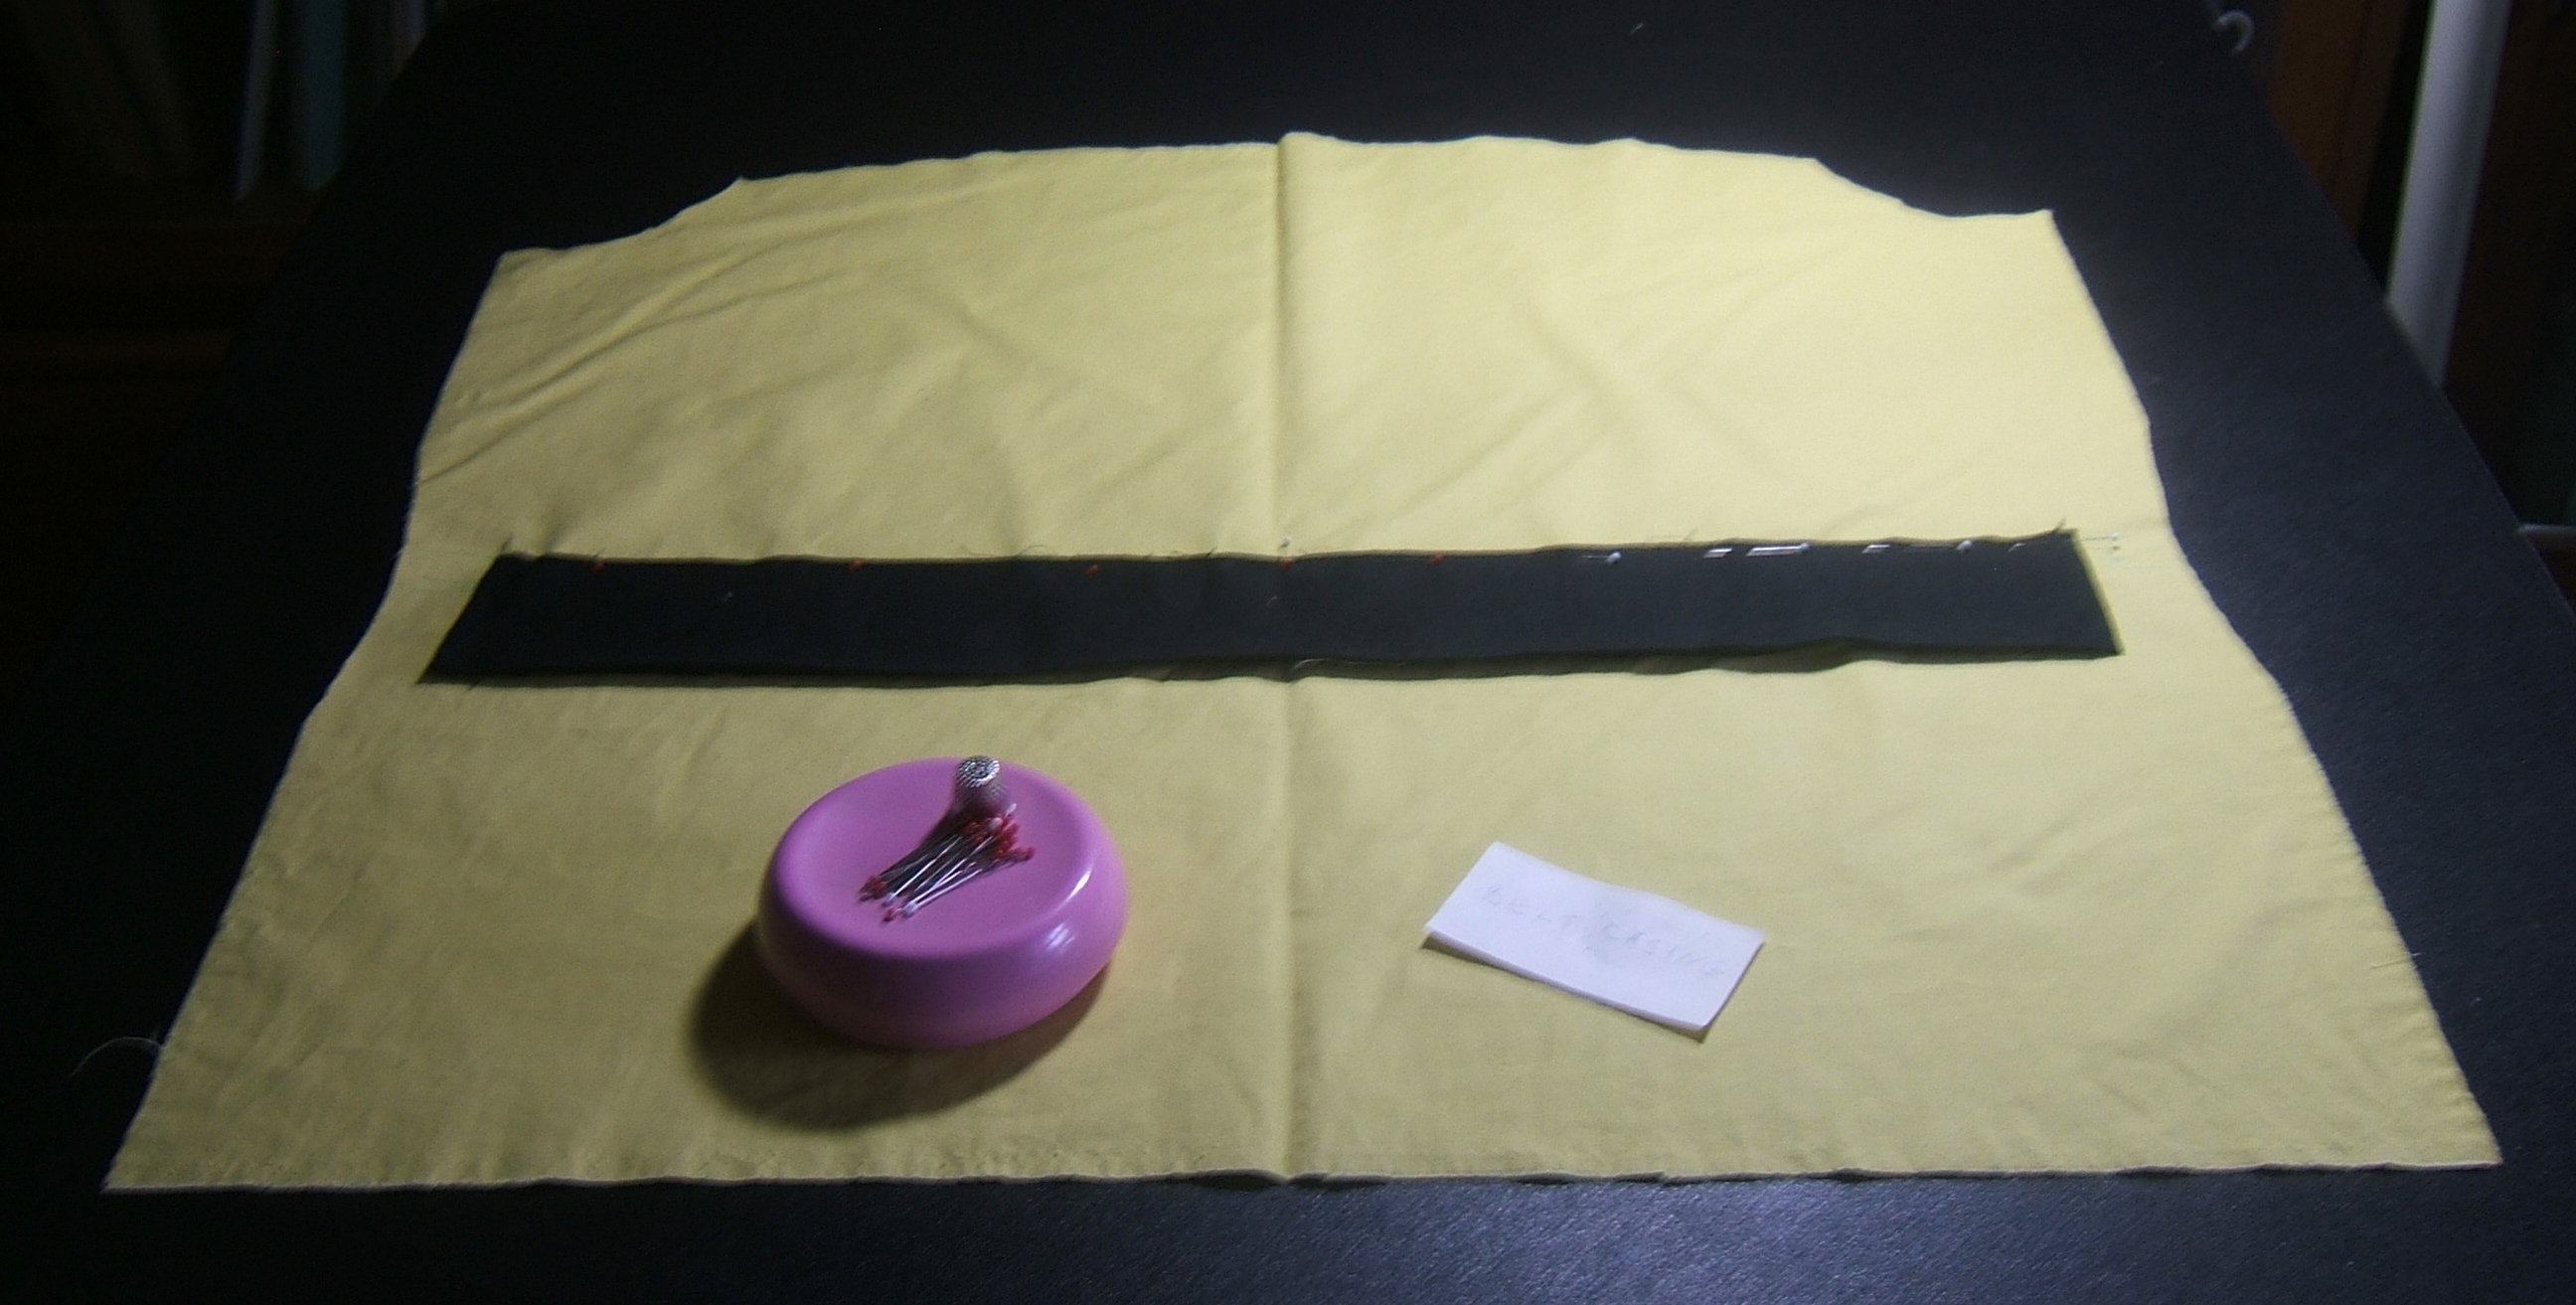
I'd like to put twill tape under the belt casing at the stitching lines, but that will require me to know exactly where the stitching lines are before attaching the belt casing. I don't have to figure anything out until after sewing the top edge of the belt casing. I intend to pin it wrong side to right side with the raw edge three-fourths of an inch above the waist line, sew a quarter inch from the raw edge, fold the casing up, top stitch as for a flat-fell seam, then fold the folded edge down to meet the waist line and stitch as for a flat fell again.
I've been dithering over putting a re-inforcement where I've ironed a patch onto the magnifiers-and-handkerhief pocket, but I think the whole shirt was pretty shabby before the glasses case broke through.
10:52 AM 6/9/2023
I should have done this search sooner. From 2019SEW1.HTM:
12 April 2019
[picture caption: belt casing pinned to back]
I attached the back belt casing today. I was concerned that three inches wasn't wide enough when I was using it double, but it looks pretty good. I matched the raw edge to the waist and sewed one toe-width from the raw edge, about an eighth of an inch. (Three millimeters.) Then I folded it up, finger-pressed it, and stitched one toe-width from the fold. This completely enclosed the raw edge.
[caption: Foot of white just finishing first row of stitching on belt casing]
Then I used the half-inch tab of the blue-plastic measuring dinger to mark a dotted line below the fold, and folded the free edge of the casing down to cover it. That's the first time I've used the air-erasable marker in a long time. I meant to use the water-erasable marker, but when I went to the pencil mug I remembered that I'd left the washout marker in the parlor, and reflected that this was one of the few times that I can be sure that I'll use a mark at once.
[belt casing sewn to back]
The casing is seven eighths of an inch wide. (Twenty-two millimeters.)
Now to sew the pocket on. First wrong side to right side with the straight raw edge matched to the line drawn on the back.
[picture]
This time the stitching did not fully enclose the raw edge. I ignored it. It will be inside a fold and difficult to see.
I decided to do the pocket stitching before inserting the elastic, because it is easier to do when the pocket is flat. I'll pick the white stitches out of the black facing before putting in the elastic, and replace them with black hand stitching.
I folded the pocket up on the fold line drawn on the back. This made the top of the pocket about nine sixteenths of an inch below the top of the casing. Plenty of room for a half-inch tape, particularly since the belt will press on the top of the casing, and not on the bar tacks.
end quote
This doesn't fully square up with what I see on the extant linen jersey. Umm, what I *saw*. Now that I know what I'm looking at . . .
The belt casings are the only part of the old jersey that are showing no signs of wear, so I think I'll continue with my plans to use one layer of fabric.
I see that the attachment ended up with the bottom edge of the casing *below* the waistline; I think I'll use that, as it will give a wide place to put the bar tack holding the top of the pocket. I'd like to re-inforce the top of the stitching (pause to inspect the old jersey) -- nope, the un-reinforced stitches held up just fine.
And with the freedom to put the pocket dividers anywhere, I can baste the pocket dividers, try the sizes of the pockets, and *then* stitch and bar tack. I'll put the folded edge a quarter inch below the waist, and stitch a generous quarter inch above it for the flat-fell effect. Then the bar tack won't pull on the casing the way it does in the old jersey.
I'll put the raw edge of the casing half an inch above the waist, which will leave a quarter inch between the lower stitches of the upper edge and the upper stitches of the lower edge.
12:30 PM 6/9/2023 time out for lunch. Now I'll take a nap.
8:16 PM 6/9/2023
Took a walk after the nap, got back just in time to put supper on the table.
Later on I drew wash-out lines on the front and the back, on the right side, half an inch above and a quarter inch below the waist line.
2:56 PM 6/10/2023
It's time to sew the name tag on the left front pocket, and I *still* haven't found the name tags. I guess I'll have to take a tag off one of the worn-out jersies. I was thinking that it was a pity I hadn't saved a name tag off something I threw out, but I'm pretty sure that I did -- and put it with the other name tags.
4:49 PM 6/10/2023
Ta dah! I dumped everything out of the box where they are supposed to bed, and there they were!
10:22 AM 6/12/2023
I pinned the belt casing while breakfast was cooking this morning.
11:19 AM 6/12/2023
I sewed the width of the narrow toe from the raw edge, then folded the casing up and stitched the crease of the fold as for a flat-felled seam, then stitched the width of the wider toe from the fold, neatly encasing the raw edge. The first row of stitching wobbled a bit, but sewing the second under tension kept the fold straight.
Near as I can make out, black on black, the second stitching is perfectly even. I must remember to switch to the straight-stitch foot before edge stitching when I've been using the zig-zag foot. Since the zig-zag works for straight stitching, I tend to just keep using it once it's been installed.
Then I spent about five minutes trying to find out why this entry didn't show on the browser even though I used both ctl-s and menu "save" . Finally closed Notepad and opened it again, whereupon the entry had vanished and I had to re-write it as best I could. Should have put the missing bits on the clipboard before closing.
12:08 PM 6/12/2023
Started to pin the lower edge of the casing on the card table, then realized that I wanted to pin under tension to keep the fold straight, and moved to the ironing board.
12:18 PM 6/12/2023
Then realized pins were apt to stick into the ironing-board cover, but my "two-sided craft mat" is thin enough to slip underneath.
12:37 PM 6/12/2023
Back belt casing complete.
All five lines of stitching extend from raw edge to raw edge, so their ends will be concealed in the flat-fell seam.
I think that this is all the black-thread stitching to be done for a while.
Attaching the pocket calls for thinkum, so I'll tackle that after my nap.
3:30 PM 6/12/2023
Final stitching of pocket facing done. Wouldn't you know, yellow on black where it's definitely going to show, I kept falling off the fold. It was almost as if something were pushing it; I could lift the foot, put the needle back into the fold, and the third stitch would be in the single layer.
But it's inside the pocket where not even I will see it.
Black fibers carried through to the yellow side a lot. It won't hurt anything to change the needle.
That needle was definitely rough. I must have hit something.
After trying and trying and trying to thread the new needle, I noticed that the reason I couldn't see the eye from the side was that it was in front. So I loosened the needle, turned it, checked that the flat side was to the right and the eyes were where they ought to be, had another long session of trying to thread the needle and vowing to have a long talk with my opthamoligist, and discovered that the needle was *still* at right angles to the way it should be.
The third time worked.
Now to pin the back pocket to the back.
6:47 PM 6/12/2023
Tried to sew the back pocket on, skipping stitches. Dug out the manual -- right where I put it many years ago -- read trouble shooting. Only cause for skipping stitches is needle bent or inserted wrong. I took the needle holder off entirely, fitted the needle into the slot -- slot clean, nothing to push the needle out of line
I put everything back together, tightened the needle screw with the screwdriver, and sewed on one of my pressing rags. Still skipping, though it might have been slightly better after I tried taut sewing.
I'll try another new needle in the morning.
2:46 PM 6/13/2023
What with washing clothes and catching up on the dirty dishes, I never touched the sewing machine.
Except to drape the front belt casings over it. I mitered the corners of the hems as I would miter the corners of a handkerchief hem, which should make for a neater application.
I don't appear to have a spare spool of the thread in the machine, so I took the kit out of briefs YD#12, which I'm saving to work on during an event I hope won't happen. That yellow isn't much brighter, and none of the hand stitches will show in the finished product.
One fold of the end hems had been creased and triple pressed. I folded the second and squeezed to make a crease I could use for a guide, then folded the corner down and basted it. Each time, I test re-folded the hem before cutting the thread. The first corner, I pulled the thread out and started over, but the other three worked the first time. I used yellow thread for the basting and left it in; it will end up inside the flat-fell looking appliqué.
Then I folded the hem into place (or the single fold to be sewn down, depending on which way the needle pointed), hid the end of the thread inside it, and running stitched to the corner, where I folded the other side and whip-stitched the miter.
12:22 PM 6/16/2023
I just ticked off the white 100/6 thread as having been used even though I'm pretty sure that what I sewed the name tag on with was the sun-rotted two-ply cotton. Finer thread shows less, and nothing is going to take hold of the name tag and pull -- unless I'm trying to get it off.
I went to the box of balls of thread and found the snack bag containing a partly-used of white, a partly-used ball of ecru, and a nearly-empty ball of ecru. (The balls are wound over plastic spools that are like short pieces of thin-walled pipe.)
Then I gathered up appropiate tools off the foot locker (which is serving as a sewing-by-the-window table) and the pocket that had the name tag pinned to it and sat in one of the chairs on the porch.
[photograph GUM box with needles in]

The needle I wanted already had white thread in it, so I used it. When I finished and put the snack bag away, I noticed that it also contained a swatch of yellow wool with a threaded needle stuck in it.
1:36 PM 6/16/2023 -- I think I can sew the snap on the other pocket before napping.
Hope I don't get "one more seam" syndrome.
2:12 PM 6/16/2023
Now I know how the safety pin got into the upholstery-thread bag. When I was picking up after sewng on the snap, I was inclined to drop the coilless safety pin that had been keeping track of the snap into the bag. Instead, I took the other one out and put both on the Grabbit.
I held the yoke up to me to make sure the snap was on the phone pocket.
And so to bed.
10:38 PM 6/17/2023
With some drama, I installed a another new needle. Whether the other new needle is defective, or I finally managed to install the needle correctly, I'll never know. I don't see anything with my +4.00 glasses on, and the bad needle doesn't wobble when spun by the point.
I hemmed the front belt casings by way of warming up, then finished sewing the back pocket on.
I've set a goal of going for a ride in my new jersey on Wednesday. Something is sure to prevent it.
4:07 PM 6/19/2023
I'm suffering from mirror bias. Every time I look at the front yoke, I think that the phone pocket is on the wrong side.
I've figured out what I'm supposed to do with the pocket mark: place the pocket about the way I want to sew it, with the raw bottom on the thread-marked line. Stitch the narrow toe from the raw edge, then fold the pocket down, stitch the fold as for a flat-fell seam, then stitch the wide toe from the fold.
Then fold the pocket into final position and stitch.
I sewed the front belt casings on yesterday. Each line of stitching ran from raw edge of the front to the other raw edge, so the ends will be caught in the side seams. The non-working stitches will be under the belt, and they will hold the working stitches.
[Counts] Once the pockets are attached, the shirt will be in fifteen pieces.
4:35 PM 6/19/2023
Oops, I put the heads of the pins where I wanted the points. Won't take long to turn them around.
5:13 PM 6/19/2023
It wasn't until I was completing the very last line of stitching that I realized that I could have sewn the bottoms of the pockets as narrow ovals, as I will do for the sides.
So much for my clever idea of moving the needle a stitch-length to the side before backstitching.
8:52 PM 6/19/2023
11:51 AM 6/20/2023
Pockets attached! Next step is to JOIN TWO MAJOR PARTS!
After basting the first side of the first pocket, I thought I might as well remove the pins on the basted side, and the no-longer-needed thread marks, and while I'm at it, I should turn it over and remove the never-needed thread marks on the lining. Hmmm . . . I don't remember marking the entire side of the pocket on the lining, I thought I just did the center mark and corners that the pocket trims would cover (forgetting that I would copy marks onto the pocket trims by way of lining them up).
Yup, I pulled out the basting. But I was able to re-pin without using the missing thread marks -- the other side of the pocket was still pinned.
Right now, it's time for lunch and a nap. 11:59 AM 6/20/2023
7:38 AM 6/21/2023
The back yoke is sewn to the front yoke.
7:41 AM 6/21/2023
Yesterday afternoon I made a false start when I pinned the back yoke to both layers of the front yoke, but caught the mistake before stitching.
I intend to divide the back pocket and install the elastic before I plug in the iron.
9:42 AM 6/21/2023
I faced the back pocket with the wider side of the facing on the inside. I see that I put it on the outside when making the linen jersey, and that was a much better plan.
I think I'll cut off a piece of the pink linen-cotton as soon as things stabilize after completing this jersey. It takes so long to make a jersey that I'll need it by the time I finish. Also I will remember tips such as the previous paragraph.
10:00 AM 6/21/2023
I marked a stitching line eight inches from the left raw edge, and another eleven inches from that one. That leaves six and a half (minus the seam allowance) for the keys-and-lipstick pocket.
11:47 AM 6/21/2023
I thought at first that I'd made the casing fit the elasice *exactly* -- there is, in fact, plenty of clearance. By the time I realized that in choosing the stiffer of the two 3/4" elastics I had chosen elastic designed to have a very high coefficent of friction, it would have been more work to pull the elastic out than to go on.
I pinned the elastic out well stretched and plan to leave it on the ironing board while I have lunch and a nap, in the hope that the gathers will more-evenly distribute while it rests. It *was* easier to get the last bit of twill tape inside the casing after I knocked off to tie paper into bundles for recycling.
I greatly fear that I made the twill tapes too long -- I overlapped only half an inch -- and the elastic won't pull the pockets in enough. If I do have to undo it, I think I'll unpick the casing and do the facing over -- it would be easier than pulling that high-friction elastic out.
2:27 PM 6/21/2023
The recipe calls for two two-inch pieces of tape. I cut five inches because I thought it might shrink -- and then never measured it again.
And feeling for the end of the tape in the yellow-linen jersey, there is only a thumb-width between the seam and the end of the elastic, so I must have also overlapped more.
But while napping, I realized that all I need to do is to unpick the two lines of zig-zag that hold the ends in place, and pull out some of the tape.
I stroked the stretched casing every time I passed the ironing board, and when lunch was done, the gathers were reasonably even, so I left it relaxed during my nap.
I think I'll make and install the collar before tackling the elastic again.
9:53 PM 6/21/2023
It was too close to bedtime to do something that required thought and a hot iron, so I picked out the zig-zagging and pulled an inch of tape out of each end of the casing.
That leaves one inch of tape between the raw edge and the elastic, which should be ample. I calculate that the seam will use three-fourths of an inch. The middle of a pre-graded flat-fell seam lies on the original seam line, and it will be half an inch wide, so the final top-stitching will be a quarter inch inside the half-inch seam allowance.
One row of zig-zagging should be quite enough to keep the tape in place, but I don't plan to do it tonight.
The tape overlaps the elastic by half an inch, so the original five-inch piece must not have shrunk at all when it was boiled.
8:00 AM 6/22/2023
It's lucky that I didn't feel up to zig-zagging last night. An unsecured bar tack at the edge of the elastic will be easier, and work better.
9:58 AM 6/22/2023
That was quick and easy. There was a needle already threaded with black on the Grabbit. I made two three-stitch bar tacks side by side so as to secure the full width.
Then I re-threaded with Supersheen, pinned the elastic full-stretched on the ironing board, and used the Nonce pencil to continue the blue lines in white on the black facing.
At this point I discovered that I can't work bar tacks with the fabric pinned to the ironing board, so I stuck pins at the crossings of the facing-hem line and the divider lines and took the work out to the porch, where I said "oops" and came back in for my magnifying glasses.
I anchored the thread at the lower edge of the facing and back-stitched to where I wanted the bar tack. The white stuff had worn off by the time I got there.
Then I held the back to my back and determined that the elastic will draw the pockets in enough.
10:39 AM 6/22/2023
Now I have pinned the dividing lines. I checked that if I leave the entire loose part of the pocket loose, the openings between pockets will be just small enough to keep my lipstick from migrating, so I plan to start stitching at the bottom and leave threads long enough to thread into a needle and make bar tacks into the triple thickness where the pockets are attached.
This will make it easier to brush the lint out of the pockets when I wash the jersey.
1:34 AM 6/26/2023
I pressed open the seams joining the yokes, ironed the collar interfacing onto the collar, and pinned the collar lining to the collar, with a bit of the black lining sticking out at each end to make the lining easier to roll to the inside.
Then I discovered that the light on the sewing machine was dead -- I distinctly remember turning it off every time I left the machine, but it must have run *many* hours to run the AAA cells *that* flat. It was too late in the evening to change the batteries, particularly since I wasn't sure it *was* the batteries.
But tomorrow I'll have the entire day to sew, and the jersey is in only ten pieces, if you count pinned as making the collar into one piece, and don't count the belt, which will remain as a separate piece..
3:20 AM 6/26/2023
Took at least twenty minutes of lying awake to figure this out.
Was imagining sewing the back to the yokes. I folded half the seam allowance under, a quarter inch. That would make the raw edge lie along the original seam line, which is an eighth of an inch below the current seam line. I should have folded in the whole seam allowance, which would make the fold lie a comfortable eighth of an inch below the current seam line. But that would make the raw edge of the yoke coincide with the raw edge of the back, and I want these allowances graded. So turn under three eighths -- an eighth of an inch wider would make the raw edge lie on the current seam line, which would be just right.
After many, many rounds of "This does not compute" I calculated it the easy way: the allowance extends five-eighths of an inch beyond the current seam line, fold it in half, five sixteenths.
The edge moves up by the same amount that the place where it starts moves up, so you make it wider by half as much as you want to make it higher.
And I solved the same problem when I figured out that to make a three-eighths allowance on the back and a five-eighths allowance on the yoke lining, I had to start with the raw edges a quarter inch apart.
1:07 PM 6/26/2023
Sewed the collar, pressed seam allowances toward the black-linen lining, running-stitched around to keep just enough yellow showing on the inside to be sure that no black showed on the outside. I left the ends of the running stitch secured only by leaving tags to pull on, in case I needed to separate the layers while sewing the lining to the inside of the shirt.
I left a quarter inch of collar sticking out to obviate the need to separate the layers and to avoid a pile-up of seam allowances. Turned out to be a bit more than a quarter inch when the stitching was done; I'll just let the tabs overlap and say "I meant to do that.".
When I started to pin for hand stitching the collar to the outside of the shirt, I found that the seam allowance was too narrow in most places. I corrected that with much fumbling around, and a lot of machine stitching hidden inside the collar.
The light is gloomy today, but I managed when sitting close to the window. The needle is actually easier to thread when the light comes from the left.
Now for some porch sitting to sew the yellow layer of the collar to the shirt. If the cushions are wet, I'll change into the pants I intend to sew pockets on when I'm done. I haven't replaced my lost pocket knife yet, my cell phone can be carried in the timer pocket of my shirt, and I'm not intending to work outside today.
1:35 PM 6/26/2023
On second thought, it's time for lunch and a nap.
6:58 PM 6/26/2023
When I went back after my nap, there was a puddle on the table beside the chairs. I said "not *that* wet" and dragged the rocking chair over to the patio doors. I needed to be near the kitchen to keep an eye on the beans in the toaster oven anyway.
Sewing the edge of the collar down took longer than expected, partly because one end of the collar was out of line. I couldn't say that I meant to do *that*, so I had to unpick it and re-stitch by hand. This got some unwanted yellow thread on the inside, but it *is* the inside.
I sewed by spaced backstitch across, then at the tab, put the needle down through yellow only, then brought it up through both black and yellow, which tucked the black behind the yellow.
I was seriously annoyed when the second needle of thread ran out just half an inch from the end -- particularly when I hadn't brought the wax with me and couldn't get the thread back into the needle to hide it. (I'd finished off the first needleful while it was still secure in the needle.)
There was no longer enough light in the sewing room to thread a needle, so I brought the wax and the new thread to the rocking chair, but didn't have enough sense to finish off the previous thread before putting the new thread into the needle. The flopping end didn't annoy me *much* while I was sewing.
I appear to have hand-sewn the linen jersey too. When I make the pink one, I hope I remember to sew the collar on first, then arrange the edge of the lining to just cover the stitches, then top-stitch near the fold of the collar by machine.
Since it took two years to make this jersey, I plan to tear off fabric to make the next one as soon as this one is in the closet.
Better take a swatch the next time I go to Lowery's and buy some pink thread. Or I could sew it with ecru 100/6. Or both: six-cord thread for construction, pink for hems and top stitching.
I wonder whether I have enough black-linen scraps.
12:13 PM 6/28/2023
Sewed back to yoke lining. The 5/8" mark had worn off completely, so I had to make a new one. Neither end had the raw edges crossing exactly at the seam line; I picked out an inch or so and re-stitched.
Since I'm pressing on the sleeve board anyhow, I've been pressing on the kitchen counter to save climbing up on the step stool.
The basted fold was a tad less than a quarter inch, and I need a tad more, so I pulled out the basting, pressed it open, and re-pressed with the new crease a stingy eighth of an inch from the old one. The curve is gentle enough that the basting was not at all necessary. Well, probably was needed at the narrower width.
About to pin for finishing the attachment of the back.
12:49 PM 6/28/2023
Found that an inch at one end didn't cover the stitching. Finger-pressed the allowance a bit narrower, immediatedly pinned in the crease.
More of the stitching missed the fold than hit it. I really, really miss the light that died. (New batteries didn't help, so I dropped it into the recycling-center bag.)
1:04 PM 6/28/2023
I have decided to switch to the zig-zag foot and stitch a bit farther from the fold. I really ought to pick out the defective stitching afterward, but I'm in a *big* hurry to wear this jersey. I can pick it out after the jersey has been worn if it bugs me.
9:07 AM 6/29/2023
Looks as though I'll change the "o" on the ecru thread to an "x". I'm running out of light-yellow thread, and going to the store to buy more would delay things by a whole day, so I'll sew the seams that don't show with ecru and save the yellow for top stitching. I should have been doing this all along, as the 100/6 is stronger than the Guetermann.
Was I dithering over whether to attach the sleeves first or the front first? I'll be attaching them simultaneously, to save on thread switching.
And I'll finish the front first, to be sure of having enough yellow thread to do the job.
12:37 PM 6/29/2023
Another thread-conserving idea: I just wound a bobbin with the brighter-yellow thread, so I can use light yellow on the side that shows and bright yellow on the side that doesn't.
I dithered over how to mark the bobbin so that I wouldn't mistake one for the other, couldn't think of an obvious abbreviation -- duh! There is a four-digit color number printed on the end of the spool.
Always before, I've "marked" a bobbin by keeping it in a bag with the spool it was wound from. And I've still got a few bobbins in the cute bobbin holders that fit into the hole in the spool.
When I took the easing stitches out of the sleeve caps, I was careful to put the polyester thread into the landfill basket. I throw cotton threads out the door.
I dast not sew so close to nap time, but I think it would be all right to pin the front to the front yoke.
I've put away the card table in the parlor! The shirt in progress is on a hanger!
4:30 PM 6/29/2023
Waited until after my nap to pin, intoned "right side to right side", and did a beautiful job of sewing the wrong side to the right side. It wasn't a *lot* of trouble to pick it out, and all went well the second time.
It's half an hour before time to cook, but the next step requires heating up the iron and I've been sweating profusely all day. Also, I'm psychicly tired. I'm going to read the newspaper and on-line funnies.
10:32 AM 6/30/2023
"Press it as it lies" seems like such a trivial preliminary! Because of the sharp curves, it had to be done in short stretches, mostly on the ham, and I had to press the sleeve seams, spray lightly, and press again. Even more on the pointiest part of the front, but substantial parts of that seam were essentially straight.
I'm really glad I didn't attempt this last night. (Not so glad that I'm unlikely to have this shirt to wear tomorrow.)
11:50 AM 6/30/2023
First top stitching done, thread changed to do the second row, cord unplugged for switching from light to iron, time for lunch.
Just remembered that I have to buy yogurt for tomorrow's party after my nap. Sigh; now that it's looking like a shirt, it's hard to postpone yet another day.
2:56 PM 6/30/2023
I can't wear the jersey tomorrow, but I *can* buy thread tomorrow -- if I get to the store before three o'clock. So I've decided to put the project on hold.
I may use the time to make potato salad for tomorrow's party. Urk . . . I hope Lowery's isn't closed for the holiday.
4:33 PM 7/3/2023
I have mentioned the humongous dart concealed in the seam between the front and the yoke. I didn't appreciate *how* humongous until I tried to stretch the seam smooth over the pressing ham.
I *didn't* iron my only white shirt while the iron was hot, but I'm about to stitch and re-press the hem in DH's new pants. Then I can put my newly-purchased thread on the machine and resume work on the jersey.
10:26 PM 7/3/2023
After some other chores.
Oops, I still haven't stitched a divider for the pencil pocket. I plan to make a bar tack into the three-layer (plus Shirt Crisp) edge of the hem, which will also put it into the three-layer (plus Shirt Crips) edge of the pocket trim, and make about the right amount of funnel for putting the pencil in.
I didn't re-heat the iron after stitching; I folded the pants neatly and left the warm iron on them for a few hours. The iron didn't cover all the hem, so I also used the plywood I keep under the iron, and put a couple of books on it. After a while I switched ends, putting the iron where the plywood had been.
The armscye and front-yoke seams are now complete. It was surprisingly hard to keep the curved seam curved as it went under the needle. I vowed to do the second sleeve an inch or half-inch at a time, and sometimes did only three stitches before shifting. This went better -- partly because I'd mistaken the front for a sleeve and was sewing a seam with no easing. The actual second sleeve was easier still (though done in shorter increments) because I remembered that I keep my grandmother's bodkin handy for smoothing fabric under the lifted foot.
Now it's time to fold a quarter inch . . . to the *wrong* side of the front, since I want the flat-fell to point to the back, and that requires making it on the outside.
But that would make three rows of stitching on the right side. Perhaps it would not be all that difficult to turn a quarter inch of the back to the right side. The elastic casing is only an inch wide, and the tape anchoring the elastic is quite thin. Not to mention that the side seam does not cross a flat-felled seam on the back, and does on the front. (It does, of course, cross the armscye seam on both back and front.)
It's already time (11:08 PM 7/3/2023) that I was in bed, and I haven't cleaned my teeth or done my exercises.
11:52 AM 7/4/2023
How did it get so late when I've just finished breakfast?
I've decided to machine-baste the back pocket in place before turning a quarter inch to the right side, and use yellow thread so I can leave it in. I'll want the basting just a bit farther from the raw edge than the fold I propose to make. I wonder whether there is a 3/8" mark on my sewing machine?
Ah. Needle in middle position, raw edge on edge of neddle plate. All already set up -- even my stainless-steel pocket ruler was already set with the slider at 3/8".
1:54 PM 7/4/2023
Then to hand-baste the fold for the first step of the flat-felled seam. After I'd been basting for a while I thought of setting my count-up timer. It took 22' 42" to finish the first side, and 29' 06" to baste the other.
2:26 PM 7/4/2023
Time out to start my lunch cooking.
I cut the tape that's sewn to the end of the elastic as close to the 3/8" stitching as I could, then stab-stitched very short stitches to keep all the layers together. I also stab-stitched when crossing the flat-felled seam at the armscye, but made no effort to trim out bulk.
I was intending to pin the seam while waiting for lunch to cook, but I think I'll wait until after my nap.
7:09 PM 7/4/2023
According to my count-up timer, it took 13' 44" to pin the first side seam.
7:30 PM 7/4/2023
And 14' 34" to stitch it. The edge of the front appears to have stretched, even in the straight-grain part of the sleeves, so I had to maintain tension at all times, often holding the tension with my left hand and turning the wheel with my right.
I'm tired. I think I'll read funnies for a while before continuing.
10:23 AM 7/5/2023
11' 27" to pin second sleeve
Front edge less fussy to ease in.
10:45 AM 7/5/2023
13' 07" to stitch it.
But I sewed with the needle on the left and it should have been in the middle.
12:42 PM 7/5/2023
On second thought, when I sat down to re-stitch, I couldn't tell which seam was the second, so instead of re-stitching both, I moved on to pressing as it lies. Much easier on a side seam than on the sharply-curved armscye and front yoke!
While the iron was hot, I ironed my only white shirt. This took more than twenty minutes. When DH was teaching school, I could iron a white shirt in seven or eight minutes (I timed each shirt and tried to do the next one faster, to take the boredom out). But in addition to being in practice, the shirts buttoned all the way down the front and could be opened to a flat strip once the collar and sleeves were done.
My stomach says that it's lunch time.
10:42 PM 7/5/2023
Got interrupted while sewing seam, stopped timer at 3' 06".
11:02 AM 7/6/2023
10' 36" to topstitch the body of one side seam, but there are long stretches of skipped stitches and it will have to be done over. I haven't the faintest clue as to how to stop the skipping.
I think I am doomed to *never* wear this jersey. I'll go make the pencil-pocket; that has to be done by hand anyway. Well, the bar tacks must, and one might as will sew the rest while the needle is in hand.
Then I'll fiddle with the sewing-machine needle and try again.
5:06 PM 7/6/2023
6:20 PM 7/6/2023
There's a finger on the bobbin case. One is supposed to put the thread through a hole in this finger when stitching with a double needle, but I can't think of any harm in using it when stitching with a single needle, and it might help.
Tomorrow, when I'd hoped to go for a long ride in my new jersey. Perhaps I'll use the clear skies and low winds to hang out a load of hot-with-bleach wash; I can't face more than a few miles in a ragged old T-shirt jersey that rides up against the front of my neck.
12:36 PM 7/7/2023
Wash on line, time for a nap.
After putting the bobbin thread through the finger, I looked at the needle with magnifying glasses and a bright light. The installation is perfect; I see no profit in loosening it and tightening it again.
I don't know whether to risk trying to sew the other seam, or to test by putting kakhi thread on the machine and darning the old pants I have on.
2:35 PM 7/7/2023
I hope this isn't haste makes waste -- I'm about to attempt the other side seam.
2:53 PM 7/7/2023
In checking the threading after switching to the free arm, I found that the thread had come out of the little loop just above the needle. Could it be that it's been that way all along and I somehow didn't notice?
If so, switching to khakhi thread to zig-zag the slits in my dirty old pants would have cured the problem.
At any rate, the stitching on the sleeve is satisfactory. I'll do the other one before trying to re-stitch the body parts of the side seams.
3:32 PM 7/7/2023
Both sleeves sewn, flatbed plate on, bad stitches picked out of the body part of one side seam, ready to start sewing -- and skip *all* the stitches! I'd pulled the thread out of the needle somewhere along the way.
Decided to break for a note before threading.
4:00 PM 7/7/2023
Seam sewn, bad stitches out of other seam, I need a drink.
4:21 PM 7/7/2023
Seam sewn, ready to heat up the iron -- the bobbin ran out two and a half inches back.
I measured the gap to the nearest thirty-second of an inch.
Bobbin wound, thread back in place. Running through the little loops as it should.
Not sweating as much.
5:20 PM 7/7/2023
but still sweating. This isn't the first time I've refilled my half-liter water bottle.
Body seams sewn, flat-bed plate off, husband hungry.
6:11 PM 7/7/2023
Noodles cooked and eaten.
When I pressed the seams for the third stitching, I also (chirp twitter) pressed the first fold of the hem. No pressing on sleeves, as they are to be bound. I intend to cut the sleeve facing an inch narrower before attaching it.
8:07 PM 7/7/2023
Super Snips to the rescue! They turned out to be just the ticket for cutting along a drawn thread that had to be held up in the air to be seen. They shouldn't be needed for the pink jersey, but I'm adding them to the tool list.
. The hem is pinned for stitching and the sleeve facings are cut down to two inches wide.
8:11 PM 7/7/2023
Turned out "thread snips" were already on the list. I added "Super Snips" anyhow.
8:16 PM 7/7/2023
I used vintage Super Sheen instead of black Guetermann thread. I just changed the check list.
8:31 PM 7/7/2023
Two "sleeve facing" tags triumphantly dropped into the wastebasket.
11:06 PM 7/7/2023
In an act of chicken heartedness, I cut 59" of 3/4" black twill tape instead of 58". One can always cut some off, but splicing isn't really an option.
7:07 PM 7/19/2023
At the cost of a little sloppy work, I did get the jersey ready to wear on the following day (Saturday 8 July 2023) and the ride was rained out.
There isn't enough space to put my hand into the keys pocket and the other two pockets could spare a little. I plan to take half an inch off the handkerchief pocket, wear it a few times, then if all is well, remove the old division between the handkerchief pocket and the wallet pocket and take an inch off the wallet pocket.
After I sew pockets to the dress I want to wear next Sunday.
9:02 PM 7/21/2023
Literally happened: I sewed the pockets to the dress and ironed it today, and in the evening, I stitched half an inch from the stitching splitting off the magnifiers-and-handkerchief pocket.
This leaves the handkerchief pocket six and three-fourths inches wide at the bottom, measured from edge of side seam to the new stitching.
I need to make a bar tack securing the top of the pocket, but it's bedtime-snack time. I'll wear it as-is tomorrow.
9:01 AM 7/26/2023
Made the bar tack, picked out the old division.
Marked new division one and a half inches from old division. This will make the wallet pocket 10 1/8 inches at the bottom.
9:27 AM 7/26/2023
Bar tack made and black stitching done
9:53 AM 7/26/2023
I am definitely making the new file with the current entries at the very bottom.
New division complete and the blue marks wiped out.
I think I'll put a seam ripper in my pocket so I can take the old division out after I've tested the new one in actual use. Looks as though I could spare even more from the wallet pocket.
6:35 PM 7/29/2023
The seam ripper was still in my pocket when I got dressed this morning, so I ripped the divider out then. I wasn't very careful about removings all the bits of thread.
The magnifier-handkerchief pocket is a bit tight: I have to poke the glasses u from the bottom instead of reaching in for them. But the handkerchief comes out all right, and I don't get the magnifiers out while I'm riding.
+end+

Plain-text copy of the check list, for making check marks (x) and changes
"x" means on the card table (or cut-pieces table),
"o" means that I checked that I have some.
Later, "x" meant that I'd incorporated it.
Items used to make the yellow-cotton jersey
fabric
42" x 4 yd yellow cotton
(25" left over, three and a half feet long on the side
where I cut away a front yoke.)
black linen scraps
Shirt Crisp fusible interfacing
notions
x black 12" zipper
x 1/4" elastic for sleeves
cut two 6 1/2"
cut two 7"
-- no second round of elastic;
it makes the sleeve too warm
x 16" of 3/4" elastic for back pocket
x two two-inch pieces 3/4" twill tape for ends of elastic
(ended up being trimmed to one-and-a-half inches)
x one short piece black 3/4" twill tape to cover end of zipper
x 59" black 3/4" twill tape for belt
x black Super Sheen thread
o #100/6 white thread
x #100/6 ecru thread
x black ONT thread
x basting thread
x yellow Guetermann thread
x black upholstery thread
x name tag
x beeswax
x large snap fastener
x 2 1" gold safety pins
tools
straight-stitch treadle sewing machine --
must get this repaired, but it will take
two men and a boy to put it into the car
electric zig-zag sewing machine with free arm
hand-sewing needles
thimble
seam ripper
eyebrow tweezers
magnifying glasses
iron
ironing board
sleeve board
point presser
shears and thread-snips and Super Snips
rotary cutter
11" x 8 1/2" transparent craft mat
12" x 18" cutting mat
23" x 35" cutting mat
pins
Grabbit
grandmother's bodkin
white wash-out pencil
blue wash-out marker
dust paper and marking wheel
tape measure
assorted rulers
red 45° 12" drafting triangle
tweezer-type tape threader
other bodkins
patterns
x LJ#1 front pattern
| cut one yellow on fold
x LJ#2 front yoke pattern
| cut two yellow on fold
x LJ#3 back pattern
| cut one yellow on fold
x LJ#4 back yoke pattern
| cut two yellow
x LJ#5 sleeve pattern
| cut two yellow
x LJ#6 collar pattern
| cut one yellow, one black
x LJ#7 collar interfacing pattern
| cut one Shirt Crisp
x LJ#8 front pocket pattern
| cut two yellow
x LJ#9 back pocket pattern
| cut one yellow
Rectangle patterns
x LJ#10 sleeve facing
| 3" by width of sleeve (15 9/16 or 15 5/8) -- 2" would be enough
| cut two black
x LJ#11 front pocket trim
| 1 3/4" x 7"
| cut two black
x LJ#12 back pocket facing
| 3" by the width of the pocket (almost 25")
| cut one black
x LJ#13 back belt casing
| 3" x 22 1/2"
| cut one black
x LJ#14 front belt casing
| 3" x 13"
| cut two yellow
No Pattern
o LJ#15 belt
| 3/4" x 57", finished
| cut one black twill tape
x LJ#16 12" black zipper
x LJ#17 16" 3/4" elastic
x LJ#18 front-pocket interhem
| 3/4" x 5 1/2"
| cut two, shirt crisp
Two patches for under snap on right front pocket.
| For the patch that shows,
{strike}cut an inch and a half square and fold the corners
to barely overlap in the middle, creating a finished square
with its edges on the bias. Appliqu� this diamond to pocket.
{/strike} Interface hem, sew snap to hem.
(Add purely ornamental diamond?)
(Chickened out of using yellow thread,
sewed snap with black upholstery thread,
tried to make the stitches on the front neat enough to look like an embroidered diamond.)
| For the other half of the snap,
{strike}sorta-quilt a scrap to the inside of one
of the layers of the front yoke.{/strike}
interface the pocket trim.
Lengths of 3" strips;
LJ#14 front belt casing 3" x 13" yellow
LJ#13 back belt casing 3" x 22 1/2" black
LJ#10 sleeve facing 3" x 15 9/16 or 15 5/8 | cut two black
-- 2" will do
LJ#12 back pocket facing almost 25" black
LJ#11 front pocket trim 1 3/4" x 7" cut two black
LJ#19 front pocket trim lining 1 1/4" x 6 1/4" cut two Shirt Crisp
LJ#18 front-pocket interhem 3/4" x 5 1/2" cut two shirt crisp
***
/\/\/\/\/\/\/\/\/\/\/\/\/\/\/\/\/\/\/\/\/\/\/\/\/\/\/\/\/\/\/\/\/\/\/\/\/\/\/\/\/\/\/\/\/\/\/\/\/\/\/\
Making front pockets:
Shave a very thin triangle off each end of each front-pocket interhem.
Iron interhems to wrong side of pockets
centered and
with the slightly-shortened edge a quarter of an inch
from the top of the pocket.
Triple press the extending quarter inch over the interhem.
Fold the hem to the right side.
Pin with the ends of the bottom of the hem extending
slightly beyond the pocket
so that the slanted end of the interhem is a quarter inch
from the raw edge of the pocket.
Sew a quarter inch from the raw edge of the pocket.
Turn hem right-side out
carefully poking the corners flat.
Sew close to the edge of the triple-pressed fold.
The next time the iron is hot,
press a quarter inch to the wrong side of each side
of each pocket, continuing the fold that you started
when you turned the pocket right-side out.
Taper this allowance from the fold line to the raw edge,
so that the underpart of the bottom fold will be a tad narrower,
to be sure that the upper part conceals it.
Making the pocket trims:
Press the trim lining to the wrong side of each front-pocket trim
centered on all sides.
Press the corners of the allowances over the trim lining.
Press all four sides over the trim lining,
making mitered corners.
baste folds in place.
Press again through a very damp cloth. Iron until the cloth is dry.
Baste trim to front yoke. Press before sewing.
(Leaving a cold iron on them when you knock off for the day will do.)
THE ORDER OF CONSTRUCTION:
(Skip around according to the thread in the machine and the state of the iron.)
Pressing:
Press a quarter inch to the wrong side:
At the bottom of the back-pocket facing and each belt casing
At the top of each sleeve facing.
At the bottom of the back yoke. (5/16" better)
Press a quarter inch to the right side:
Around top of sleeve
(baste fold first, to avoid burned fingers and crooked creases)
Stitching:
Sew tape to zipper. Cut tape off roll with pinking shears.
Top stitch fold of tape.
Turn the front yokes rightside out
Press in the crease.
Sew yoke halves to zipper, right side of yoke to wrong side of zipper
Sew pocket trims and pockets to front yokes
Hem back belt casing and sew to back
Sew back-pocket facing to back pocket
Thread-mark fold line, then stitch casing of back pocket
Sew back pocket to back
Hem front belt casings and sew to front
Belt casings are sewn raw edge to marked line, right sides together.
Then folded up and stitched twice, on fold and a quarter inch away
Then folded down, pressed fold matched to other marked line
And stitched twice like the upper edge
Pockets are sewn like the first stage of belt casings,
but wrong side to right side,
and folded down for second and third stitching.
Sew
back yoke lining to front yoke lining and
back yoke to front yoke
Sew collar to shirt
Sew back to back yoke lining.
5/8" on lining, 3/8" on back.
Top-stitch the seam, catching the yoke lining underneath
Set in sleeves
Sew front to front yoke
Sew side seams
Face sleeves and finish hem
TIPS
The collar must be sewn on after the yokes are sewn together, but it can be sewn on before attaching the back.
Read 2023June 26 before attaching collar.
The back must be attached before the sleeves can be set in,
but the front need not be flopping around during the operation.
On the other hand, the sleeves will be floppig around
while the front is attached
Attach belt casings and pockets while the pieces are still flat.
The dot is marked on the sleeve cap, but not on the armhole.
This was annoying.
As soon as the back pockets are finished and youi aren't going to fiddle with the elastic any more, stitch 3/8" from the raw edge to hold them in place during subsequent operations. Hand baste (matching thread) at the junction of tape and elastic earlier in the procedure.
Mark the back-pocket fold on the front, to assist in pinning the side seam.
/\/\/\/\/\/\/\/\/\/\/\/\/\/\/\/\/\/\/\/\/\/\/\/\/\/\/\/\/\/\/\/\/\/\/\/\/\/\/\/\/\/\/\/\/\/\/\/\/\/\/\
On to construction notes for the pink jersey
Back to Rough Sewing
Back to the writing page
Back to the links page