Dewey Decimal
DD646
DD746
revised 7 October 2019
=== && Insert essay on flat-felled seams here. && ===
38 inches: length of floor-length skirt.
I think that one yard finished length would be ample.
My waist is a yard around. Taking pi as three, that makes the radius of the circle four feet, which makes a circumference of twenty-four feet, or eight yards.
The circumference is taken off both ends of the fabric, which makes four yards, but to this must be added half the waist measurement, and one inch for every seam.
So the fabric must be nearly five yards wide. Five yards is 180 inches, so three yards of sixty-inch fabric would do the job. Plus allowance for shrinking, crooked cutting at the store, and waist seam and hem.
To make a skirt of less than a full circle, one would allow a longer waist measurement, then trim it off along a hip curve at each non-selvage seam. Details would depend on available fabric.
I'm going to do this thing! I measured my waist: 39". I got down the roll of black broadcloth and measured the width: 40".
Hmmm.
But if I use two pieces, that is only twenty inches per piece, and each piece has two ends: ten inches per end. The skirt should be reasonably full.
Two widths would make a reasonable pleated skirt, and a circle skirt of the same area would be fuller.
With the help of DH, I measured the hem of my seersucker shift, which is about the right length, as ten and a half inches from the floor.
Verify: red print pleated skirt is thirty-seven inches, black print pleated skirt is thirty-seven inches, both show marks of having been turned up one inch.
So thirty-eight inches, as noted in speculation, is floor-dragging. I want the hem to clear the floor by at least six inches, but probably not by more than ten and a half.
So I want not more than thirty-two inches finished length, and not less than twenty-seven and a half.
Allow half an inch for the seam, and half an inch to sew a facing on at the hem. (Perhaps I could use some of that surplus red-ramie tape!)
Minimum length to tear off the roll is twenty-nine inches. For estimating fabric need, round off to thirty. Round waist to forty.
Assuming a perfectly round waist, the radius of the waist would be twenty divided by pi: 6.4".
So the radius of my skirt is about a yard, and for a full circle, the hem would be a tad more than six yards. From two pieces, I would get at best a hundred and twenty inches: three and a third yards.
For each additional piece torn, I get two and two-ninths yards, minus seam allowances.
So three pieces would be skimpy, and four would be a yard too long. But there will be a lot of panels, losing an inch for every panel, extra fullness will help cover up the sleasiness of the fabric, and I did want side seams on the straight of grain.
So I shall go into the parlor, mark "wrong side, this way up" arrows on the fabric, and tear off four thirty-inch pieces.
⁂
The fabric was a bit dusty, so I decided to rinse it, so I embroidered an arrow on each piece. But the arrow on the roll is Nonce pencil.
Farmers' Market tour tomorrow, the next day is Sunday, but I might get something done between loads of wash Monday. I plan to cut the waistbands by the My Pants pattern, but make an eighteenth-century style pocket to hang under each slit. So I'd better look up eighteenth-century pockets. I did have a link to some in "Get Out of Here", but it died.
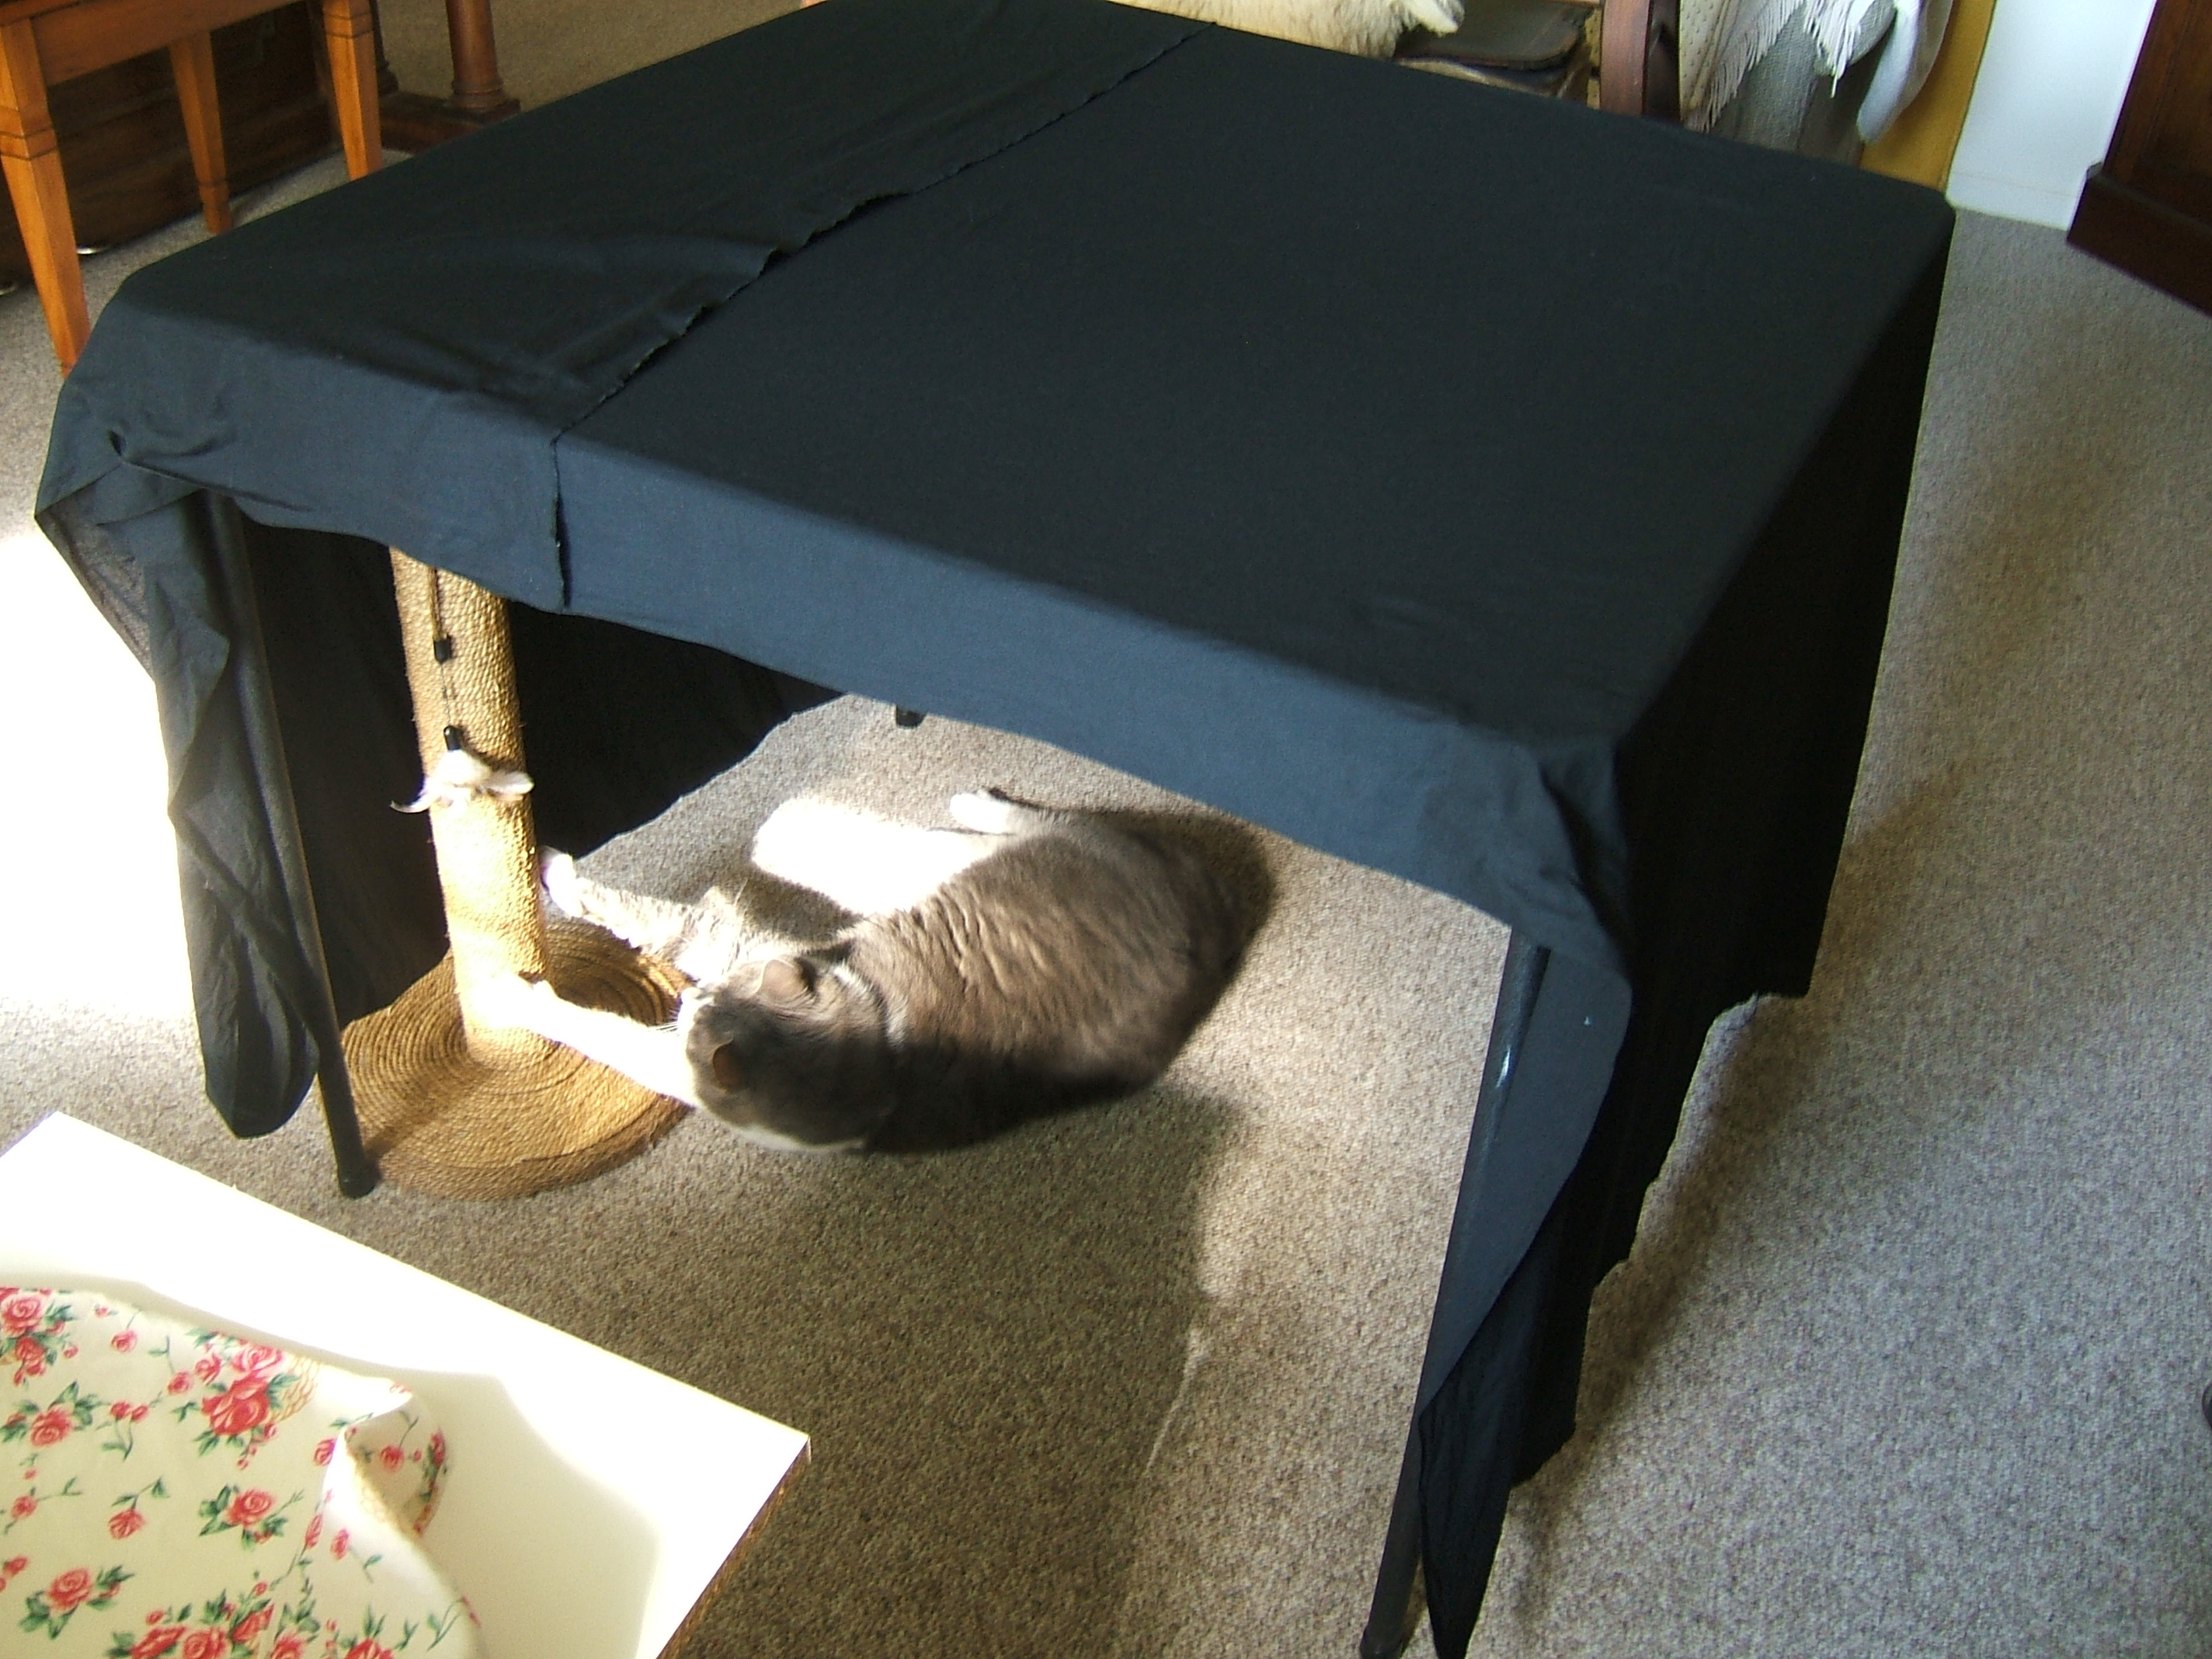
Since the light was dim, this is a time exposure. The camera didn't move, the table didn't move, but what did the cat do with which back leg?
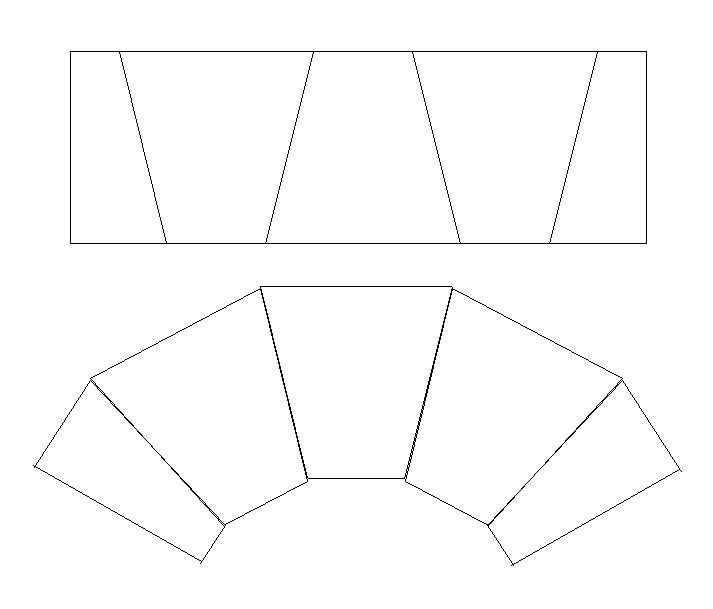
I have four pieces of broadcloth each 30" by 40". If I make two panels of each piece, that will be an eight-gore skirt. I think that adequate. The angle of the sides is a little more bias than I would like, but three panels would be harder to calculate — and twelve seams instead of eight.
I'll call my waist forty inches, and overlap half an inch on each side at the broadfall pockets.
Um, I have to allow for four piecing seams in addition to the eight panel seams. The selvage is good, so for the center front and center back seams I plan to make mock-fell seams: pin with one selvage sticking out an eighth of an inch, then sew a toe's width from the other — that would take up 5/8". 10/16" is too fussy to measure, how about making one pieced panel an eighth of an inch wider than the one on the other side of the same piece, AND THEN MARK THEM. That would also center the center seams! On the other two pieces, I allow half an inch on each selvage and then press the seam open, and top stitch as for a hem.
The bottom of the slit will be a weak spot. I don't think I want to call attention to it by appliquéing a decoration over it. I think a small bar tack at the very bottom, with a longer bar tack a sixteenth of an inch above it might do the job.
This is akin to the buttonholed bar I read about in a Victorian sewing book, and employed in the neck slits of my poncho shirts.
Absolutely no back tacking!!!
Measured my waist again, just to be sure. It's still 39".
I have decided that I want each cut edge to be sewn to the edge it was cut from, so I'm going to assemble each panel before cutting the next one, and I'm going to flop the middle piece instead of rotating it.
The torn edges were ruffled; I thought about spraying and ironing them — but eight edges? Better to dip the whole piece and spin it out in the washer. I even figured out how to trick my smart[-alec] machine into letting me use it as a bucket to save dripping as I put the wet fabric in to spin: I set it for "rinse and spin", turned off "extra rinse", and let it run until there was enough water — about ten minutes, because it doesn't believe in opening the faucet all the way any more often than it takes to inform you that it could fill faster if it weren't programmed to annoy you as much as possible. Paused it, soused the fabric, set it for "drain and spin", pressed "cancel" repeatedly until it gave up trying to continue "rinse and spin", and bob's your uncle!
And they are quite dry, or at least dry enough to iron, and I haven't even searched for information on 18th-Century pockets yet. But I think I'll use the shape I'm accustomed to feeling for through a slit in the side when I wear a skirt over jeans.
I think the rinsing took off the cat hair, and it didn't take off the chalk marks I'd made before deciding to wet the whole piece.
The roll came with two scraps: the piece I tore off to straighten the end, which I keep wrapped around it in case I want a narrow cross-grain strip, to assure me that I have pre-washed this fabric (it still has the zig-zagging on it), and to secure the other scrap. This is a torn rectangle with one selvage, which appears to be just right for making a new pocket bag. It's probably what's left of a strip I tore off to make the old one. No, it's wider than the wallet — which I noted because I want to make the new one with side walls, which will require a wider piece.
I'll start another project log for the pocket wallet.
My lunch smells ready.
Recogitating: I was lying in bed thinking about how the center mark at the bottom would have to be shifted to compensate for the different seam allowances, and reflected that if I made all allowances half an inch, and used only five eighths at center front and center back, that would make the waist half an inch longer and I'm already putting in an extra inch by marking ten inches per panel instead of nine and three-fourths.
But that will be divided: three-fourths of an inch of overlap at each side wouldn't be all that bad, and even in broadcloth, it will be easy to ease half an inch out of twenty when I sew on the waistbands.
Each of the four panels will have two selvages, one for a side seam, and one for a center back or center front seam.
Having found some pictures of eighteenth-century pockets on the web, I've decided to use the "my pants" broadfall pocket pattern, but add two inches at the back, then stitch off that section pencil-pocket style. That will give ample coverage under the slit, and I might even put something into the . . . let us call it a reading-glasses pocket.
I plan to do the full bit with passport pocket and watch pocket. Making the pockets will probably be the biggest part of this job!
But I'm going to make the four panels before I cut out the pockets. Unless I get antsy to make a new pocket wallet out of the scraps.
I wish I knew where to buy black muslin. Perhaps Dharma will have it by the time I use up the roll of broadcloth.
Yesterday, Sunday, I cut one of the pieces of black broadcloth into three pieces, and pressed the cut edges of the middle piece to the wrong side, which I'm going to turn over and use as a right side. It was very difficult to see what I was doing even though I was right under a light, and the off-bias edges weren't at all inclined to fold neatly. I think I'd better press the others over a straight edge of some sort.
I sewed a seam yesterday. Black on black wasn't easy, particularly after the sun got low in the sky and my fingers left huge shadows on the work.
I picked up where I'd started to pin a few days ago, and found that the pressed-in crease was pleated in one spot, making it unusable, so I pinned the other one. I was pleased to note that the torn edges match exactly; no offsetting to make the seam cross at the seam line!
After pinning, I pressed the seam as it lay, and also refreshed and corrected the crease on the other side. That crease is still flat this morning; the other one had unfolded in the days it had been lying around. Then I finished the seam in the usual pre-graded felled seam manner — much handicapped by the setting sun.
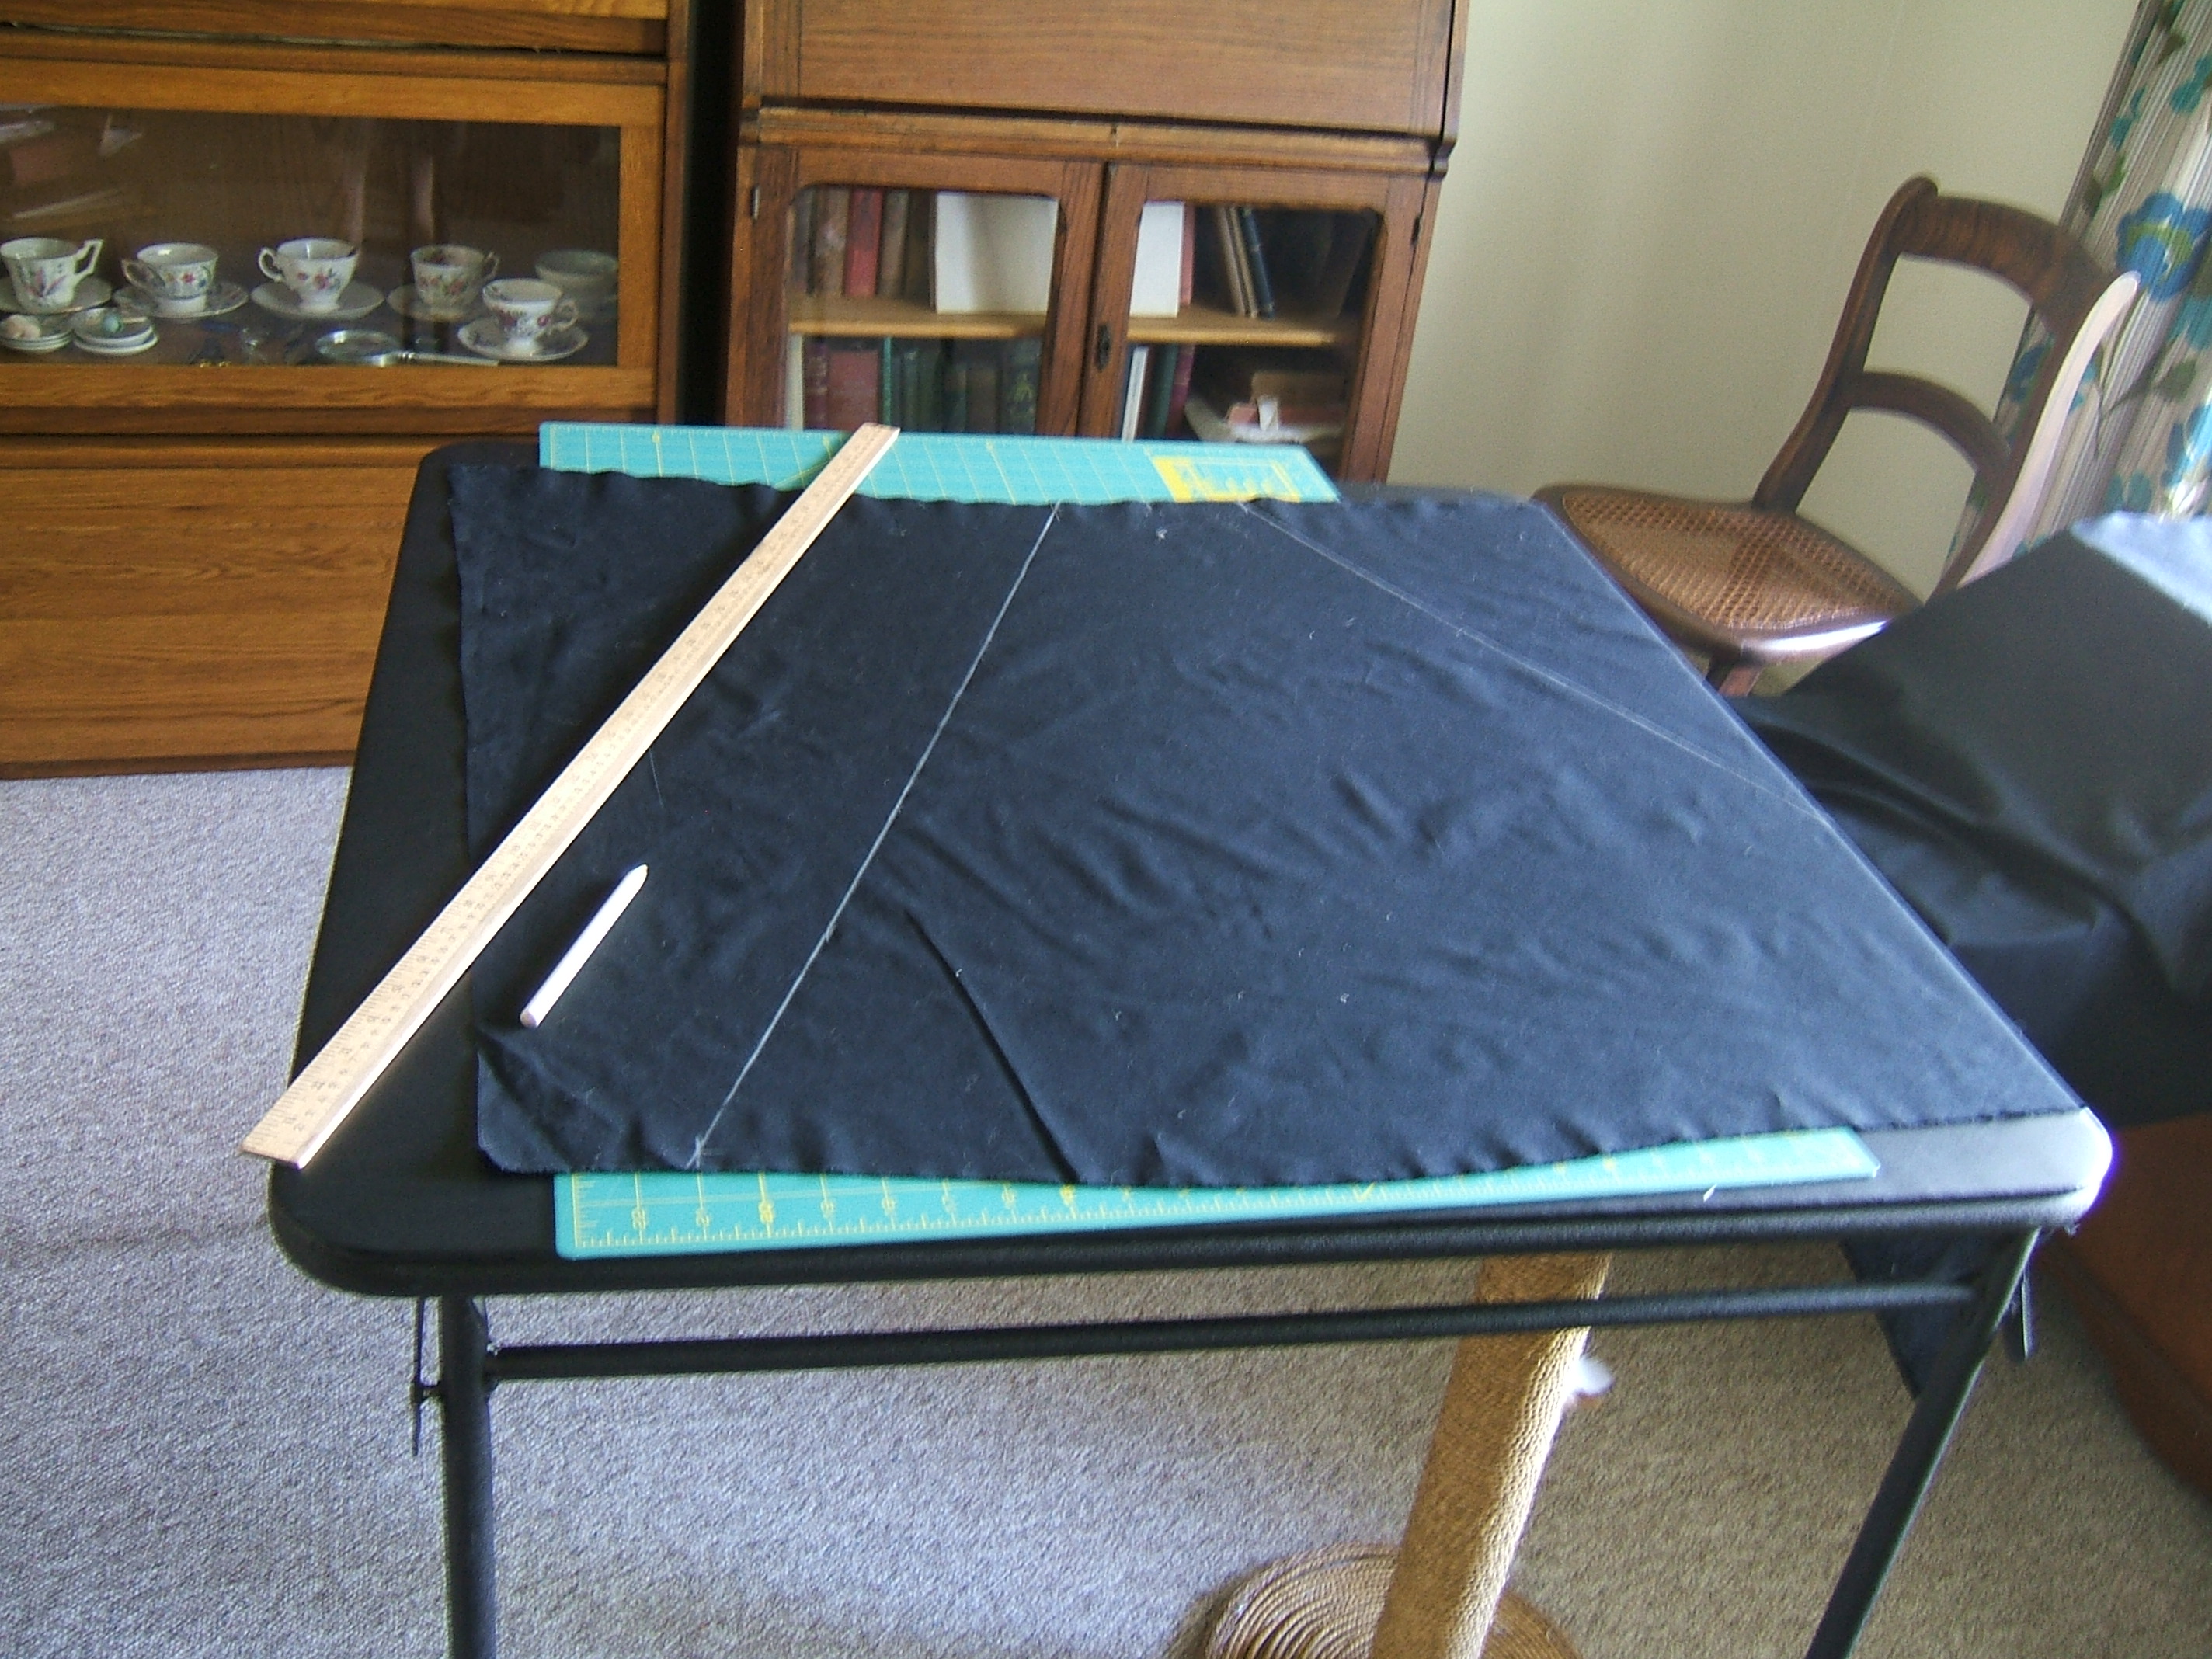
This morning I pinned the other seam of that panel, again having trouble with the light. The bulb over the ironing board burned out and I replaced it with a brighter one, but the light still shines straight down and casts no shadows. The traces of chalk on the edge of the fabric were a big help; when I mark the next panel, I shall be sure to make firm, continuous lines all the way, leaving nothing to follow with a ruler.
Off to open the White, after picking up this room to let Roomba in. The White is threaded with polyester, since only feeble cotton thread comes in black. (Well, King Tut comes in black, but I haven't tested its endurance yet, and don't care to wait for mail order on a beta anyway.)
I've suddenly developed an increased interest in finding eye tape I can use on a broadfall waistline. I no longer have the patience to sew on twenty eyes. But a skirt can be worn pinned forever, if the eye tape doesn't appear.
Now where was I? I shook some of the cat hair off the top panel, and when I got to the bottom of the pile, I found that a second panel is marked for cutting. The cutting marks cross the seam line six inches apart — three inches to each side of the center mark — at the top of the middle panel, and they cross the seam line three and a half inches from the selvage edge at the tops of the split panel. The panel is wrong-side up, so I can cut, then pin starter folds into the middle panel to show that they are to be pressed to the wrong side, which will be the right side of the middle panel.
Now I'm off to beat the cat to the card table.
⁂
After cutting along the first line, I decided to take "one panel at a time" one step further, and sew that seam before I cut the other one. Inefficient, but I am warming up.
Pressed the crease by touch and dead reckoning. I turned out the light to turn off the iron and pinned by the light from the window. After I thought of rotating the board a little, so that the light wasn't exactly parallel to the cut edge, all was plain to see.
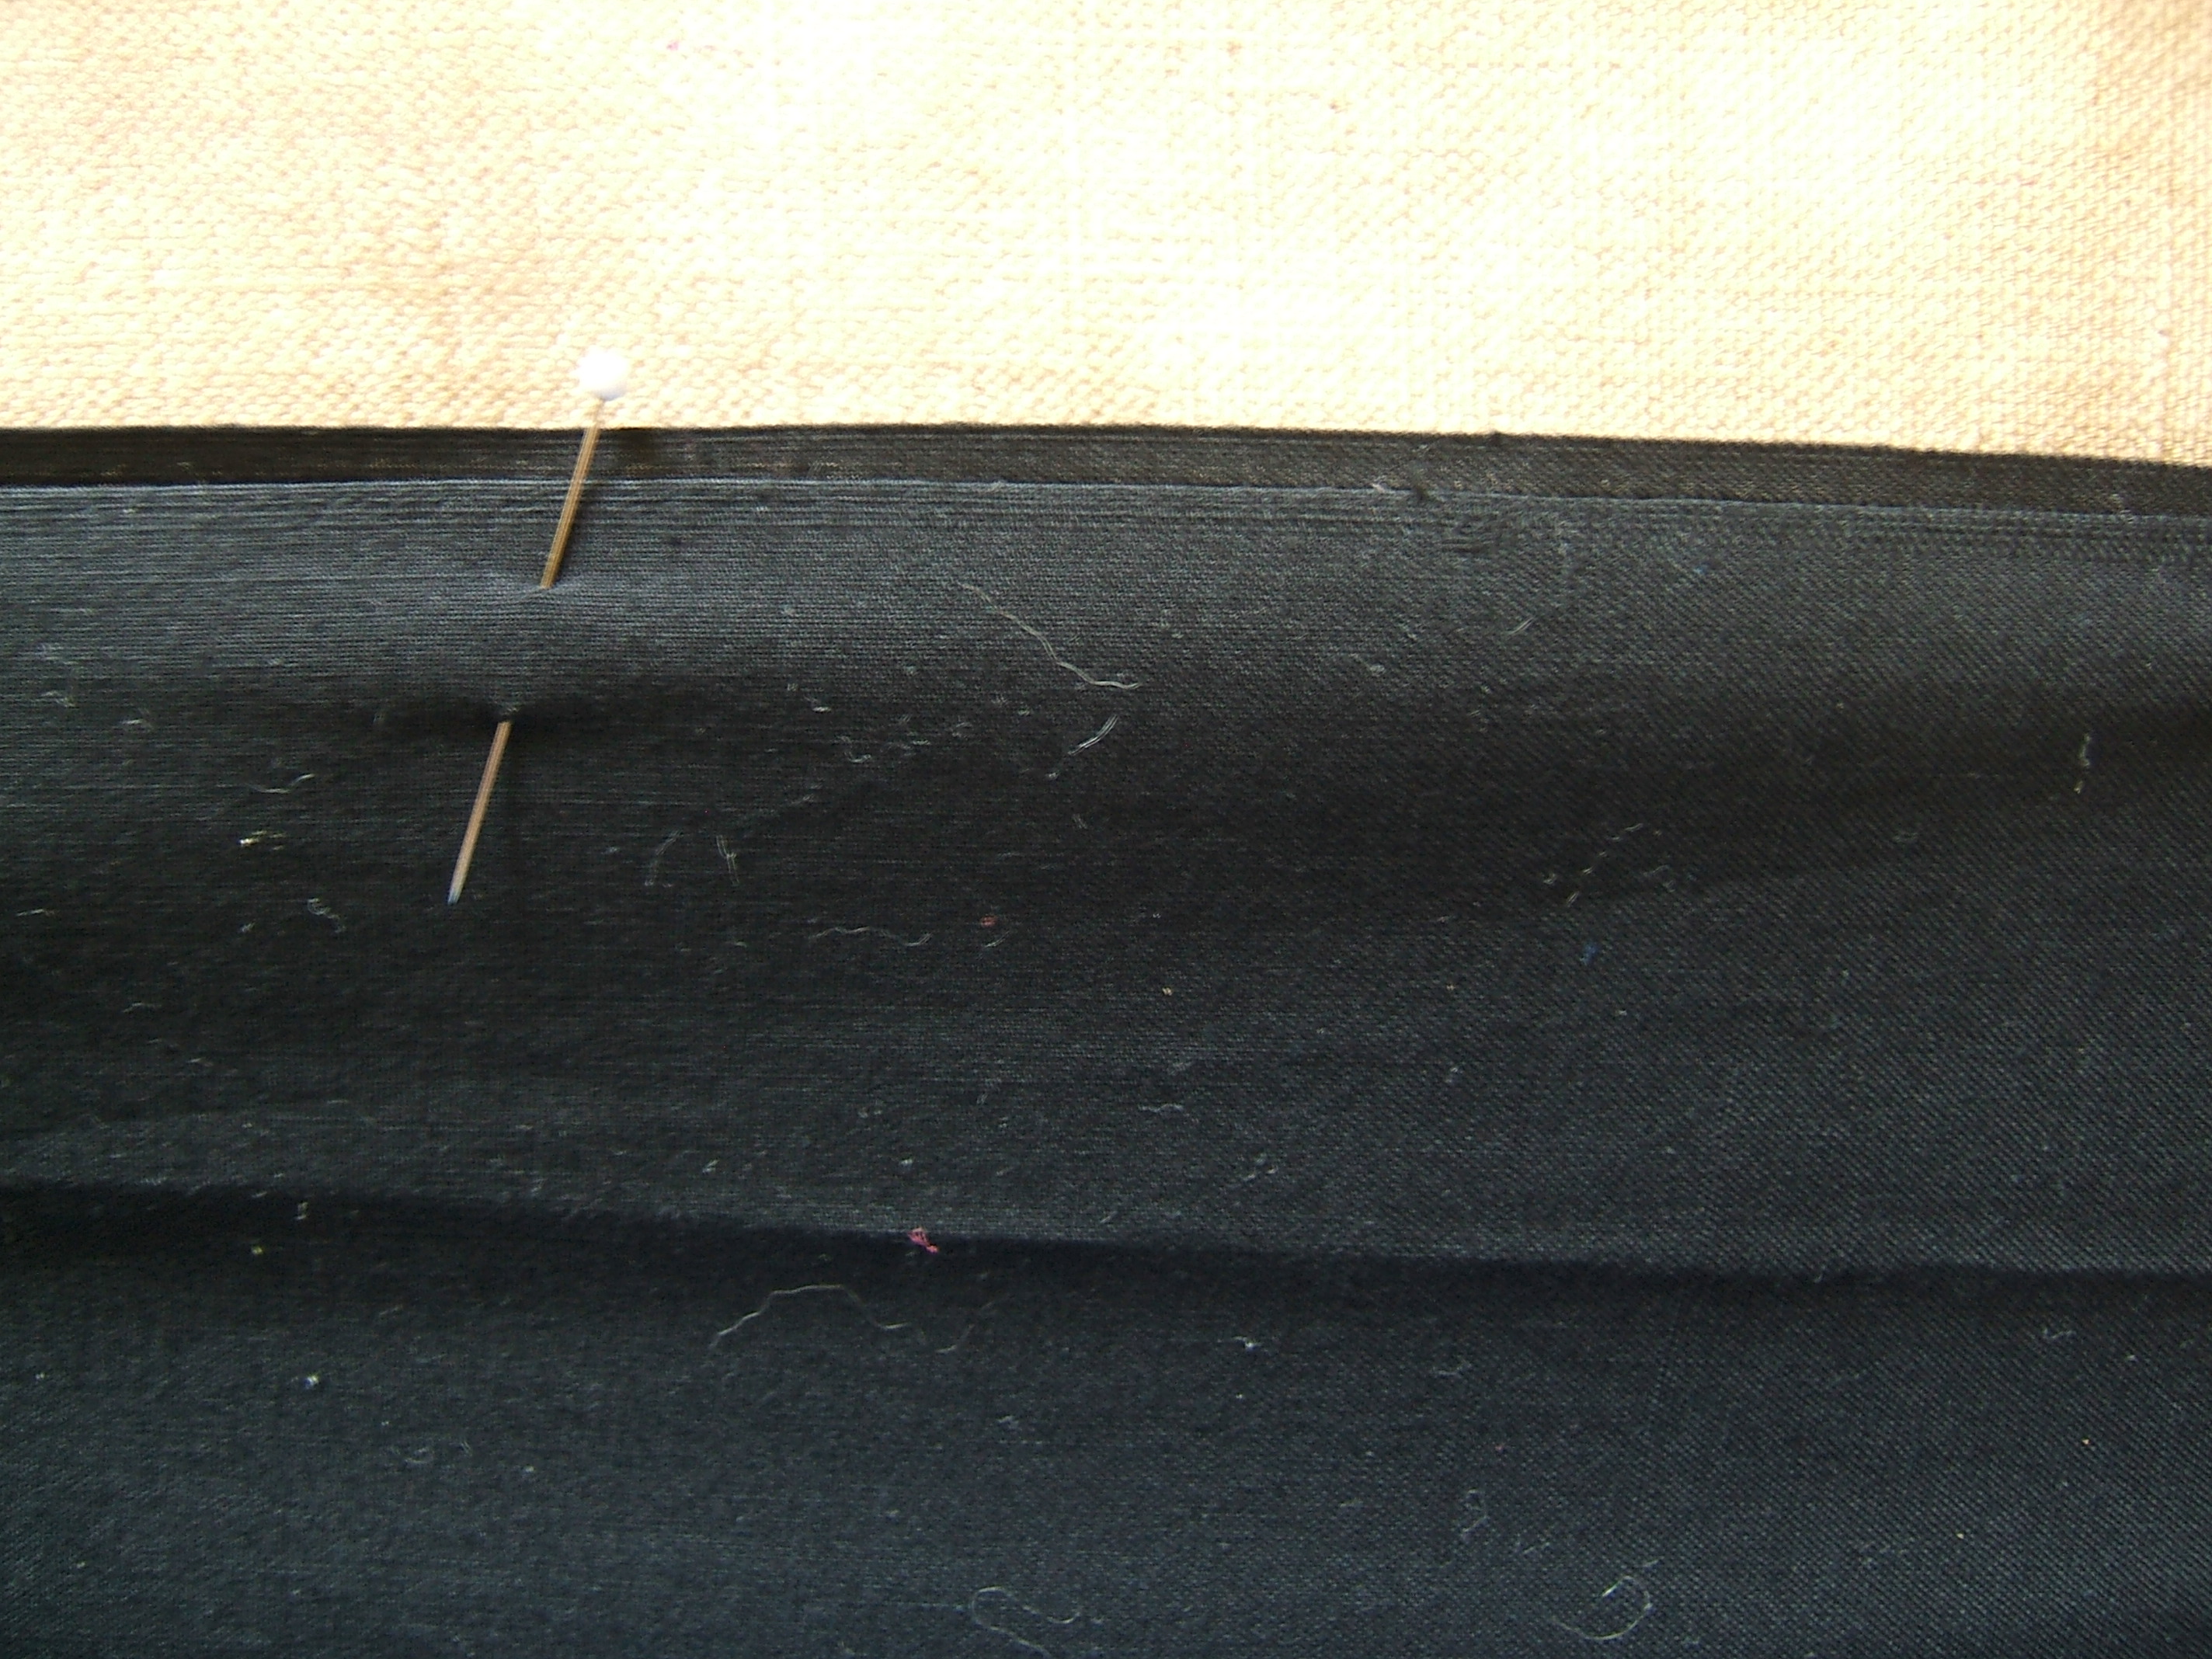
Then I sewed the seam, pressed it as it lay, ironed a press cloth into close contact, sprayed it with water, ironed it dry. sewed the fold of the flat-fell in, triple-pressed again, sewed the folded edge of the flat-fell down (I think that this step is the actual "felling"), gave the finished seam a swat with the still-hot iron.
Then I cut the other seam, and found that with the board still rotated, it was easy to see to press the crease even with the dead-overhead light on.
⁂
That should have been "quadruple-pressed" — after removing the press cloth, I give the seam one more swat to be sure it's dry.
And the pancake has one more minute to cook.
⁂
The nap is napped. I took a picture of the panel I marked, and now I'll go cut it.
⁂
Oops! After cutting the first seam, I realized that I'd marked with the grain arrow pointing down. Ah, well, it's a beta -- and I'm pretty sure that broadcloth is reversible.
⁂
While pressing, I reflected that this was going much smoother than heretofore. When I began to press the cut on the other side of the gore, I realized that I'd been pressing from the wide end toward the narrow end. So I rotated the piece, and pressing went just as smooth on this one.
The light in the sewing room isn't nearly as good in the afternoon, and in the evening, there will be none at all. It's good on the sewing machine, which is on the west side of the house, beside a glass patio door.
⁂
I got the third panel ready for "press as it lies", then it was time for supper and now the light is so poor that sewing isn't fun. I might fiddle with the photographs.
Tomato festival tomorrow, the next day is Sunday, Monday is wash day -- I hope I don't forget what I'm doing.
I've decided to put tapes on the skirt, like an eighteenth-century petticoat, instead of sewing hooks and eyes. Infinite adjustability! But I won't sew the pockets onto a separate tape.
The tomato festival was rained out, so after my nap I quadruple-pressed the two seams I sewed yesterday. Not strictly necessary, but the iron is hot for the press-as-it-lies, and the press cloth and the sprayer are right there. And stitching does go easier when the turn-under has been thoroughly subdued.
I find that pressing-as-it-lies also goes easier when I proceed from the wide end to the narrow end. I should also stitch that way.
⁂
So I made a point of doing the top-stitching from wide end to narrow, and it did go smoothly, but since I hadn't been paying any attention to direction before, I can't say whether it went more smoothly. Since I prefer to have the fold on the right when I'm edge-stitching, I presume that I did one of each on each panel.
On each of the first two passes, the starting scrap managed to flop over and get caught in the stitching. I'm not sure how it did that; I haven't had that kind of trouble before. The scrap laid flat and behaved itself when I was top-stitching the final free edge -- perhaps because I had a suspicious eye on it.
It did need the swat with the still-warm iron -- from wide end to narrow -- but I didn't quadruple press.
Three panels down, and I think I have time to cut the last one before it's time to fetch supper.
Didn't, but I cut out and assembled the final panel yesterday morning, before my afternoon appointment with the eye doctor. (Eyes are stable, come back in a year.)
Since it's Roomba day in the room where I keep the treadle sewing machine, I'm working on the pocket pattern instead of sewing the four panels into a front and a back (which is which will not be determined until I put on the waistbands.)
I got down both pocket patterns and found that the Injoo Kim pocket is an inch deeper than the My Pants pocket. So I tried on the last pair of pants I made by Injoo Kim, and found that the pockets aren't too deep, so I'll use that one to design my skirt pockets.
I intend to design the waistbands from measurements. I wondered for a bit which nail to file the patterns on when the job is done, then realized that since waistbands and pockets are all there is to this pattern, I should put it into an envelope in the pattern trunk. Been a long time since I did that; most of my patterns don't even have envelopes.
Since I know the height of the pattern, I think I'll tear a strip off the broadcloth before I make the pattern.
⁂
I don't agree with Fasenella's reasons for cutting waistbands on the cross grain, but it's so much easier to just tear two three-inch strips off the bolt that I think I'll do it. The broadcloth is definitely stretchier on the cross, but when folded four layers thick, it isn't going to stretch much. I'll use twill tape for the ties. I think I've got one-inch black.
⁂
An additional advantage of using the Injoo Kim pocket is that it has a pleat to fit the pocket to the darts in the pants. I added another pleat of the same size at the side-seam line, which is going to complicate the placement of the watch pocket. And the pocket is not caught in a seam, so the watch pocket can't be caught in a seam.
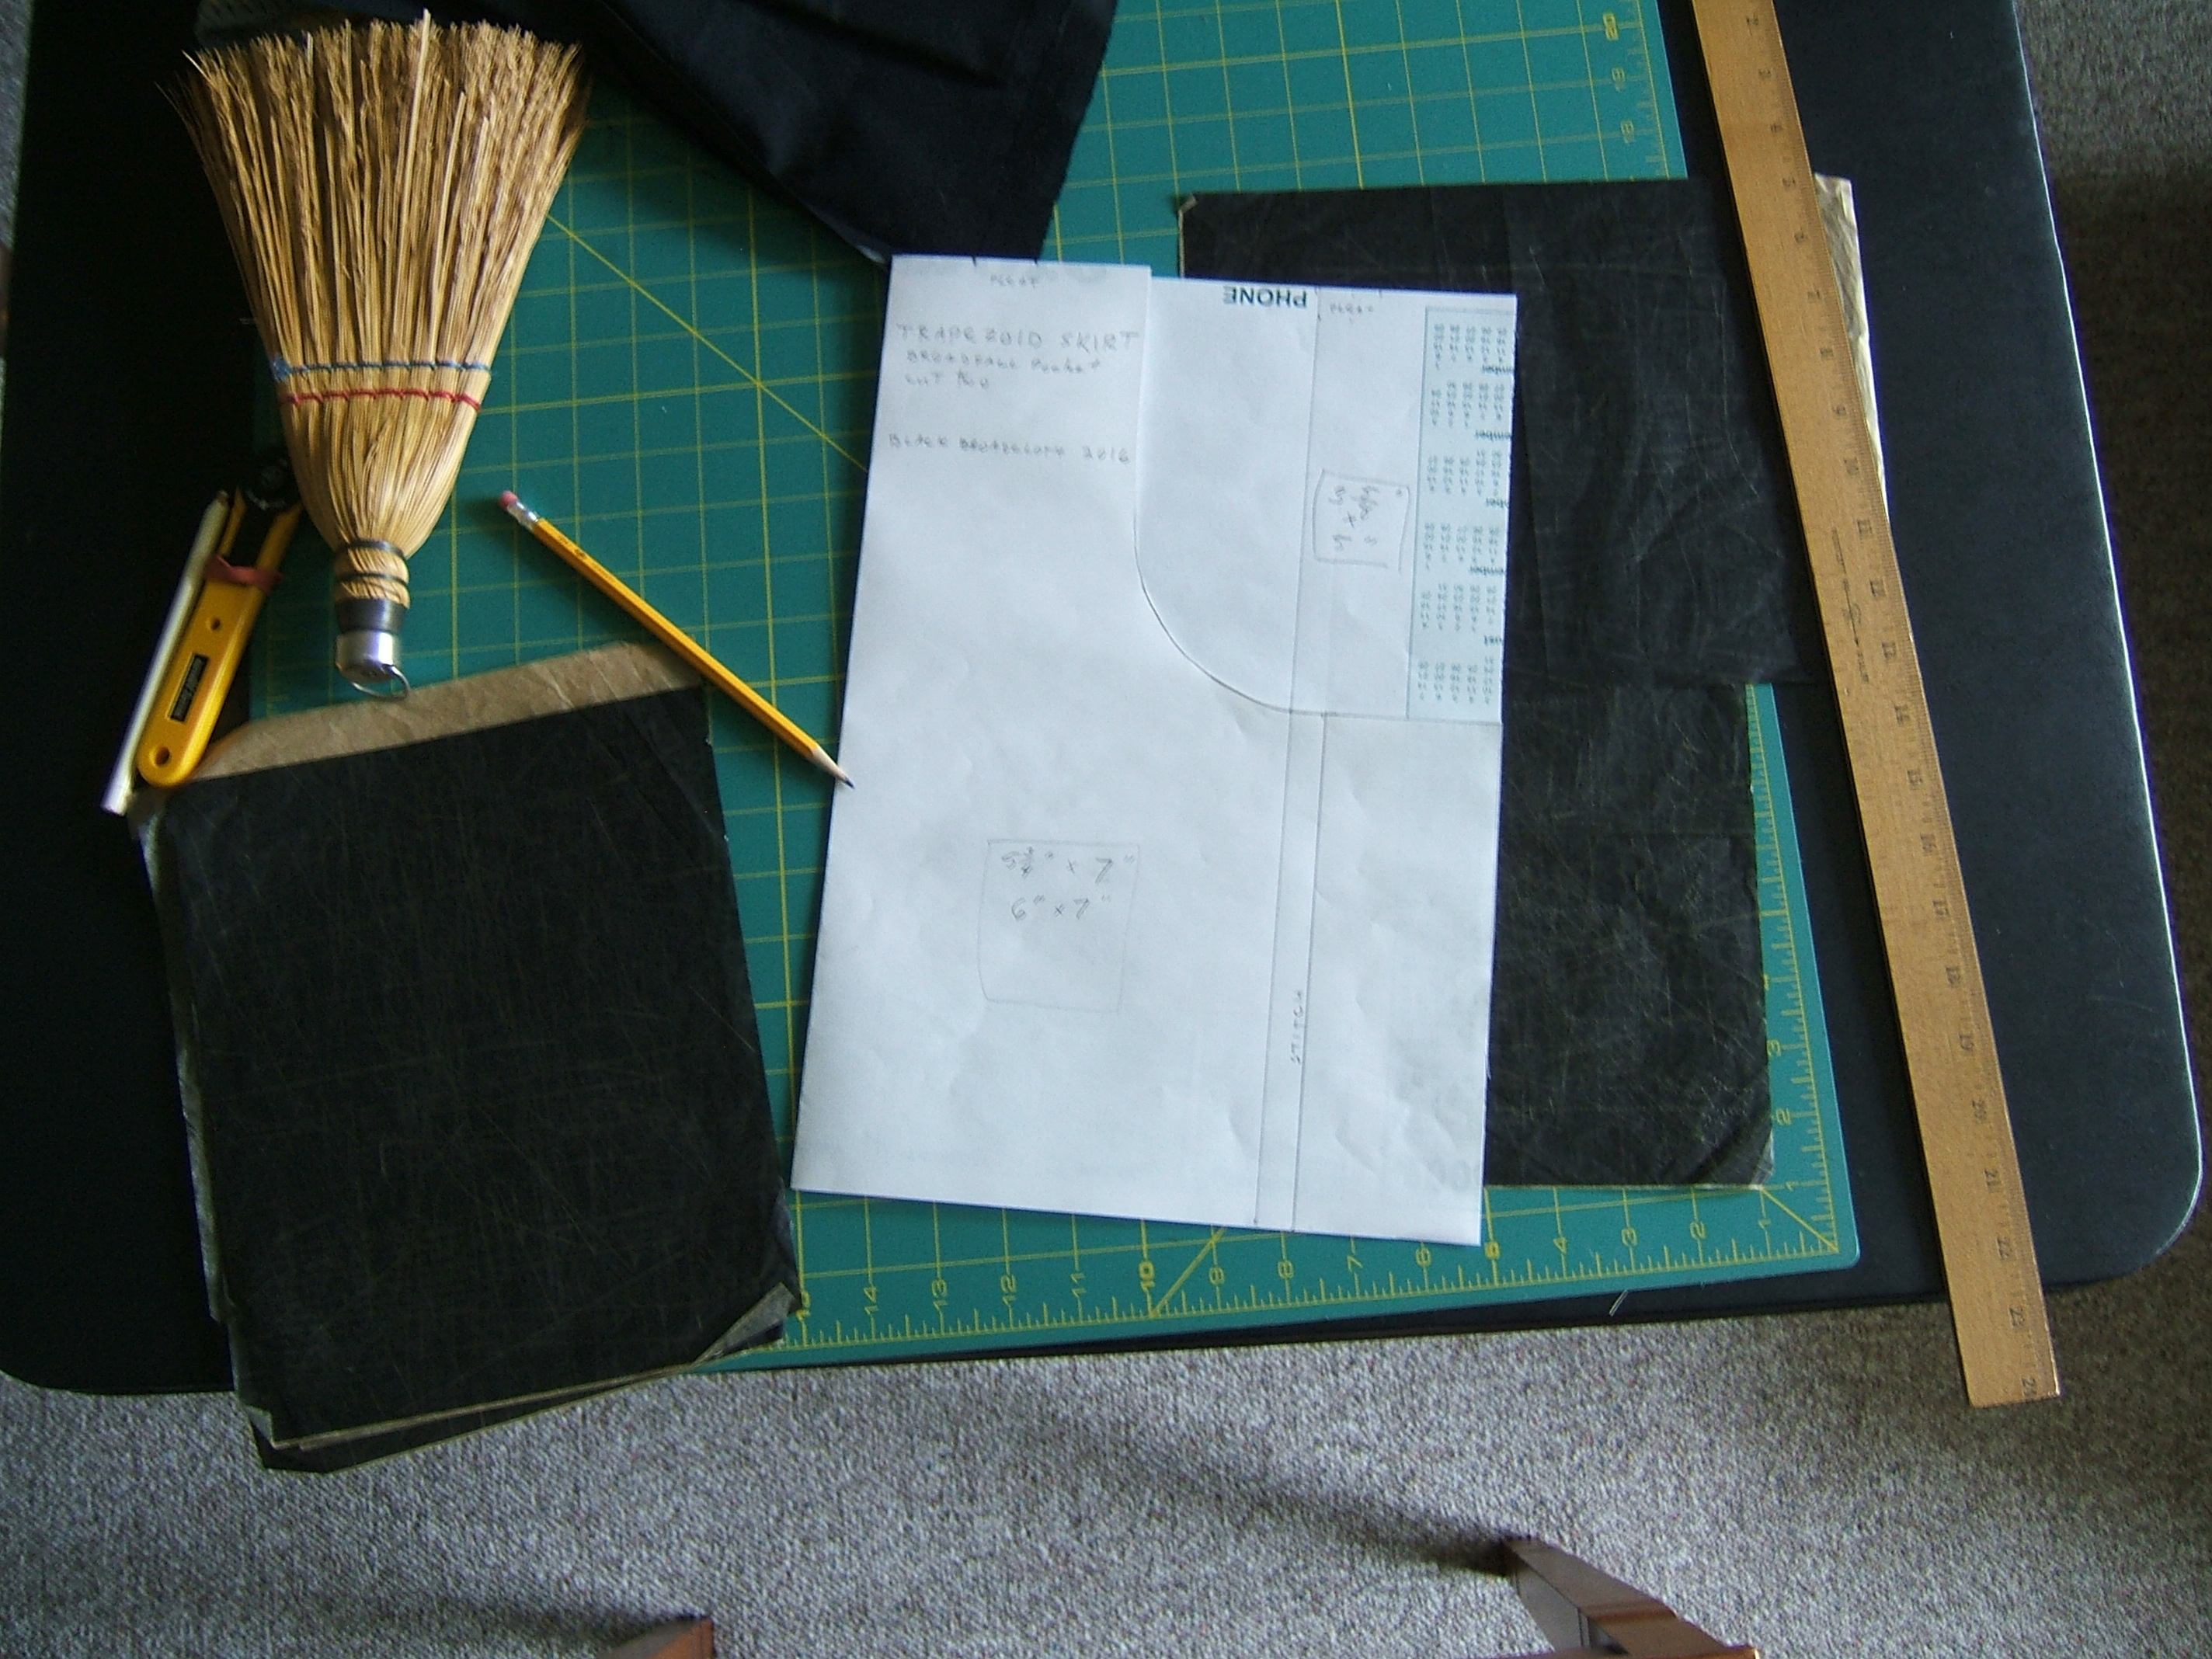
In the end, the pocket pattern is a 14 11/16" x 20" rectangle, with one corner cut off. Instead of drafting a passport pocket pattern, I wrote «5¾" x 6½"» on the pocket pattern. And lo and behold, the corner I'm cutting off is 5¾" x 7" -- but one corner is rounded. I'd best reserve those scraps for the watch pockets and tear a new strip for the passport pockets.
And maybe I'll make it seven inches long, to allow for the french seam. The space it is to fit into is 7½" high, and more fabric will be used up hemming the passport pocket than in facing the main pocket.
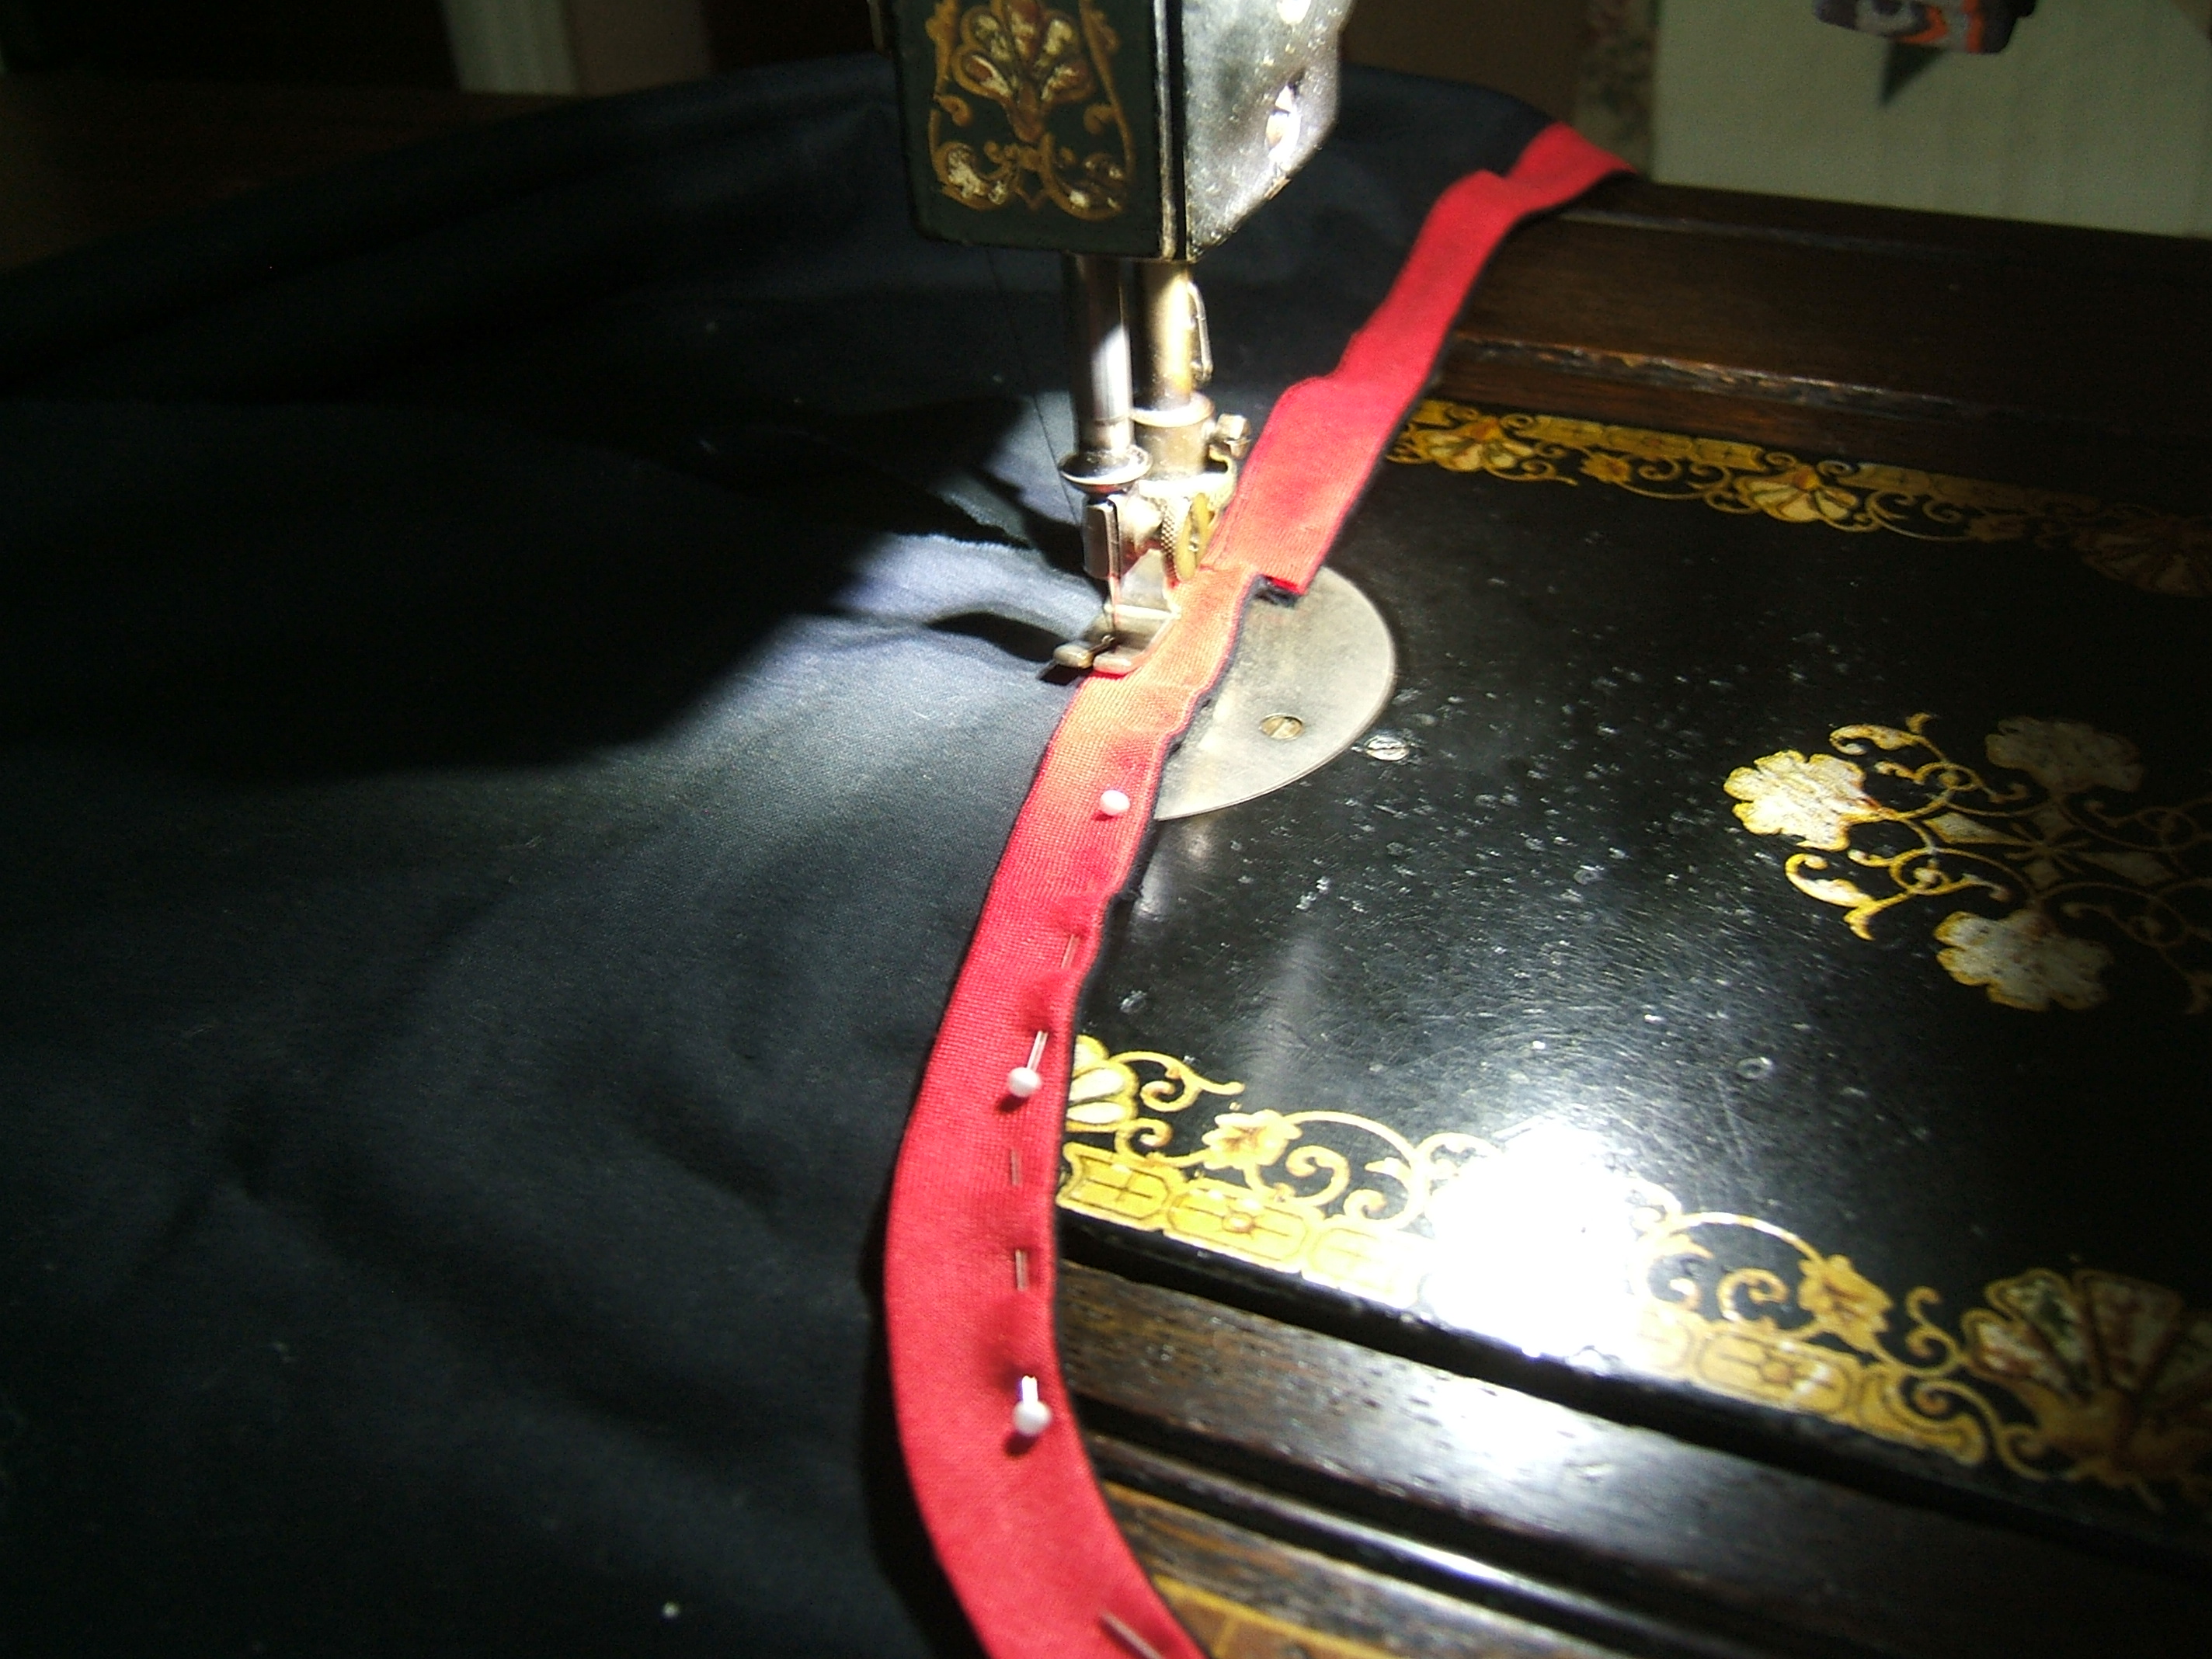
I think I'll use some of my vast surplus of red-ramie bias tape to face the pocket openings.
Urk. How do I make a square corner in a french seam? I think I'll bind the vertical edge -- with more red-ramie bias tape. Or perhaps I should use black in case it shows. Or, perhaps, make a mock french seam on the vertical edge.
I think that last thought is my best one. Simply press a quarter inch to the wrong side before beginning operations, top-stitch after the bottom is closed.
I've torn a strip for the pockets and two strips for the waistbands, rinsed them, and hung them up to dry. This took out a lot of creases!

Oops! The broadcloth has one good selvage and one with lengthwise wrinkles that can't be ironed out. I'd intended to mock-fell the bad selvages together at the center front and back, saving the good selvages for the pressed-open side seams.
But the panels are identical! However you slice it, there will be one left selvage and one right selvage in every seam.
Except the panel that I made upside-down by mistake.
I tore a seven-inch strip off the roll of broadcloth to be the passport pockets, and put it into a bucket of water to soak. Perhaps I'll spin it out tonight, perhaps I won't.
The scraps should be ample for making a pocket
bag wallet. Though I call
it my little bag of stuff -- not to be confused
with the big little bag of stuff in my go bag -- a
"pocket bag" is part of a pocket, and it's
confusing to keep calling it a pocket bag.
Besides, it has three compartments.
Remembered the seven-inch strip, wrang it by hand, hung it over the bar of a suit hanger. There was a lot of black dye in the water.
Both center seams are sewn. By turning the ironing board at right angles to the window -- or as close to it as I could with all the clutter in here -- I was able to see the woven-in crease and use it as a guideline.
No pressing was done; I just flipped the seam end-for-end as I finished each row of stitching and started the next one. Stitching the opposite way after turning the work over keeps the presser foot pushing the fabric in the same direction that the feed dog pushed it during the previous row, so there is less ripple.
Oops. I cut the waist an inch too big, thinking it would overlap half an inch on each side. But I'm going to have to cut it bigger still to change the angles into curves. I should have cut the waist an inch too short.
Weel, more overlap. And I may be able to ease some of it out. It's good that I'm using cheap broadcloth!
I hope to make another skirt of black raw silk. I already have a shirt made of Dharma's black raw silk.
I think I have enough black silk crepe to make a skirt and an overblouse.
It looks as though the length is going to be about right. I might up and not trim off the corners. Uneven hems are all the rage just now.
With people much younger than me.
An unexpected benefit of moving the KikStep from the garage to the sewing room and retiring the ammo box I used to stand on when plugging the iron into the ceiling: When the typing chair is in the bedroom and I want to pause in using the White to make a note here, I don't have to drag the chair back.
I cut the broadfall pockets this morning, and am in the middle of facing the pocket opening. For the first pocket, I folded the edge that will become a mock french seam — I was surprised that simply pinching it creased it firmly enough — and started pinning at the top so the excess would stick out at the bottom to allow for a fold under.
Because of the piecing seam in the scrap of bias tape I'd chosen (and because it is a mirror image of the first pocket), I needed to pin the second facing the other way. As I was about to pinch the pocket and leave a quarter inch of the bias sticking out, the dime dropped and I lined up the raw edges, to be folded under together when I press the facing to the wrong side.
Whoosh. This record is really going to need a pithy summary when I'm done. I doubt that I shall find the time and energy to write it. Perhaps I should take notes at the bottom of the file: "cut waist too small" certainly needs to be on it.
⁂
And this whole entry needs to be copy-and-pasted into the trapezoid-skirt file.
⁂
Resuming in the proper file:
I hemmed the passport pockets and the watch pockets entirely by finger-pressing, but I gave them a thorough press through a wet rag before sewing them to the broadfall pockets.
Also before sewing them to the broadfall pockets, I sat down here to add the above paragraph to this file, found that my previous entry was in the wrong file, and got involved in correcting the mistake.
Found a problem with my clever mock-french seaming to save turning a french seam around a corner: the mock-french seam doesn't go all the way up. But before getting too involved in figuring out how to segue into a hem, I realized that the side that does go all the way up is a selvage. No problem this time, but something to remember when I cut the skirt in a better fabric -- even if it does have good selvages, I'll have to remember to put them in the right places.
⁂
Duh! After carefully turning under one end of each bias tape, I realize that this end is going to end up inside a mock-french seam!
Using half of forty-inch fabric skimped the twenty-inch pockets a little -- but I have realized that I used the cutting line on the Injoo Kim pockets to mark the stitching line, so that adds half an inch.
Today, I intend to appliqué the pockets that I hemmed yesterday, then design a pattern for waistbands. I may mark both on one strip of deskpad paper.
I wonder whether offices still use desk pads?
I have decided what to do about the too-large waist: I shall pin it to the waistbands, fold back the excess fabric, and taper to a half-inch seam allowance at the hem.
Nap time and no pockets pinned. but the broadfall pockets are marked.
⁂
Just looked up black silk noil on the Dharma site. It's a nominal 45", currently running 42", shrinks ~6% in width and ~11% in length, so it would be half an inch narrower than the broadcloth, so the skirt would still be four pieces, and each would have started about a yard long.
Fifteen inches for the broadfall pockets, seven inches for the passport pockets, six inches for the waistbands: twenty-seven inches; that's most of another thirty-two-inch yard.
If I don't deem the fifteen-inch strip quite long enough for two broadfall pockets, I can cut them a little off center and piece the fly -- or not make it double all the way across. But I may have found a use for the reading-glasses pocket by then.
Five yards of black noil would be $37.95, plus shipping. Ten yards would be $69.90, so I'd best decide about any matching blouses etc. before ordering. Not to mention that buying all at once is the only way to be sure it matches.
⁂
Watch pockets and passport pockets are appliquéd and I'm ready to begin the french seam.
Eyeballing the centering of the passport pocket between the stitching line and the fold line was difficult until I thought of rubbing two corners of each pocket with chalk.
Just checked out the hole in the pocket of my sleazy "taxicab" linen jersey; I think I'm going to have to sew the patch on by hand.
The taxicab scraps are right on top of the box of linen.
Since my belly protrudes, I thought I'd measure from side-seam to side seam and make the back waistband shorter than the front waistband, but I have realized that with this style of opening, moving the pocket slits slightly toward the front is all to the good, so I shall make each of them half of the total length.
I do hope the black tape in my tape box is fast. The tape has been boiled and it's still black, so the dye can't be *too* loose.
⁂
Pockets made. Details tomorrow.
And I have ten minutes before time to roll.
I put the french seams in first. After the first stitching, I turned one inside out and poked out the corner with a 22mm wig hook I happen to have in the tool drawer of the White. (When you are a crocheter and see a well-formed steel hook, you buy it! So many "steel" hooks are wooden hooks made outa steel. And wooden hooks don't *have* to be a mere notch on the side of a dowel; I'm pretty sure that I once saw one with a proper hook carved into the end.)
It's probably lucky that at that point I decided that I needed glycerin on my fingers to roll the seam to the exact edge, because when I came back, I wondered why I could see the red facing on the pocket opening, and realized that I was doing a beautiful job of forming a french seam on the inside of the pocket, as if I were making a dress.
Polyester thread is fairly easy to pull out.
Starting over, I guided the stitching by running the toe along the edge of the fringe from tearing, then after turning the work right-side out, I guided to leave the fold just visible outside the foot. That enclosed the raw edge nicely. Then I sewed the mock-french seams with a U-turn at the top, the way I would appliqué a pocket.
I puzzled over how much space to leave at the bottom of the reading-glasses pocket, then started at the bottom, intending to pick out an inch later. Which I haven't done, nor have I made a bar tack at the top, so the pockets aren't made.
I folded the double part at the top in half, stitched -- timer!
⁂
the width of the toe from the fold, and basted the resulting pleat flat. Then I folded on the side-seam mark, and made a half-inch pleat the same way. When held up to my hip, the pocket seems to fit.
Tomorrow: the waistbands.
Roomba Day. I'd folded the ironing board up and put it in the bedroom instead of making Roomba sweep around it, as I usually do, so when I'd eaten breakfast and folded the socks that I forgot in the dryer on Monday and Roomba still wasn't done, I set up in the kitchen. This was the first time the muslin I draped over the ironing board got pressed, and it is already improved -- in the areas that I pressed on.
The light from the window wasn't sufficient so I reached for the switch to the light over the ironing board, then realized that slanting light is better -- especially when viewing black on black -- and switched on the other.
I pressed each waistband strip in half, confirming it with a damp press cloth -- what I've called quadruple pressing elsewhere, but a great deal of it is ironing. The I pressed one flat and turned one edge up to meet the crease mark, then re-folded on the center crease before confirming with a damp cloth. Repeat for other strip and other side.
Now to mark the side seams on the back waistband. I went through gyrations to copy the mark on the folded strip to the inside of the seam allowance, then realized that all I needed to do was to open the crease and fold the edge back to meet the mark on the outside.
Then I started to pin and realized that I was going to sew the wrong side of the pockets to the outside of a seam allowance that was to be folded to the inside. So what I wanted was the mark I started with, extended a bit.
Got the pockets pinned, wrapped the belt around my waist to see how they hung, and realized that I'd pinned them with the openings facing one another, as if I were making a front waistband. Also realized that I would be wearing the skirt over a blouse -- I'd tried it on over my shirt and pants, and it was too short -- so instead of making the side seams nineteen and a half inches apart, I want to mark them at twenty.
Which will be easier.
Off to re-mark and re-pin.
Though the waist unexpectedly came out exactly right, with exactly half an inch of seam allowance, the very simple side seams were both off, one by a quarter inch, one by five eighths.
I meant to trim the hem anyhow, but I think I'll sew the side seams of the silk-noil skirt, if I make it, before attaching the waistbands.
First I decided that since the bands were wide enough to go around my waist, it was silly to cut them off and sew on tapes. That gets me back to sewing on hooks and eyes, but four hooks and four eyes are a whole 'nother story from four hooks and twenty eyes! Not to mention that I might decide to use just one hook per end, instead of two side-by-side.
The upon noticing that the front band overlaps enough to make hooks awkward: Forget the eightteenth century! I'm going to make sashes to be tied in a bow in back, 1950 schoolgirl style. (Or, considering the design of the skirt, I should call it the style used for apron strings.) Maybe make the sash even wider than the strip I folded in quarters to make the waistbands. That was three inches; I think I shall tear off four. And the selvages will neatly finish the ends.
Still planning hooks and eyes for the back band, which will fasten in front. I'm going to be sorry that I sewed back and forth across the ends of the waistbands.
I'm ready to press the side seams open and commence handwork, but my stomach says that it's time for lunch.
Finally getting around to the handwork -- I got up to bring in the paper.
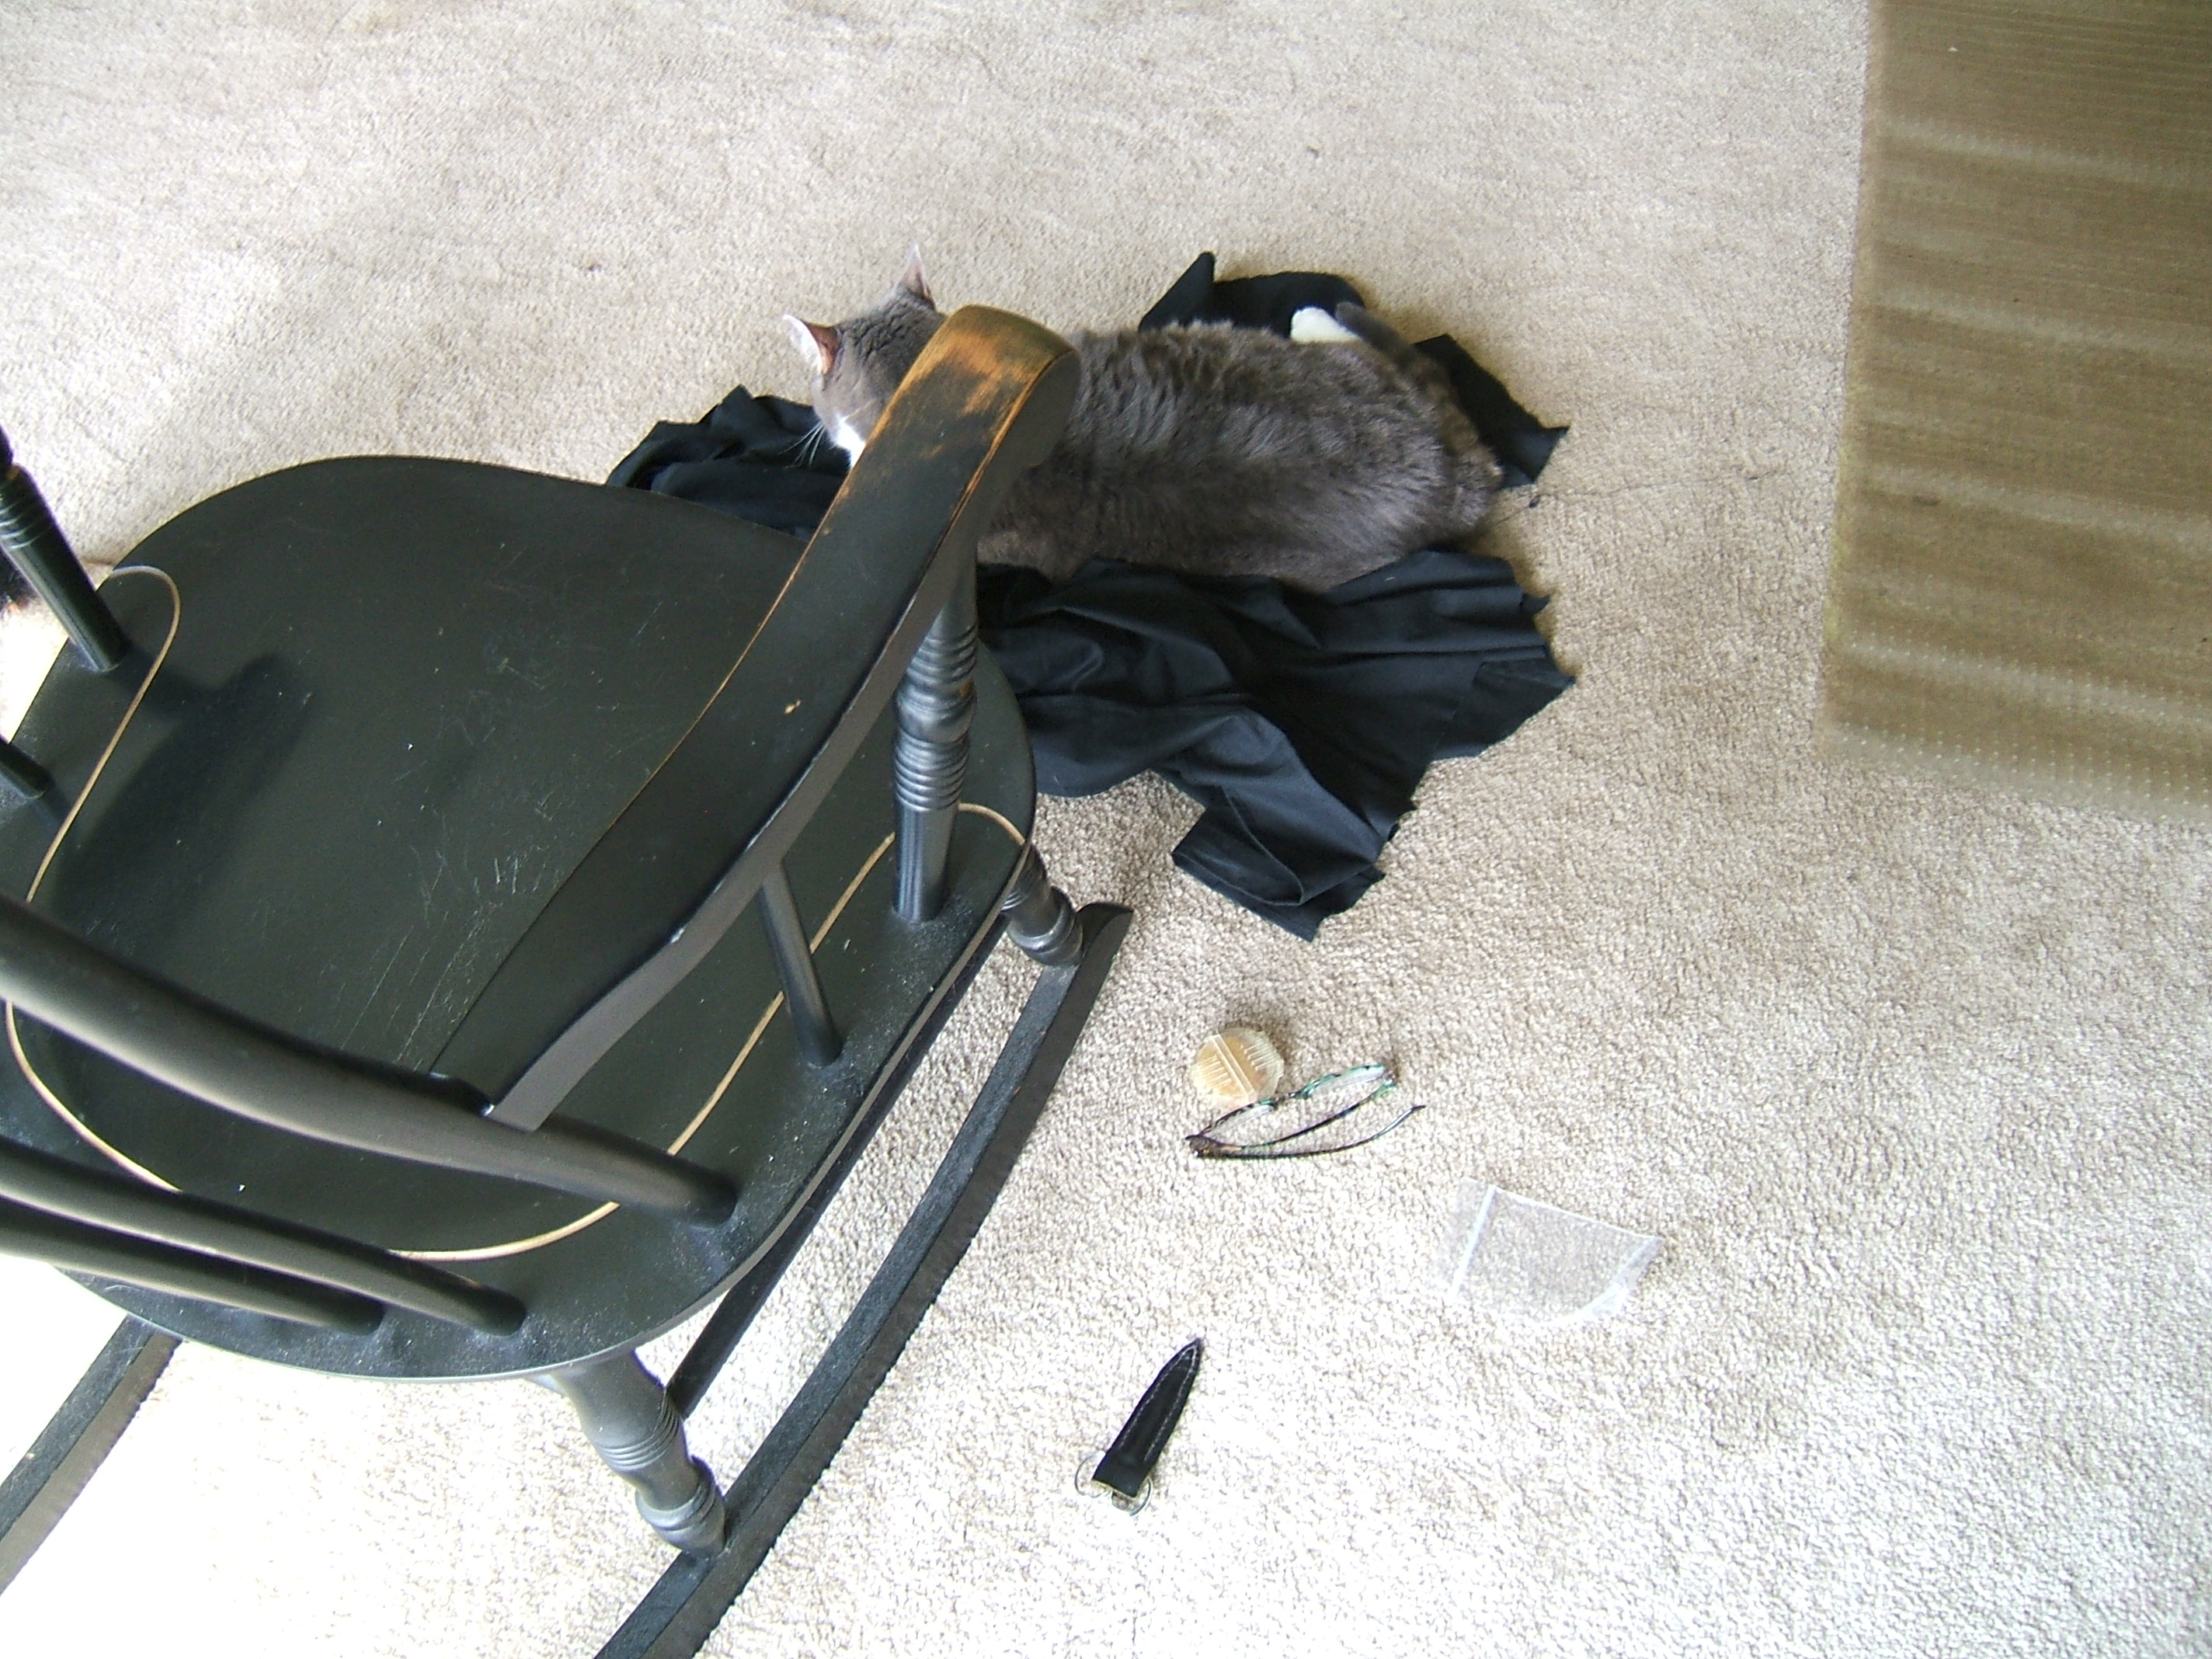
You will note that the tools I left on the floor do not include my thimble, and I didn't leave the spool of thread in that little plastic bag. He lost interest in the beeswax after opening the case once.
The skirt now lacks a few bar tacks and a hem. I'm tempted to turn the hem up the way it is, since uneven hems are all the rage. But I still want to wear my wizard suit for Halloween -- or, rather, The Family Fun Fall Festival.
The side seam allowances seem inclined to stay put without being sewn down.
The back waistband is long enough to tie in a square knot, but just barely. I may sew a short piece of twill tape to each end, but just appliquéd on, not neatly tucked inside like the sashes I sewed to the front waistband.
I tore off a four-inch strip crosswise, hemmed the torn edges, tore it in half, pleated the torn ends to fit inside the ends of the waistband, found that the pins I'd secured the pleats with interfered with sticking it into the waistband and basted them. Couldn't get the basting out after stitching over it, but I pulled out what showed and trimmed the ends close. I'd used black thread in case that happened. When I make the real skirt, I must remember to break the basting thread and never turn and go back.
A tied skirt is much harder to hang up than one that you can hook together before pinning it to the hanger.
Haven't touched the skirt today. I've been sorting my yarn collection. That job sort of expanded; I'd forgotten how many places I've stashed yarn in. I hope that in the process I'll find my black persian and #000 needles so that I can resume knitting in waiting rooms.
I found two of the 000 needles.
All yarns back on the shelf.
The theme for the Family Fun Fall Festival is the fifties, so I'll wear my trapezoid skirt after all -- over my wizard suit. The sash is also fifties -- but it's for girls too young to wear circle skirts, and should be a half sash on a dress. And it was more late forties than early fifties.
It's also an authentic fifties apron tie.
Frittered away most of the day, but I did press a hem into the skirt. A most uneven hem, but it's for Halloween. I turned it just once, and plan to zig-zag over the torn edges. Widest zig-zag, longest stitch, to be easy to take out.
I was shooting at half an inch, and mostly went over.
It took a long time to press all eight sides. I can see why felt was the fabric for poodle skirts! Especially considering that we sewed hems by hand in those days.
My double-circle skirt was factory made. I presume that it had a narrow hem top-stitched by machine. I was mostly interested in how FULL it was, and never looked at the hem or the construction.
I wonder whether one of those is in a museum some place. Wikipedia redirects from circle skirt to the article on poodle skirts, which is only a stub, and somewhat made up.
Today I zig-zagged the hem, sewed a piece of twill tape to one side of the back waistband so that I could tie it in a slipped square knot, worked bar tacks at the top of the spectacle-pocket divisions of the pockets, worked bar tacks at the bottom of the side slits, and ripped the side seams back to the bar tacks. The skirt is in the closet under "archive", next to my wizard gown and ready for the halloween party. I intend to trim the hem even after the party so I can wear the skirt to church.
Wearing it to a party will tell, but I think that pockets accesed through a slit need to be farther forward than broadfall pockets. That would mean adding four inches instead of three, and setting the side seam an inch behind the pocket division.
The waistband of the back half rides a bit below the knot holding the front half. Won't matter if I wear it over a black shirt, I suppose.
I originally planned to sew tape to both ends of the waistband, but realized that one long piece would work as well as two short ones. I sewed it to the short end of the band, so now the knot comes center front instead of on the left.
I wonder whether it would be better to make the entire waistband out of tape, as eighteenth-century women did?
⁂