Best viewed in a narrow window.
Inspired by the above illustration from Jessup's textbook -- and a rash promise to teach a class at Creative Kids Camp -- I invented this project as a way to introduce children to the use of a needle. It turned out to be inspired: making medallions can serve to teach any level of needle-handling, from the baby who scribbles with markers on a scrap of fabric that an adult mounts for him to the highest level of skill. I've also found that the class can be compressed to fill up small scraps of time left over from other events.
I think that adults can use these medallions to practice new skills or warm up for large projects, but I'm going to discuss them as a way to sneak sewing lessons to children under the guise of playing with embroidery.
The original class made Christmas-tree ornaments by attaching a loop of thin, wiry nylon thread to the medallion. When the class is repeated at various baby-sitting gigs, the children have been content to hang them from eighth-inch ribbons and call them necklaces, or keep them plain and call them medals. If one is doing the work calmly at home, it should be possible to attach a pin to the back and call it a broach. You will recognize that the technique for covering cardboard circles is very similar to various traditional techniques, such as covering buttons.
My original idea was to make two medallions and sew them back-to-back to make an ornament that is pretty on both sides. This suggestion was met with such horror that I haven't brought it up since, but I still carry a bobbin of sewing thread to all lessons, just in case.
Draw a circle on the fabric.
Running-stitch around the circle with a strong thread. End with both ends of the thread on the right side of the fabric.
Draw up the stitches until the fabric is gathered all the way around the circle, then flatten it enough that you can put the cardboard circle inside.
Tie the first half of a surgeon's knot in the two ends of thread. Pull the ends of the thread until the fabric is tight around the cardboard circle. Finish tying the surgeon's knot.
Put the medallion right-side-down on the ironing surface, press the edges with the tip of the iron all around. Pull firmly on the excess fabric while ironing, in order to make the gathers orderly. Ease out the gathers as much as you can.
Trim off excess fabric with small pointy scissors, pulling on the excess fabric all the while so that you can see what you are doing.
Cover the medallion with a press cloth and press firmly with the hot iron, then twist the iron back and forth to get the trimmed edges nice and flat.
Cover the back as desired. Notary seals don't come big enough, so I use a label cut from construction paper with an old pair of pinking shears. (Fancy-edge shears for paper can be found in scrap-booking stores.) Paper is easier for the children to write on anyway, said the fox.
So then I thought that I could buy cardboard circles at the scrapbooking store, or at least a die and some posterboard. But they didn't have anything as plain as a simple circle, and the nearest thing to a die was a punch, which came in too big and too small, was harder to use than a die, wasn't guaranteed to work on cardboard, and was too expensive.
Cardboard coasters such as restaurants use would work, but they are way big and I suspect that one couldn't buy retail numbers of them.
So I ended up inspecting all cardboard boxes that were on the way out of the house, and saving pieces of any particularly-good cardboard. Now I have a large enough collection that I insist upon corrugated board that's as thin as posterboard, but the standard thickness works perfectly well.
I use a flat lid intended to seal a home-canning jar as a template for cutting my cardboard circles. It happens that a plastic coaster which was also lying around is just enough larger than the canning-jar to serve as a template for drawing the circle for the gathering thread.
I found it very difficult to cut neatly around a circle drawn on cardboard. Eventually, I hit upon using an Exacto knife with a triangular blade to poke holes all around the metal template. Then I could cut neatly by poking the knife into one of the holes and pushing until I broke through into the next hole. Needless to say, I cut my circles well ahead of time, and don't let the children see the scalpel!
The round boxes that sour Altoids come in are convenient for carrying my supply of cardboard circles and some of the other small items required. The rectangular box that the "curiously strong" Altoids come in nicely fits a stack of packets of needles, together with scraps of felted wool flannel for giving away single needles. It's rather a pity that the lids are embossed; the flat tops of Sucrets boxes could be redecorated without making the boxes take up more space. Ah, well, labels stuck to the bottoms of the boxes are good enough.
Iron
Sleeve board
Plywood
Towel
Press Cloth
Floss
Sewing Thread
Gathering thread (strong, not meltable)
Tape winders for disordered floss
Needles: crewel, tapestry, darning,
Thimbles
Adhesive Tape
Hoops
Cardboard circles
Construction paper for making paper circles
Pre-cut paper circles
Glue sticks
Waste paper
Osnaburg Strips
#2 pencil
Pens for writing name and date
Sharpie markers for small children
Fading marker
Iron-on pencil
Transfers
Pre-marked tracing paper
Plain tracing paper
Drafting tape
Plain paper
Designs
6" ruler
Tweezers
Scissors
# 8 Crochet Hook
Wax
Needle threader
Pinking Shears
Exacto
Template (lid)
Cardboard
Ribbon
Empty calling-card sewing kits for giving away needles.
Sandwich bags to put partly-done designs in.
magnifying glasses
doll needle
Water bottle
Make sure a wastebasket is nearby.
If you don't have space for a sleeveboard in your bag, a towel on plywood works just fine.
The towel stayed on the list after I started carrying a sleeveboard because it comes in handy when I'm packing away a hot iron.
I have discovered chenille needles: big eyes, sharp points, not awkwardly long. I still display darning needles -- the very biggest was chosen by a boy who spent time "just watching" before deciding that a big kid could do it too. I didn't tell him I'd brought the big needle for babies!
Tracing paper etc. is for marking more designs on blank fabric. Children have not shown interest in making new transfers, but I sometimes run out of a design and stamp more, and one boy designed directly on the fabric.
The iron-on pencil should be part of this group, but it's convenient to list it with the other writing implements. (After all, I carry it with the other writing implements.)
For attaching ribbon to finished buttons: force hook through fabric (be sure to take a bite big enough to hold), pull the middle of the ribbon through the hole, pull the ends of the ribbon through the loop just created.
It's also handy for tucking in short ends.
Likewise, I put "drafting tape" on the list so that the children could trace their own designs, but I ran out of tape, it hasn't been convenient to buy more, and the children have shown no interest in tracing their own designs, so I don't bother with it.
If I am making pre-marked tracing paper, I will now center the coaster -- the gathering-circle template -- inside the circle that is just a line's width bigger than it, and draw around it with my iron-on pencil.
If I'm making a transfer, I'll trace the design first, then mark the gathering circle.
I have various clip-art designs, and I've printed out dingbats from fonts such as Wingdings, but the most popular design is the six-petal flower made by drawing a circle with the compass, then drawing six more circles with their centers on the circumference.
For a Valentine's Day gig, I made a few designs by tracing around cut-paper hearts.
REVISION NOTE:
I finally realized that the gathering-circle mark should be a dashed line, to mark each individual stitch.
I made this pattern
 out of Open
Office Draw's 24-point star, but upon trying it
out, realized that the stitches were needlessly
short and the drawing had un-necessary
parts. I re-opened the drawing and deleted
one of the two stars and the pointless outer
circle, then dragged the "attribute" of the star
so that the points touched the outer of the
remaining two un-necessary circles:
out of Open
Office Draw's 24-point star, but upon trying it
out, realized that the stitches were needlessly
short and the drawing had un-necessary
parts. I re-opened the drawing and deleted
one of the two stars and the pointless outer
circle, then dragged the "attribute" of the star
so that the points touched the outer of the
remaining two un-necessary circles:

Do as I say, not as I did: to create a similar dashing guide, open a drawing program and look for the flowchart symbols. "Summing junction" and "or" are quartered circles; make one of each, one about twice the size of the other. They will mark the center of the drawing to make it easier to line up your designs.
Now draw a circle the width of your gathering circle, a circle the width of your cardboard circles, and a 24-point star bigger than your gathering circle.
"Format Position and Size" to place the centers of all these figures in the same place. While you are in this menu, check to be sure that the height of each figure is equal to its width
Drag the attribute of the star until the rays are about as wide as the spaces between them where they cross the gathering circle.
To use, put the pinhole your compass left at the center of the tracing paper over the center mark, tape the paper down (removable correction tape will do if you have no drafting tape), and trace the parts of the gathering circle that are inside the rays. Or the parts that are outside the rays if you prefer, but don't get confused and do some of each.
I give the child a fresh piece of waste paper -- discard every sheet instantly when done, so that it won't get used again by mistake -- and he puts the circle face down on the waste paper and strokes a school-glue stick out from the center, coating all the points of the zig-zag edge. (If a parent tells him to swirl it around in the middle and leave all the edges loose, just forge on without saying anything. The child can learn how to paste later.)
Consulting the child as to which way is up, I center the paper on the back, cover it with a fresh piece of waste paper, and rub it down, using the closed glue stick as a burnisher.
REVISION NOTE:
The children can write just fine on paper circles cut calmly at home, and pre-cut backs will keep neat and fresh in a sour-Altoids tin. Use plain white paper as well as bright colors.
Even in frantic condtions, the child can place and rub down the backing. But I'd better find a dedicated burnisher.
How much of the work I do and how much the child does varies with the age and experience of the child. But I hang onto the iron regardless of age; even an adult will sometimes burn himself, and I'd just as soon the child got *that* lesson at home.
When possible, I leave the stamped fabric in strips, marked into squares by snipping between the designs and starting to draw a thread. When a child has selected a design, he has to draw out one or two threads to show me where to cut. (Scissors kept in pocket! Don't forget to put scissors back in pocket!)
[I have purchased a "key caddy" to keep my scissors attached to me, but have yet to use it during a lesson.]
Since the fabric is loosely woven and the thread is very short and already loosened in its channel, success is guaranteed -- and the idea is planted.
(Squares don't have to be perfectly square; width of squares is adjusted to neatly fill the length of the strip.)
The stamped squares should always include a few that have the gathering circle and nothing else.
I've forgotten why I made these scans, but I think
I can use them somewhere. Stand by for
updated page.
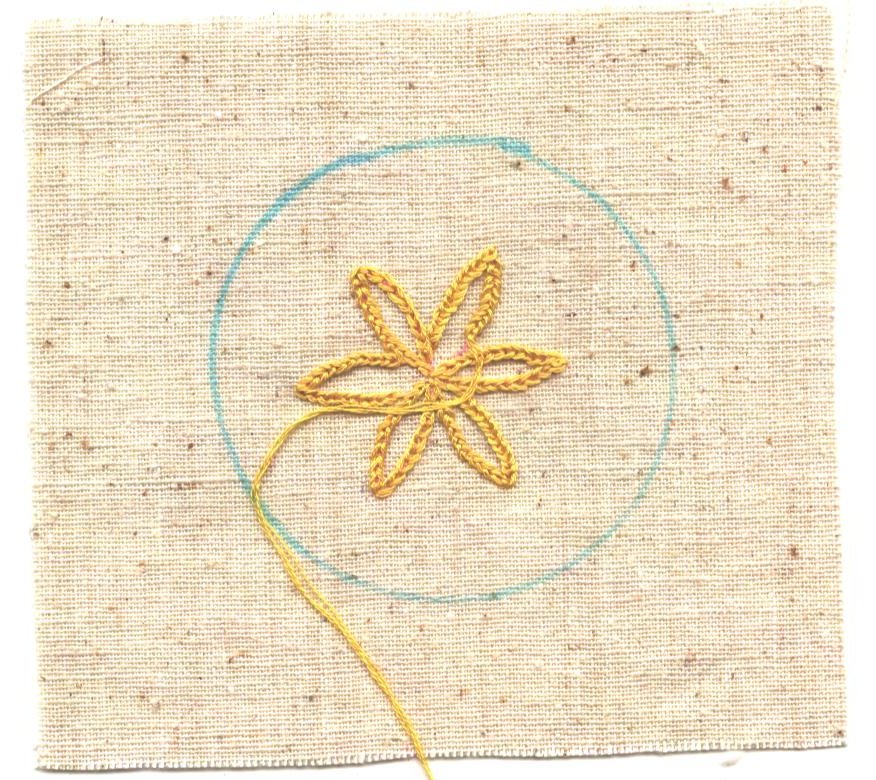
Work intended to be eternally in progress.
I waited for business longer than usual last time
and came perilously close to finishing it, so I've
created a harmonizing design that I can work for
the other side.
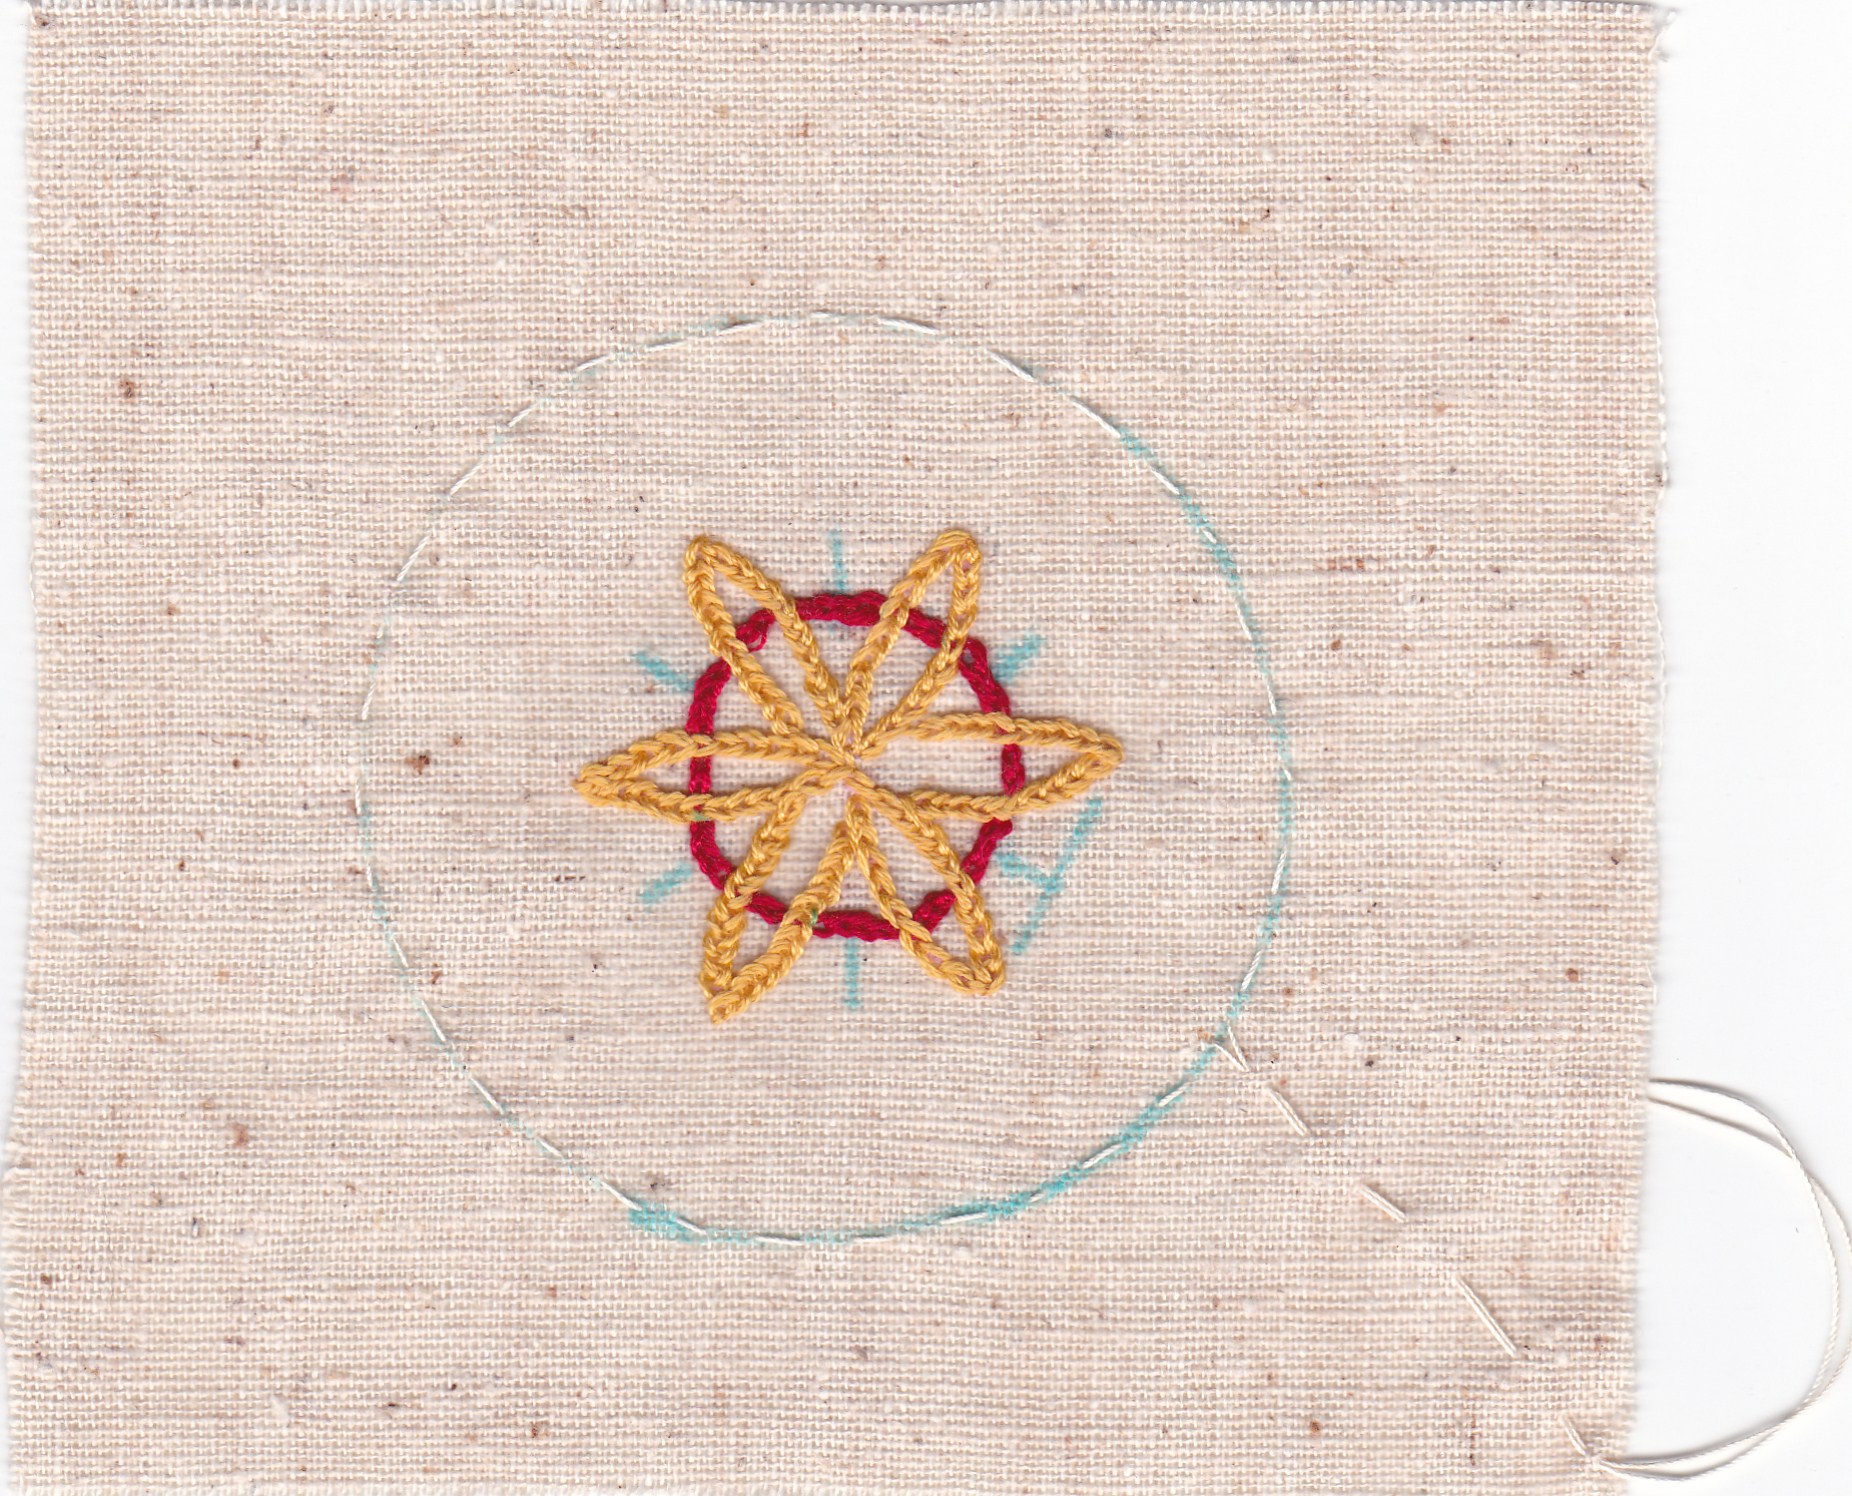
Sample medallion. I've forgotten why I made
it.

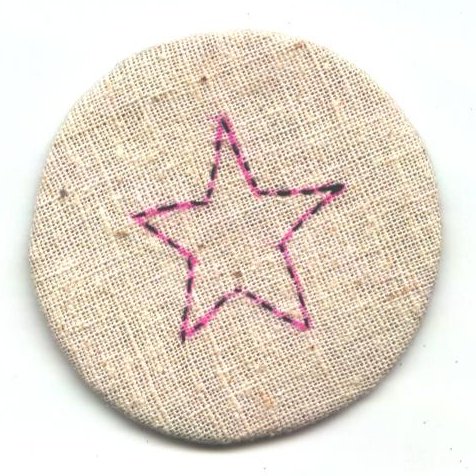
Back of above medallion, and back of one I made when I needed a finished sample in a big hurry and mounted a scrap of linen print. Star left unfinished to show construction.
Cut out a whole bunch of cover-the-back papers yesterday and put them into a sour-Altoids box. I had had no idea that I had so many colors of paper! At least six colors of typing paper, but only one color of cover stock. I was minded at first to use only the bright yellow of my construction paper, but cut one each from the dull and faded-looking colors -- including a charcoal gray intended to be black even though I have no idea how a child will write on it. On the other hand, the fading marker *did* show.
I suspect that I'd have done a better job if I'd cut them one at a time under the un-nerving gaze of an idle child; one gets tired of being very, very careful very very fast. Not to mention that one needs a lot of spares when doing them in advance; I cut three of most colors, and it took most of the morning. I seriously need some sort of die for this job. I think some re-enactor's supply houses sell pinking dies for making raw-edged frills. (Elegant clothing wasn't washed in the days before dry cleaning; they just made very, very sure they didn't get it dirty.)
Today I put the junk paper into a labeled 9 x 12 envelope to make it easier to put the backpack back together next time.
Yesterday I marked two 9 1/2 x 6 1/2 enevelopes for the new designs and the left-over tracing papers; I left the deprecated designs in their flat plastic bag. All three went into the flat-rate envelope with the colored papers, designs to trace, check list, etc.
After I cut a new strip of osnaburg, I think I'll be ready to put the backpack back on the shelf.
Some details in 2015 sewing
diary
The backpack is packed, and I'll take it to the church this evening and set up for tomorrow.
New idea: yellow fabric, draw own happyface. Couldn't buy plain yellow fabric, bleached two semi-sheer yellow-orange scraps, pasted yellow paper on cardboards. Only two samples; will see whether the children like them.
Discovered that scraps of "petal pink" linen-cotton work. Decided not to take any to Day of Helping, as would only confuse. (Also couldn't decide which designs to print on them.) I put some pieces into the box where I keep stuff I'm likely to want later.
Realized that my paper sewing kits [insert link here] would be better than tin boxes for giving away needles, made six, put into snack bag with six razor blades and six wool swatches. I'm taking the bag of tin boxes anyway.
Bought two pieces of beeswax at the Farmers' Market, added to supplies.
I've been using Open Office Draw to create designs directly on my dashing guide. Then I mark over the ink lines with transfer pencil; tracing paper may be obsolete.
The embrodery gig was a resounding success. Having a competent assistant makes all the difference in the world.
I should make white aprons for the staff -- if we are asked to wear white shirts again next year.
Somehow, I missed getting a name tag. So did Megan. It all worked anyhow.
The sewing kits are obviously better than tin boxes for giving away needles, and I intend to take the needle swatches out of the tin boxes, put them back into the tin-box box, and use the bag they are in for tin boxes containing cardboards, backing papers, and so forth.
I need to take sandwich bags to put sewing kits and partly-done designs into.
I also need to take some tape winders -- the cardboard rectangles that used to come in bias-tape packages -- because a skein of floss will get disordered. I wound it around an old sewing kit that I had found in the backpack and thrown in with the new ones. <pauses to put half a dozen tape winders into a snack bag and put them near the backpack, which I left on a table in the parlor.>
We used up a whole box of cardboard circles and part of another. I mounted six medallions (I counted the trimmings under the sleeve board before I threw them away), and we sent some cardboard circles home with people.
The very thinnest corrugated cardboard is apt to bend while drawing up the gathering thread.
I took some old adhesive tape, and some electrical tape that has dried up into drafting tape, but did not use either. I intend to put the electrical tape back in the bike closet (Note: look for it there!), but leave the adhesive tape in the backpack.
I snitched a mug from the kitchen to put the writing implements in -- and forgot to wash it before I left. Someone else probably took care of it; I didn't notice it on the counter. If not, I'm going to the kitchen before church anyway.
I found the mug in the sink, washed it, and left it in the drainer.
Halfway through the sermon I realized that I'd missed an opportunity. During the lessons, someone asked whether we sent "the round things" home with people. Distracted with other things, I said "no". Heavens to Murgatroyd, I have way too many hoops, and having a hoop might have made the difference between giving up and sticking with it.
I've put the ugly plastic hoop that has never been used on top of the pile of hoops as a reminder. That one is to be given away first!
#30 thread is way too thin for gathering thread. I'd broken it twice before I started handing out double strands. The first time, the knot held, and the second, I was able to get hold of the broken end and pull it out as long as the other -- I did use ridiculously-long pieces of thread.
I was sure I had an old spool of button-and-carpet thread. I thought I had two, one gray and the other black. I've put button thread on my list; I can come back past Lowery's after going to Marsh supermarket next week. Or, perhaps, go to Lowery's first and come back around the south end of the lake.
Perhaps #10 thread isn't too thick after all. I'm using chenille needles now.
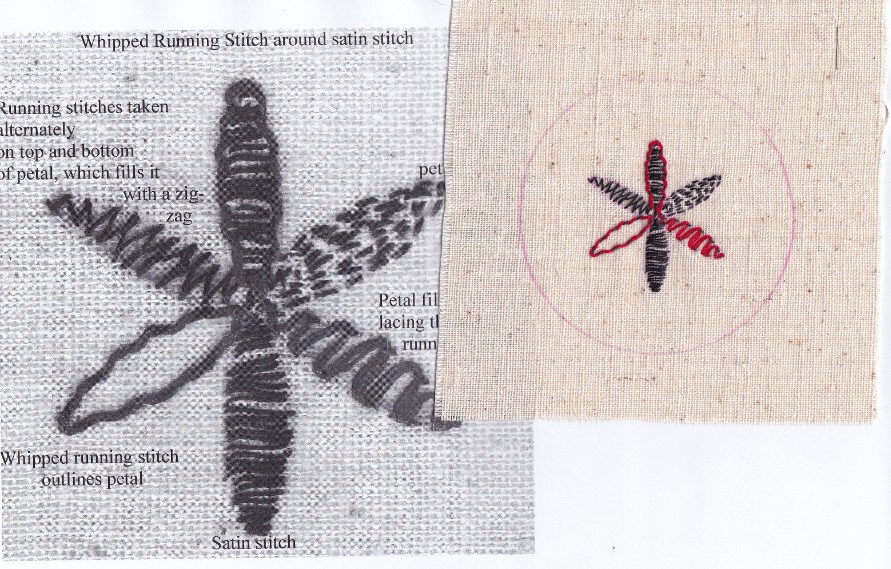
Perhaps I should make a new sampler to show what can be done after outlining a design with running stitch.
One petal with a second thread woven through, one with a second thread whipping the running stitch, one with the thread laced back and forth across the petal — there are at least three ways of doing that. The remaining petal should be left plain. Laced petals alternating with outlined petals -- I've got a design! And, unlike the previous sampler, I've got black floss; this one should look much nicer.
On the other hand, I could use red and blue.
I need to get the backpack off the card table, so I'd better list what needs to be done:
Cut more cardboard circles
Buy another packet of #22 chenille needles. I'd love to go back to Nappannee to the store where I got the first packet, but it will be a long time before I'm in shape for that ride, so I'd better get them at Lowery's.
Stamp more designs, and cut another strip of blank osnaburg. I don't know where to get more fabric that's coarse but not too coarse, but what I've got should last at least another year.
Perhaps I should also include a strip of washed osnaburg, because often adults prefer not to mount their work, and they can deal with the denser weave. And an adult can deal with stamping a design.
Make more empty sewing kits. Photograph process.
I've already inventoried the backing papers and selected sheets to cut more. I'll leave that job on the piano when I put the backpack away.
I thought the sandwich bags, like the designs and the blank tracing papers, could be stored in nine by six envelopes. Alas, the bags are precisely as wide as the envelopes -- on the outside.
I've got nine by twelves around here somewhere.
A doll needle or a large darning needle makes a good pointer when supervising stitch-by-stitch, and can be used to poke a hole where the next stitch should begin.
I've left the paper, pinking shears, template, a craft mat, fading marker, and box of backing papers on the closed keyboard of the piano, and now and again I'll pause while passing through the parlor to cut out a backing paper. Makes it much easier to concentrate on cutting pink-by- pink. I'm doing blue at the moment, and when I've cut a few red, I'll put all away.
I found my packet of mixed typing paper and put another sheet of blue into the pile that goes into the Priority Mail envelope because I plan to cut up all that remains of the old one -- we ran out of blue backing papers entirely, so I suspect that it was a popular color.
The scrapbooking store in Sprawlmart is no more, but I've learned that the Buffalo Street Emporium has "essential scrapbooking supplies", so I plan to stop there sometime soon. Paper-cutting dies do exist, according to the Web, but whether they are usable, available, and come in an appropriate size remains to be seen. None of the people selling dies on the Web tell you what size circles their dies stamp.
I have established that there are no scrapbooking supplies in Warsaw. I'll try to remember to check the crafty-wafty section of any big-box store I enter. Google Maps says that there is a scrapbooking store in Shipshewana; that would be a good stop on the way back from Bonneyville Mills -- if I had a place to rest for an hour before driving home
Today I put the backing papers I've cut, the #22 needles I bought, and the cardboard envelope back into the backpack, and got out all the cans of cardboards. To my surprise, there are at least two cardboards in each of the three cans. <checks> seven white, three yellow, and five fine. I'll want to fill all three cans before the next Day of Sharing, but there are worlds to go on with if I get a gig at Kiddy Kollege. Mrs. Nier is out of town this week, so I'm excused from asking about it for a while.
I need to sort the designs and stamp new ones, but if I have only one student, I can show him the transfers and stamp only the one that's wanted, so I've no excuse for not speaking to Mrs. Nier.
Except that I'm chicken.
While cleaning out drawers today, I found some adhesive tape and put it into the backpack.
I added "doll" to the needles entry of the check list. It should be elsewhere, but I don't know where.
Um, right after "magnifying glasses", I think. At my last gig, I found a doll needle very useful for saying "make your next stitch here: it can make a hole that will persist until the child has passed his needle through it.
I see that I've mentioned this before, but didn't think to put it on the check list.
Scanned the current state of the busywork samples today. Four files: original scan plus cropped and scaled scans of the original busywork square and the one I started when the original threatened to finish. I'm hoarding red, blue, and yellow floss so that the colors will continue to match however long it takes to finish. I'm hoping that I'll get enough gigs that I finish soon; when I do, I'll sew the two medallions back to back.

I need how-to-finish sheets to put into the plastic bags with half-done projects. I have decided to copy "the basic idea" from this file to a subdirectory (MEDFIN) of RUFFTEXT, edit it into a tutorial complete with many colored photographs, then copy that into Open Office and edit it into something that can be printed. Will I finish before the Day of Caring?
I just looked through the pictures in EMBROGIG_FILES, and none are suitable. I shall have to take all-new photographs.
-->