On New Year's Day, I wore the undershirt I was designing at the beginning of last year, under the floral blue linen salwarish kameezish tunic-and-jeans suit I started in 2009 — 2008 if you count making the beta tunic.
I haven't worn the beta tunic enough to wash it. A knee-length shirt is too formal for walking around the block, and blue plaid shirting just won't do for dressing up. Perhaps I should make a pair of matching shorts and wear it as a mini-dress.
Another shirt that gets very little wear is the wrong-side-of-misprinted-linen shirt I hastily cobbled together for our trip to Australia, when I realized I didn't have anything white, long-sleeved, and cool. The only time I need long sleeved linen and don't care how I look is when I go for a walk in the bike trails on a warm day, and I've been taking all my exercise on streets these last few years.
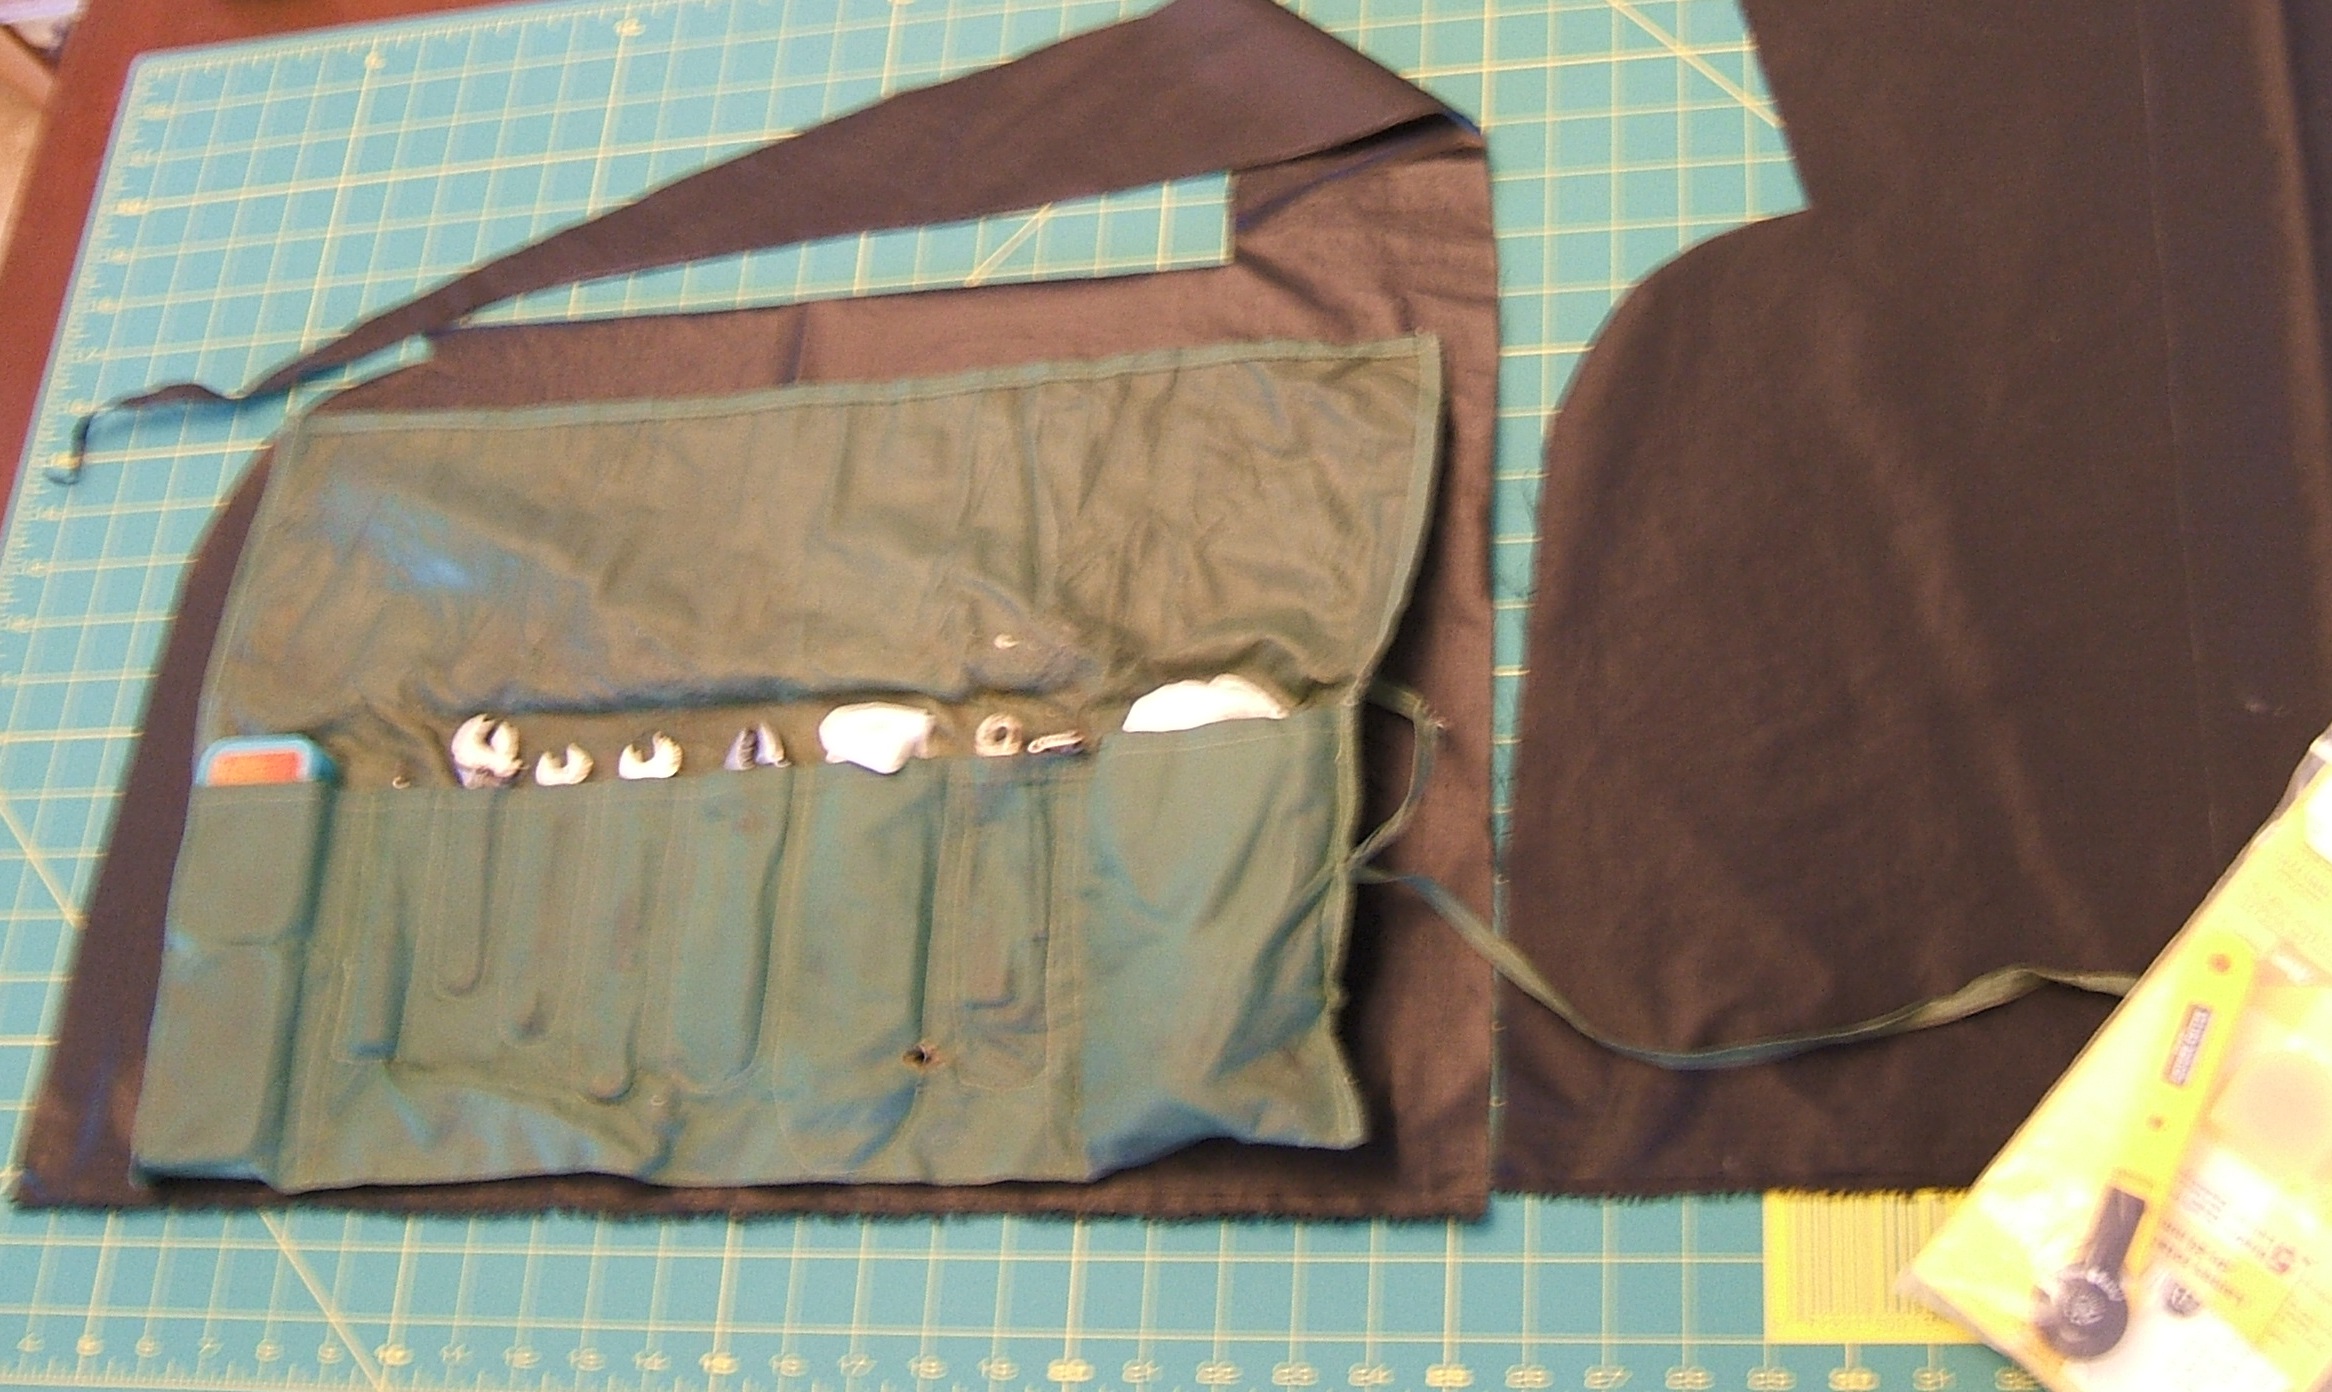
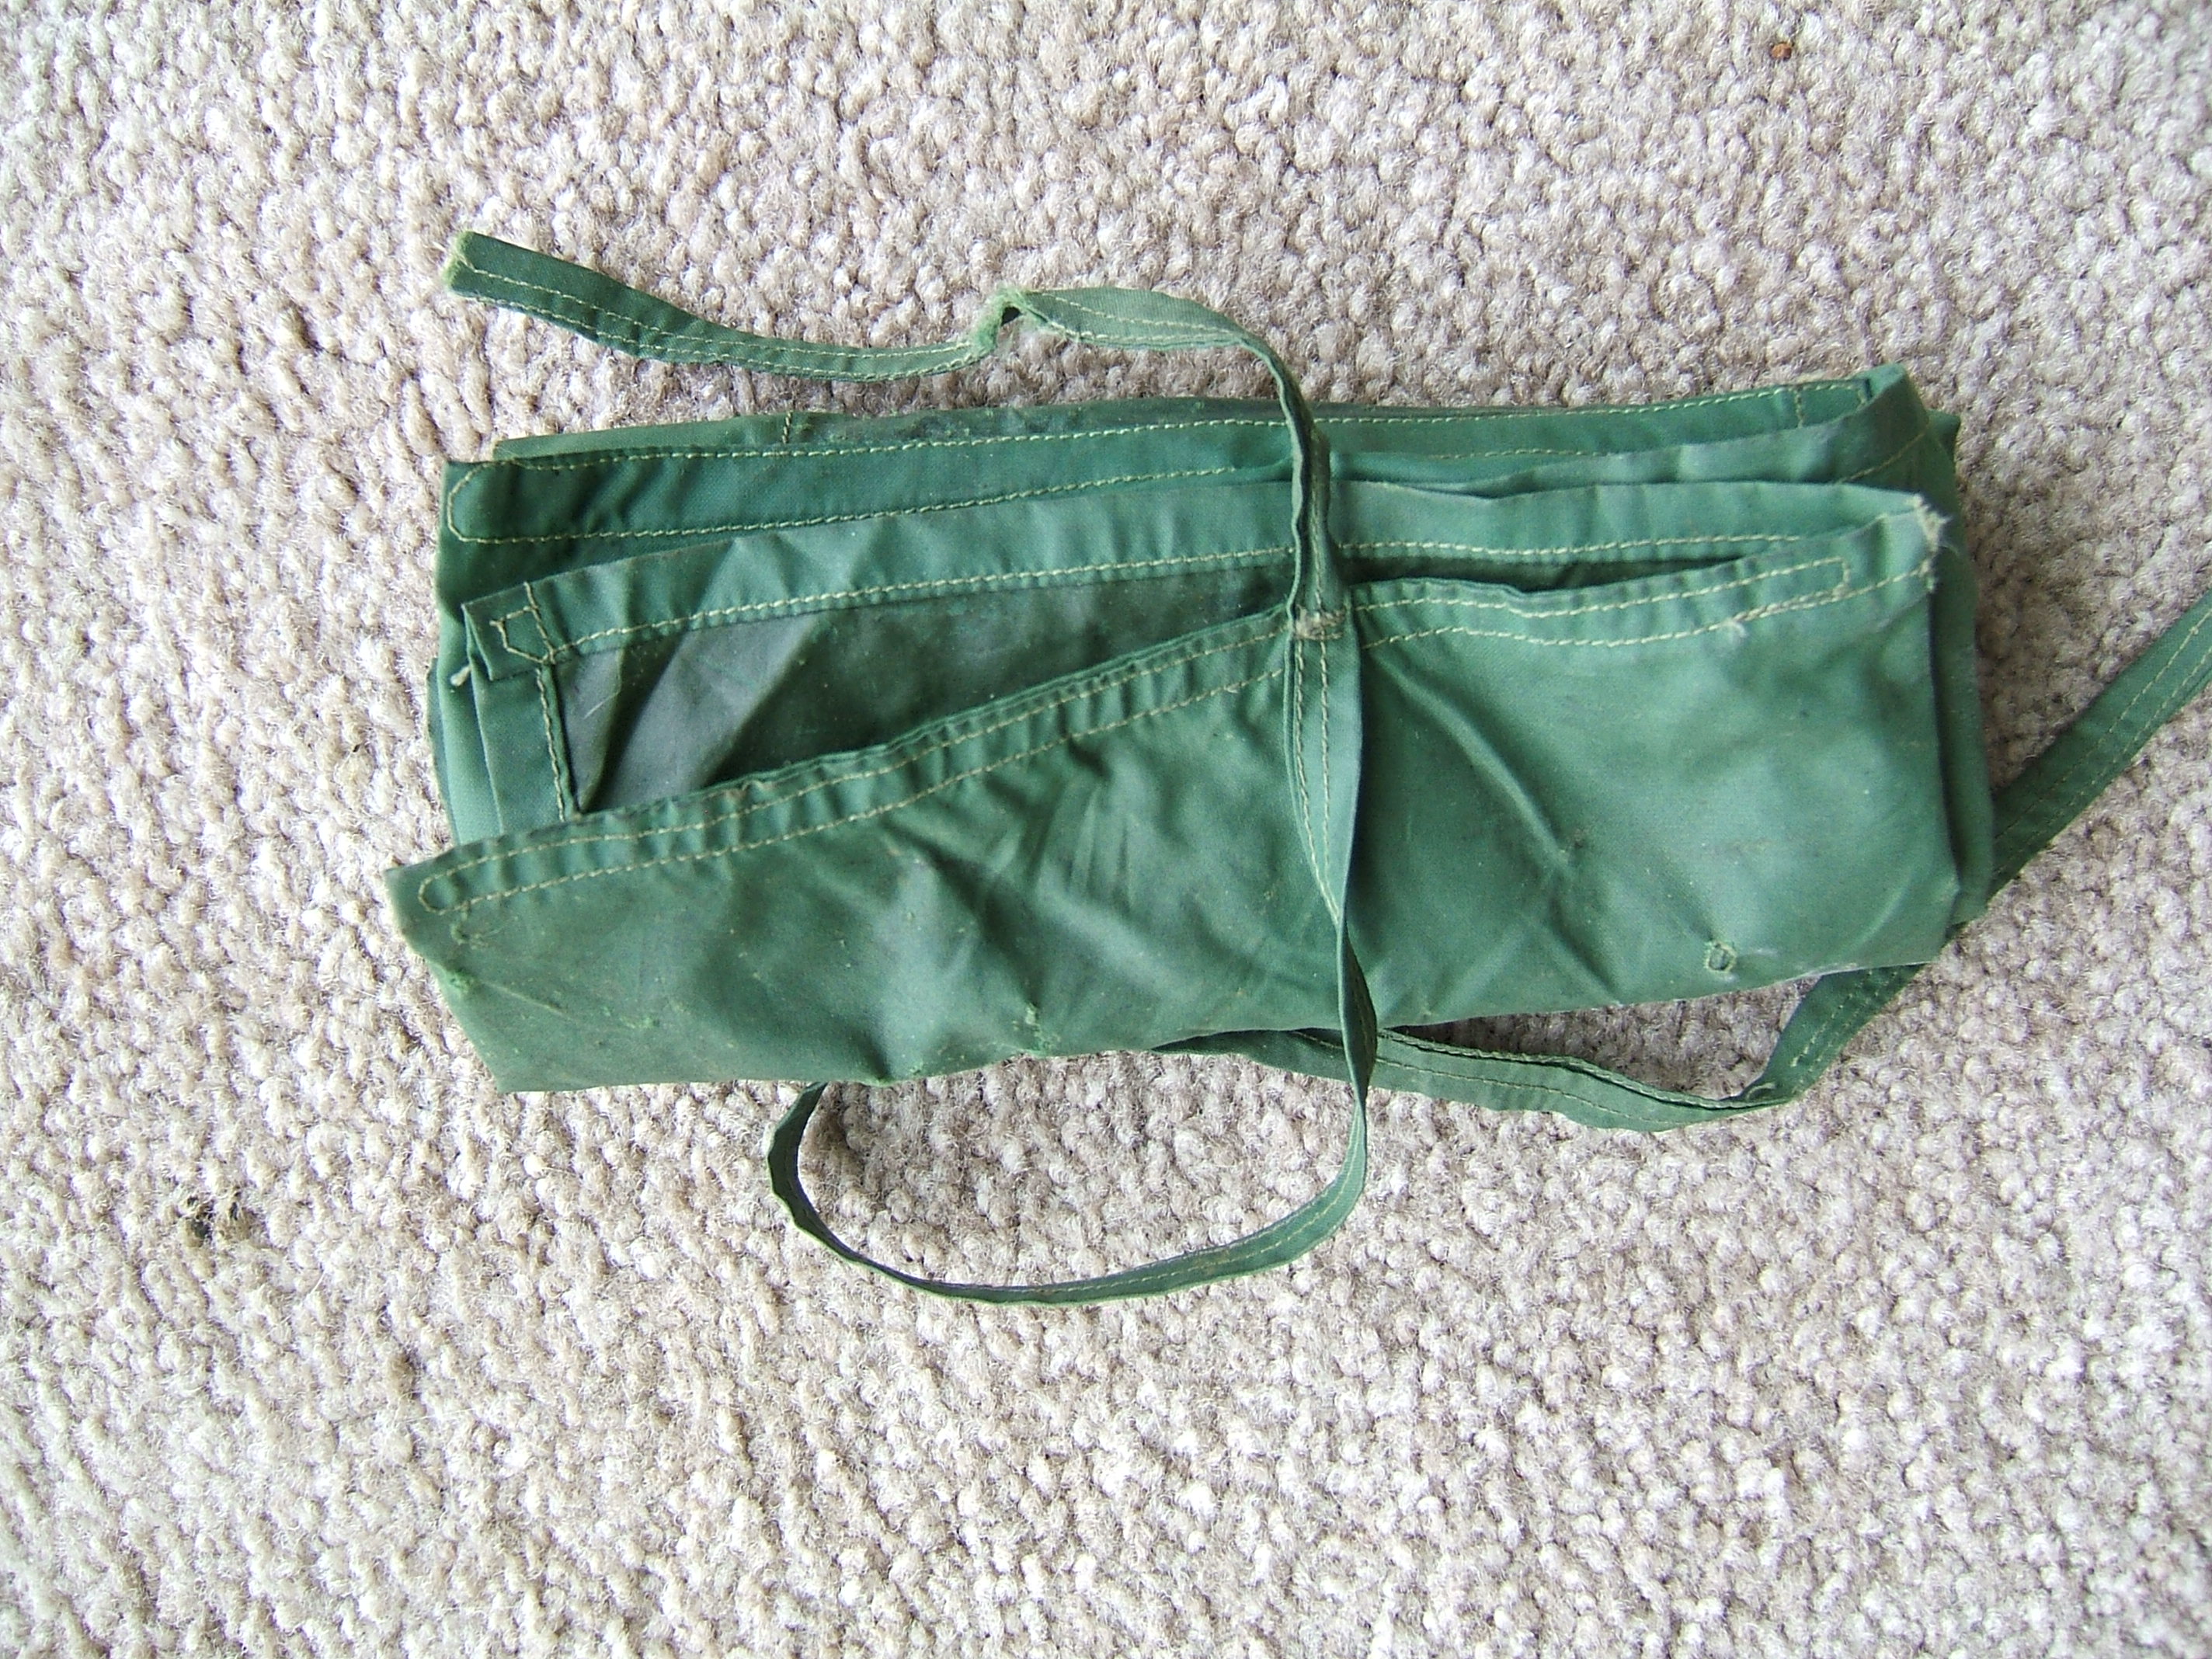
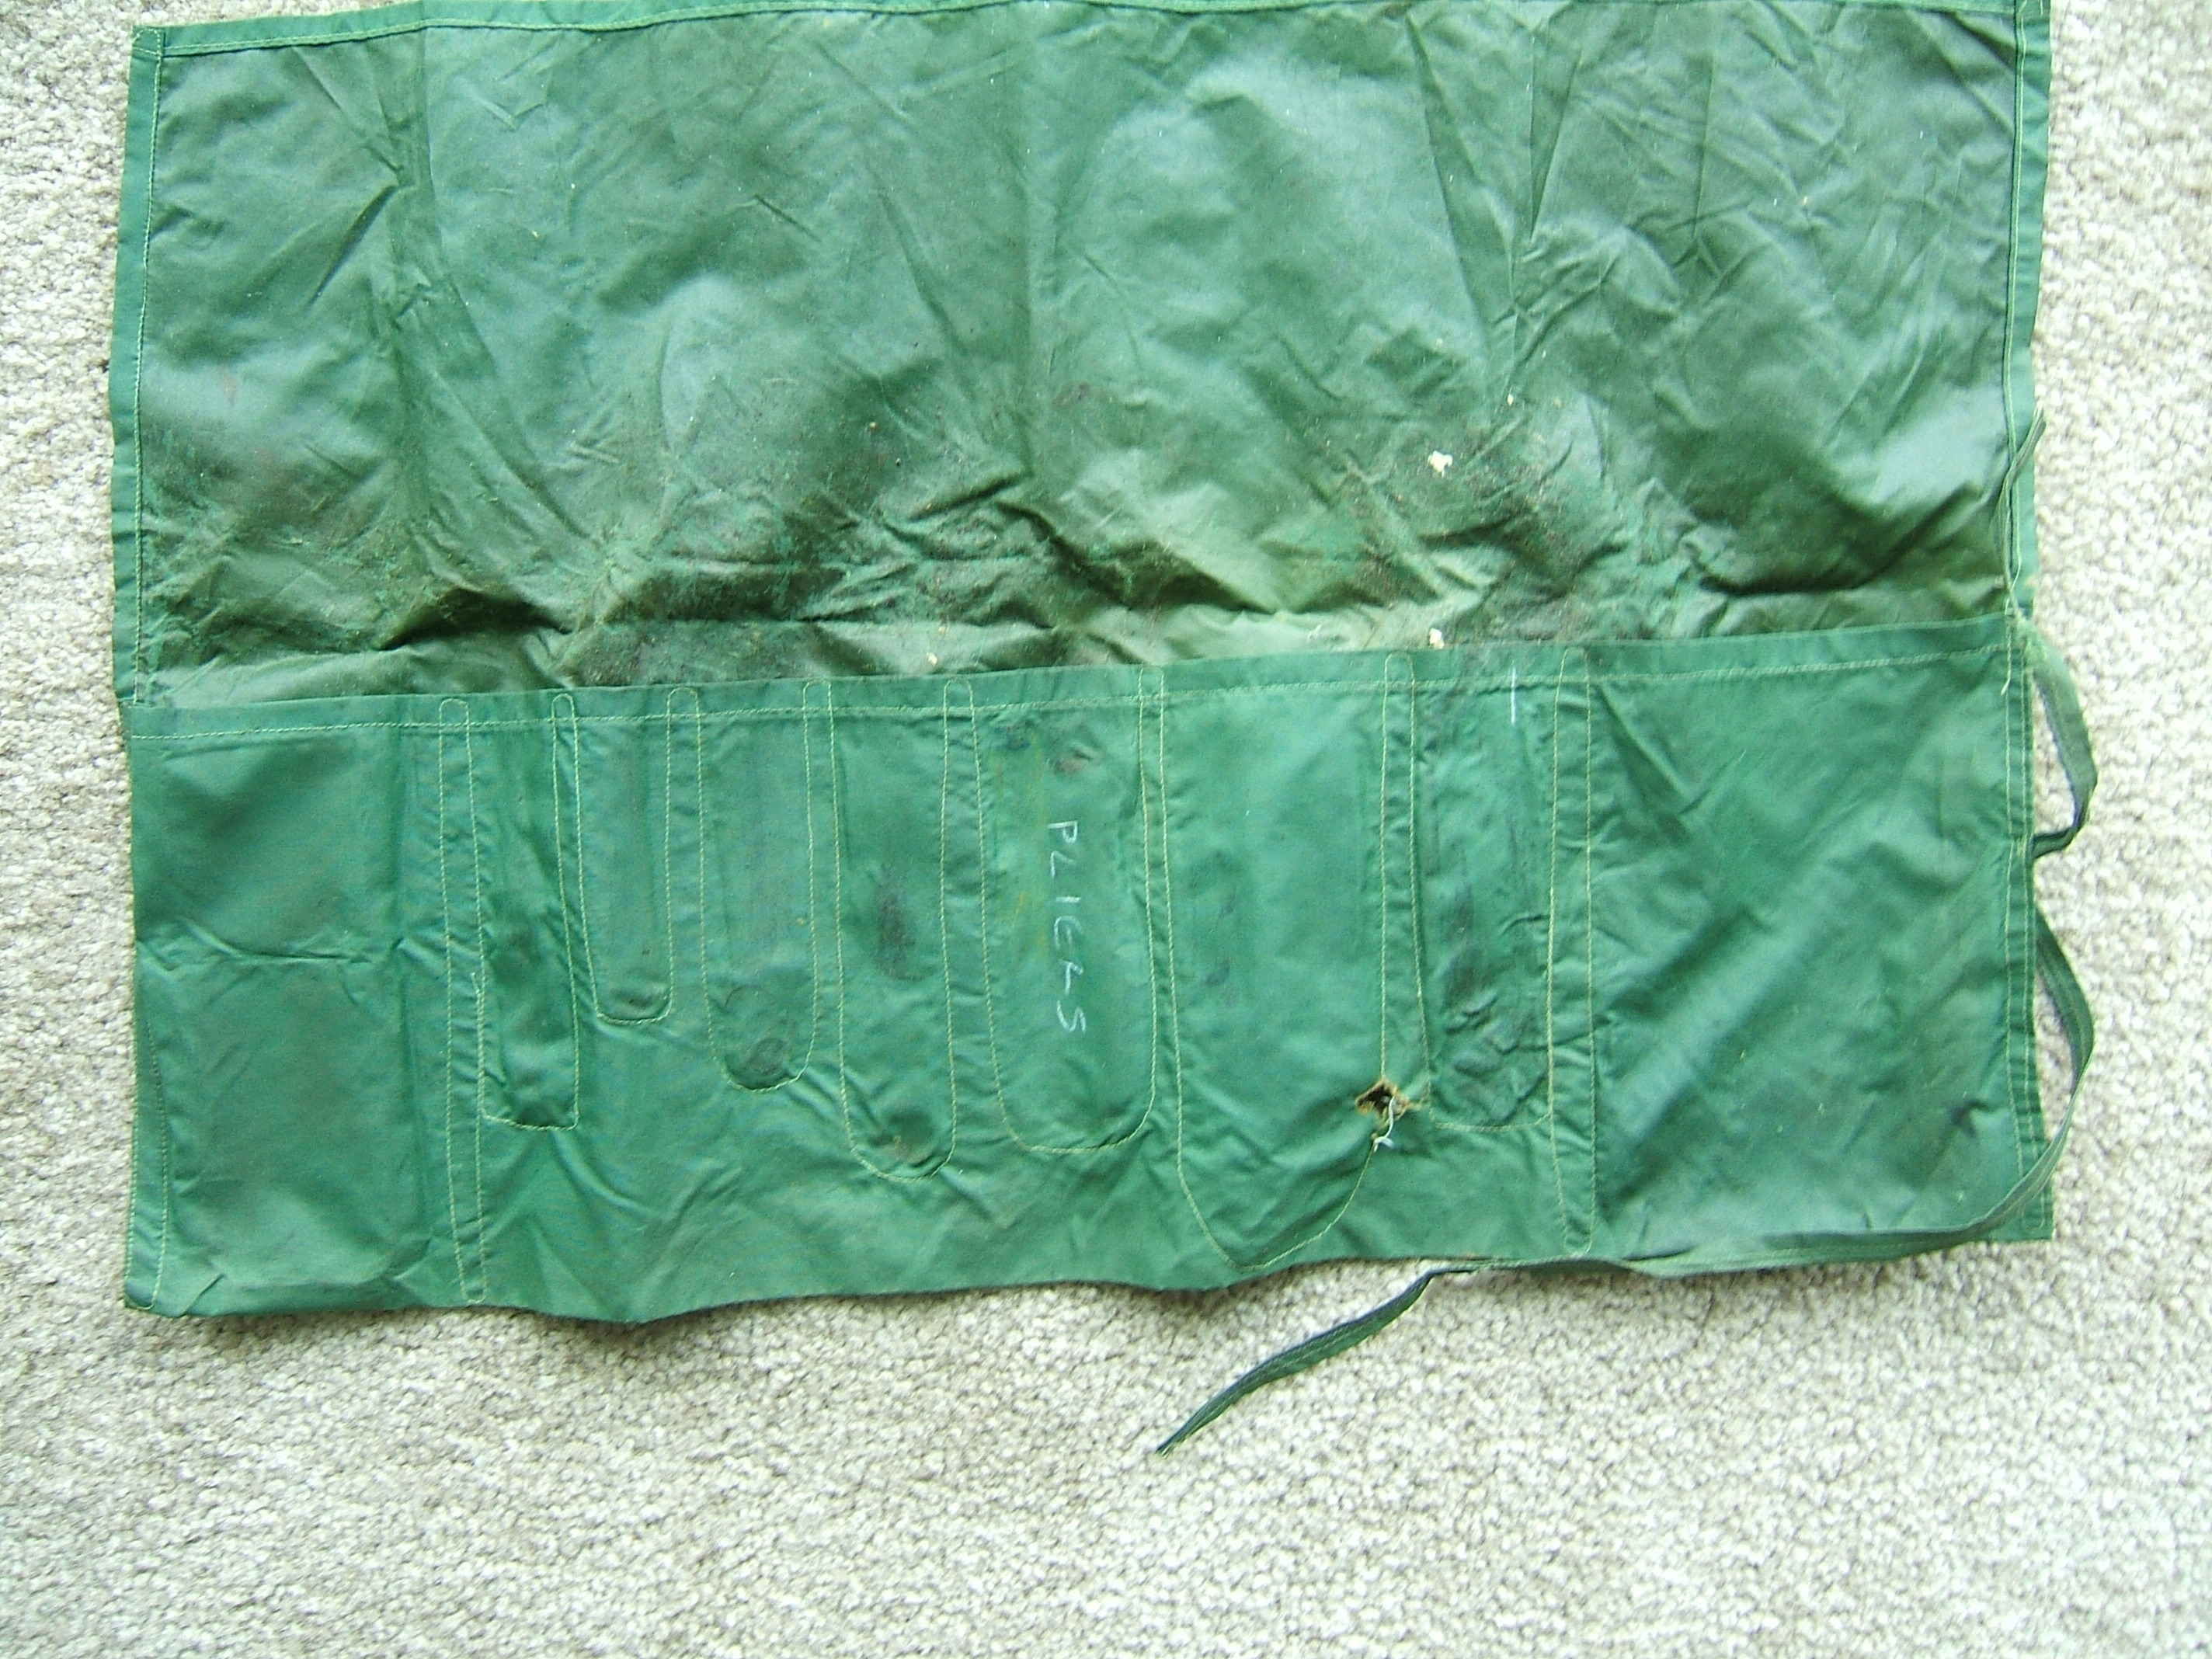
New project on the front burner: When getting my bike overhauled, I remembered that my tool kit has needed replacing for years. The acid damage can be ignored, but the waterproof coating has gotten sticky and glues my tools into their pockets.
Much to my surprise, my scraps of black ripstop were exactly where I looked for them. I can't remember whether it's nylon or polyester, but the two fibers are interchangeable for the current purpose. Both are water-repellent and strong when thin.
So I have two scraps of ripstop on the ironing board, waiting for me to piece them together and make a roll-kit. Hope I remember to document the process with DH's camera.
Also on the ironing board: the pieces of a pair of white cotton briefs I cut out to test the idea of using the good parts of my worn-out hemp-cotton briefs to make the crotch linings.
There must be a less indelicate way to refer to the third piece of a briefs pattern!
And a pair of worn-out bicycle tights I want to pick the elastic out of so I can put in elastic that works and wear them for underwear for a while, some stuff I took out of the footlocker when I started organizing it, and a box of crochet thread I took from someone who wanted to get rid of it, but didn't want to put it where it would be taken for trash or packing string. I may put it on the top shelf under the osnaburg.
Also, it's past time I took all my patterns off the wall and labeled the nails.
Maybe I could get away with just labeling the nails.
Another project for 2013: decide what color my new bra should be, and buy some fine linen. Pity I can't look at the fabrics on offer; RGB isn't all that accurate for selecting colors. And no use at all for selecting texture.
Oops! As I was pinning the very last seam on my new underpants, I noticed that the seam allowance was curling the wrong way: I'd sewn the back panel inside out.
And I did have blue marks all over the wrong side!
I am not going to pick it all out and start over.
Finished the briefs and picked out the old casing on the worn-out tights. Two items off the ironing board!
DH showed me black specks he washed off his feet this morning. I guess that not quite all the thread I picked out of the tights ended up in the wastebasket.
Today's schedule is to replace the roll pouch for the tools in my bicycle's emergency kit. The pictures taken in indirect sunlight came out tolerable; the ones taken under the fluorescents over the dining table, not so hot.
Surprise! The ripstop scraps are hanging in the closet exactly where I reached for them — and there's a rectangle just the same size and shape as the roll pouch — oh, wait — well, there's another rectangle I can sew on for the pockets.
But piecing is a royal pain. Nope, that won't do either.
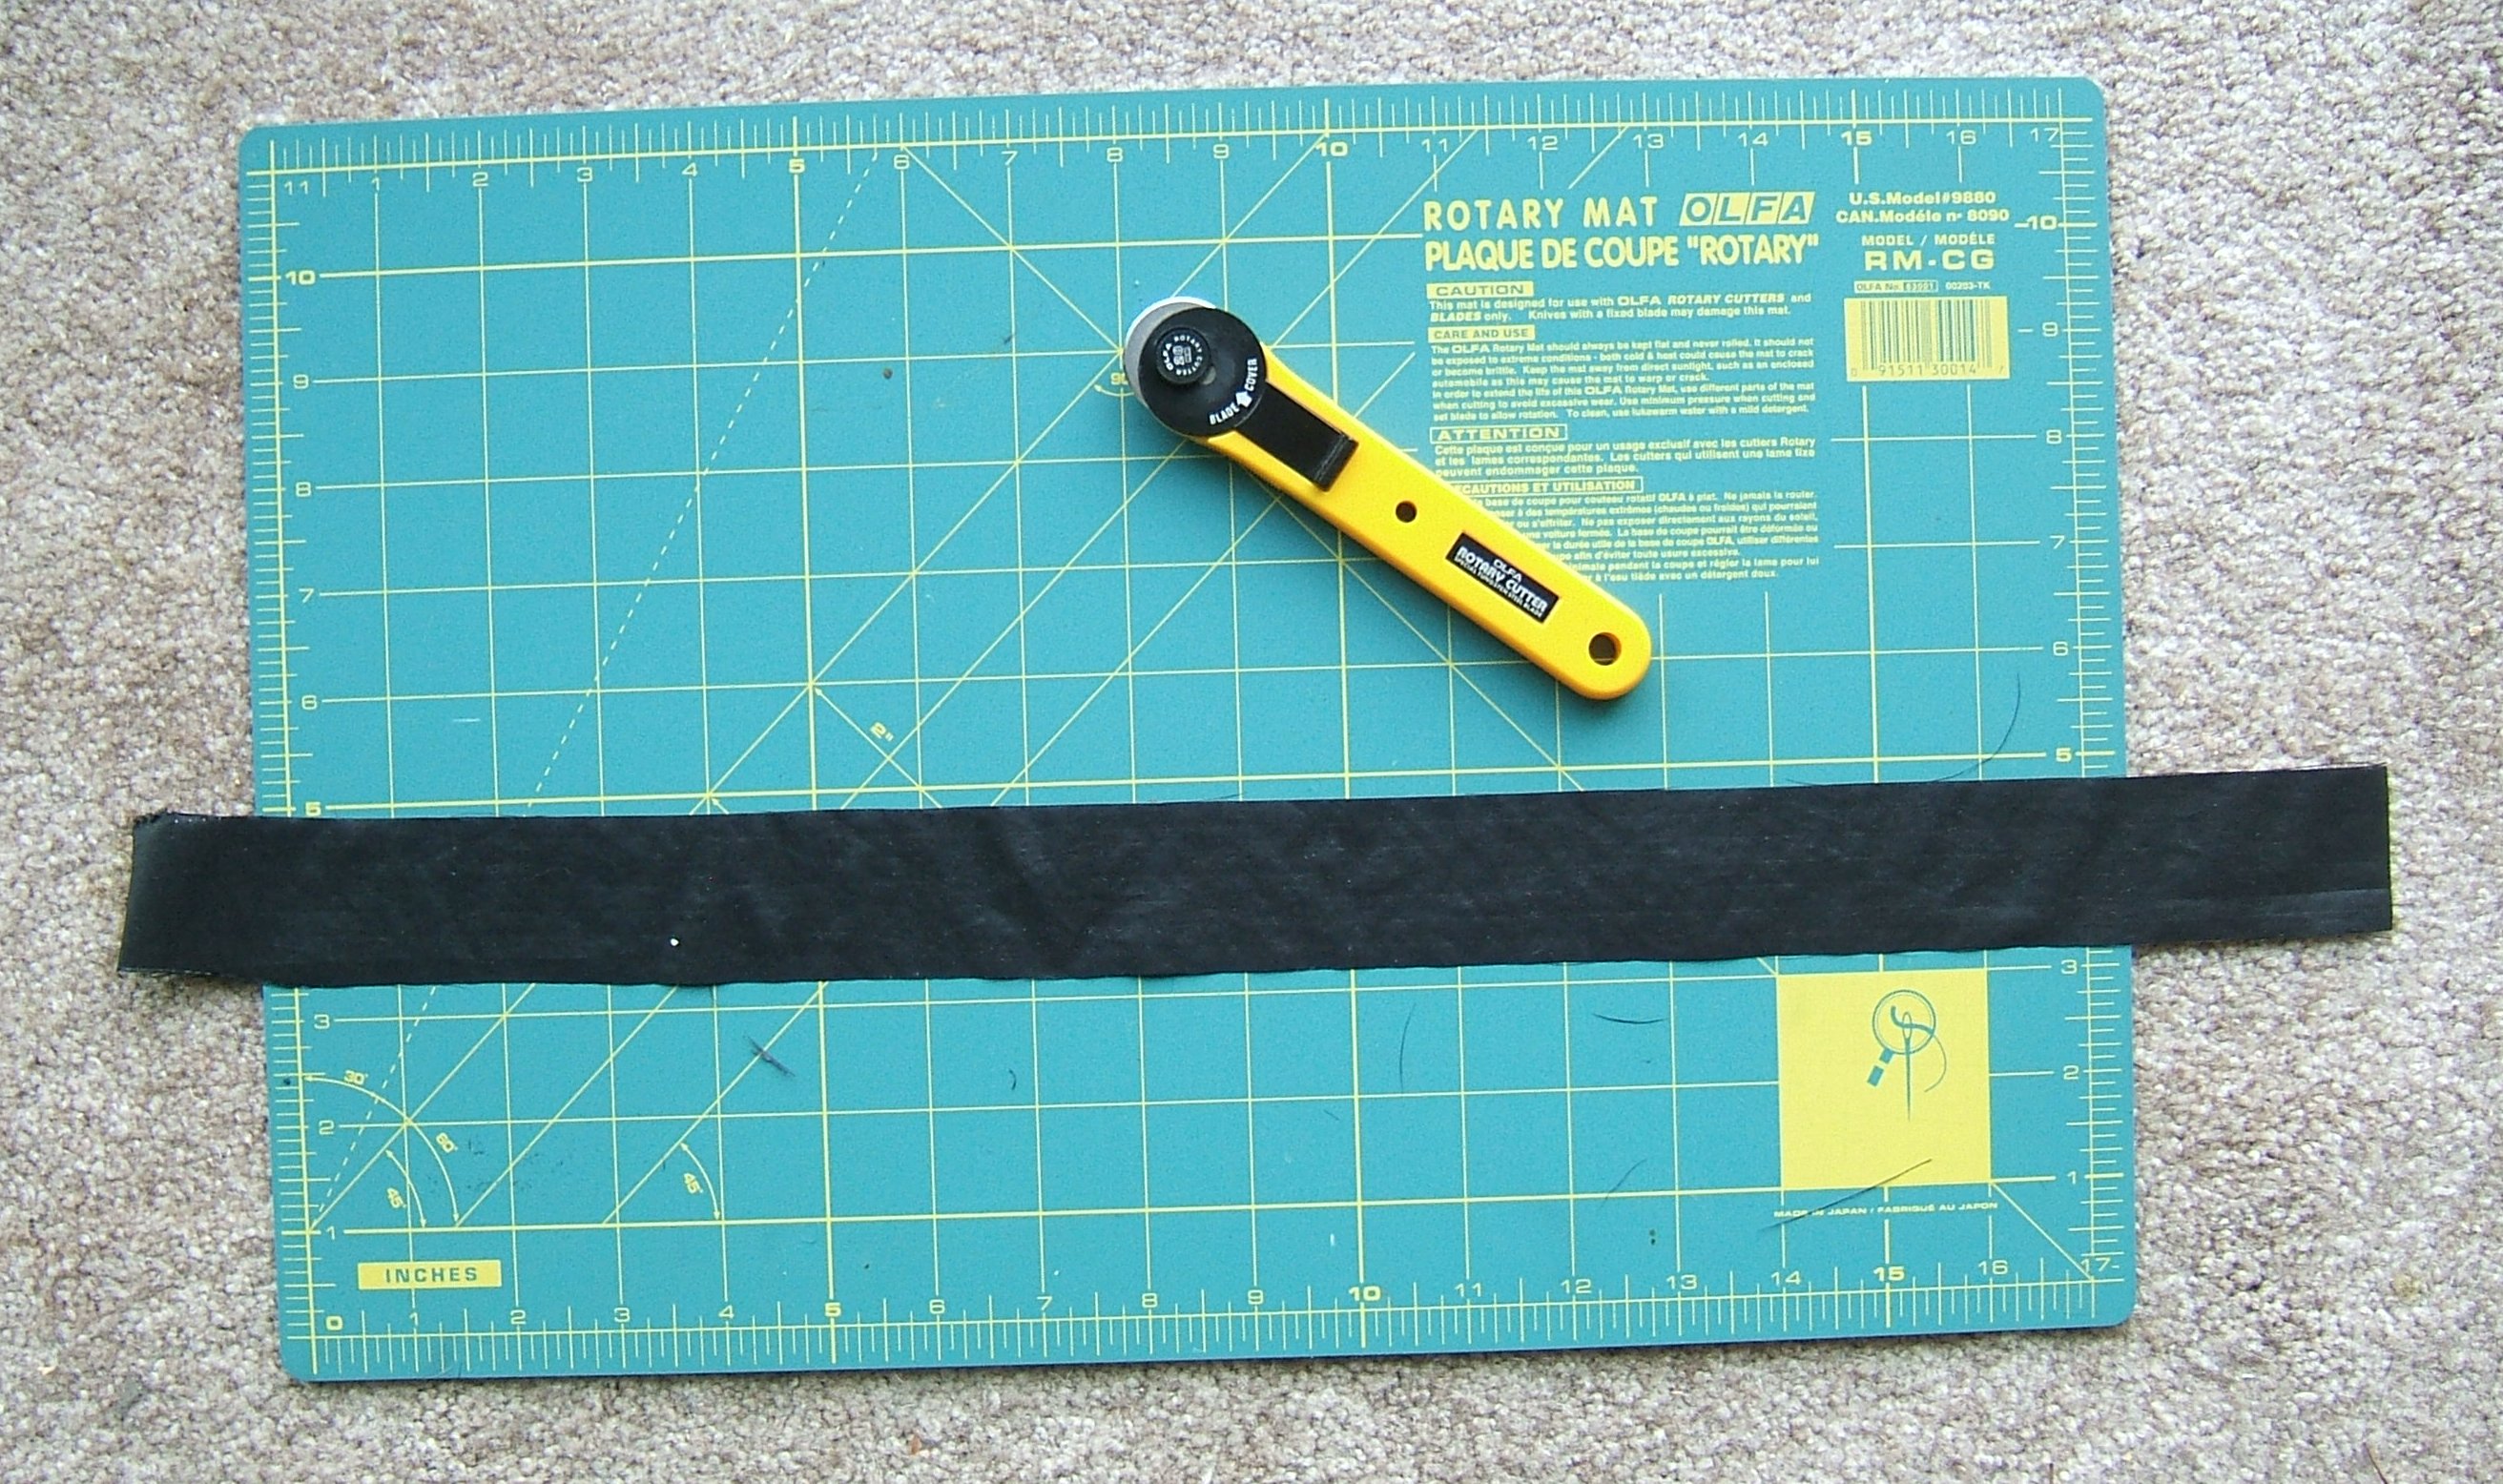
Ah, here there is plenty of room.

I dotted the cutting lines because the lines woven into the fabric are more precise than my silver pencil.

So now I've got the piece I want cut off and the rest folded up to put back into the closet. Saving that register tape didn't do me a lot of good because the ink is fugitive, but I copied the price and yardage in pencil before it was quite gone, and I pin it to the fabric blank side out to save what's left.
The best I can do in the line of fine black synthetic thread is Gütermann polyester. Could use yellow nylon, as I did on the green one, but strength isn't critical in this application, and I'd just as soon not be reminded of how wobbly my stitches are every time I unroll the thing.
Since I have to re-thread whatever machine I'm using, and it's all straight stitch, I'll use the White. Grump — I'm out of #11 Universals. But when I was planning to use the Necchi, I was giving serious thought to leaving the stretch needle in. I think I'll use a #11 stretch. Assuming that #11 can handle the poly thread; I was thinking nylon when I decided to use a finer needle.
I was threading the needle before I remembered that I had to change it. Since the end of the thread was fuzzy, I had plenty of time to remember, but I decided that #14 would do just fine. I feel a sort of snap each time it penetrates the tight-woven synthetic, but I got the same effect from pins much finer than the finest machine needle.
So one hem is in, and it's time for my nap.
I hemmed all four sides, since the fabric is so thin that it won't matter that six layers of it are piled up at the ends of the pocket strip. For the same reason, I didn't miter the corners, but simply let them overlap.
In the evening, I plugged the raw pictures into this file, and shrank them with the length and width attributes so that I could see what I'm working with. Will write the captions later — and crop and scale them later still.
If they haven't been cropped yet, click on "view image" to see what-all you downloaded. When I crop and shrink the pictures, the reasonable images will be links to the humongous version.
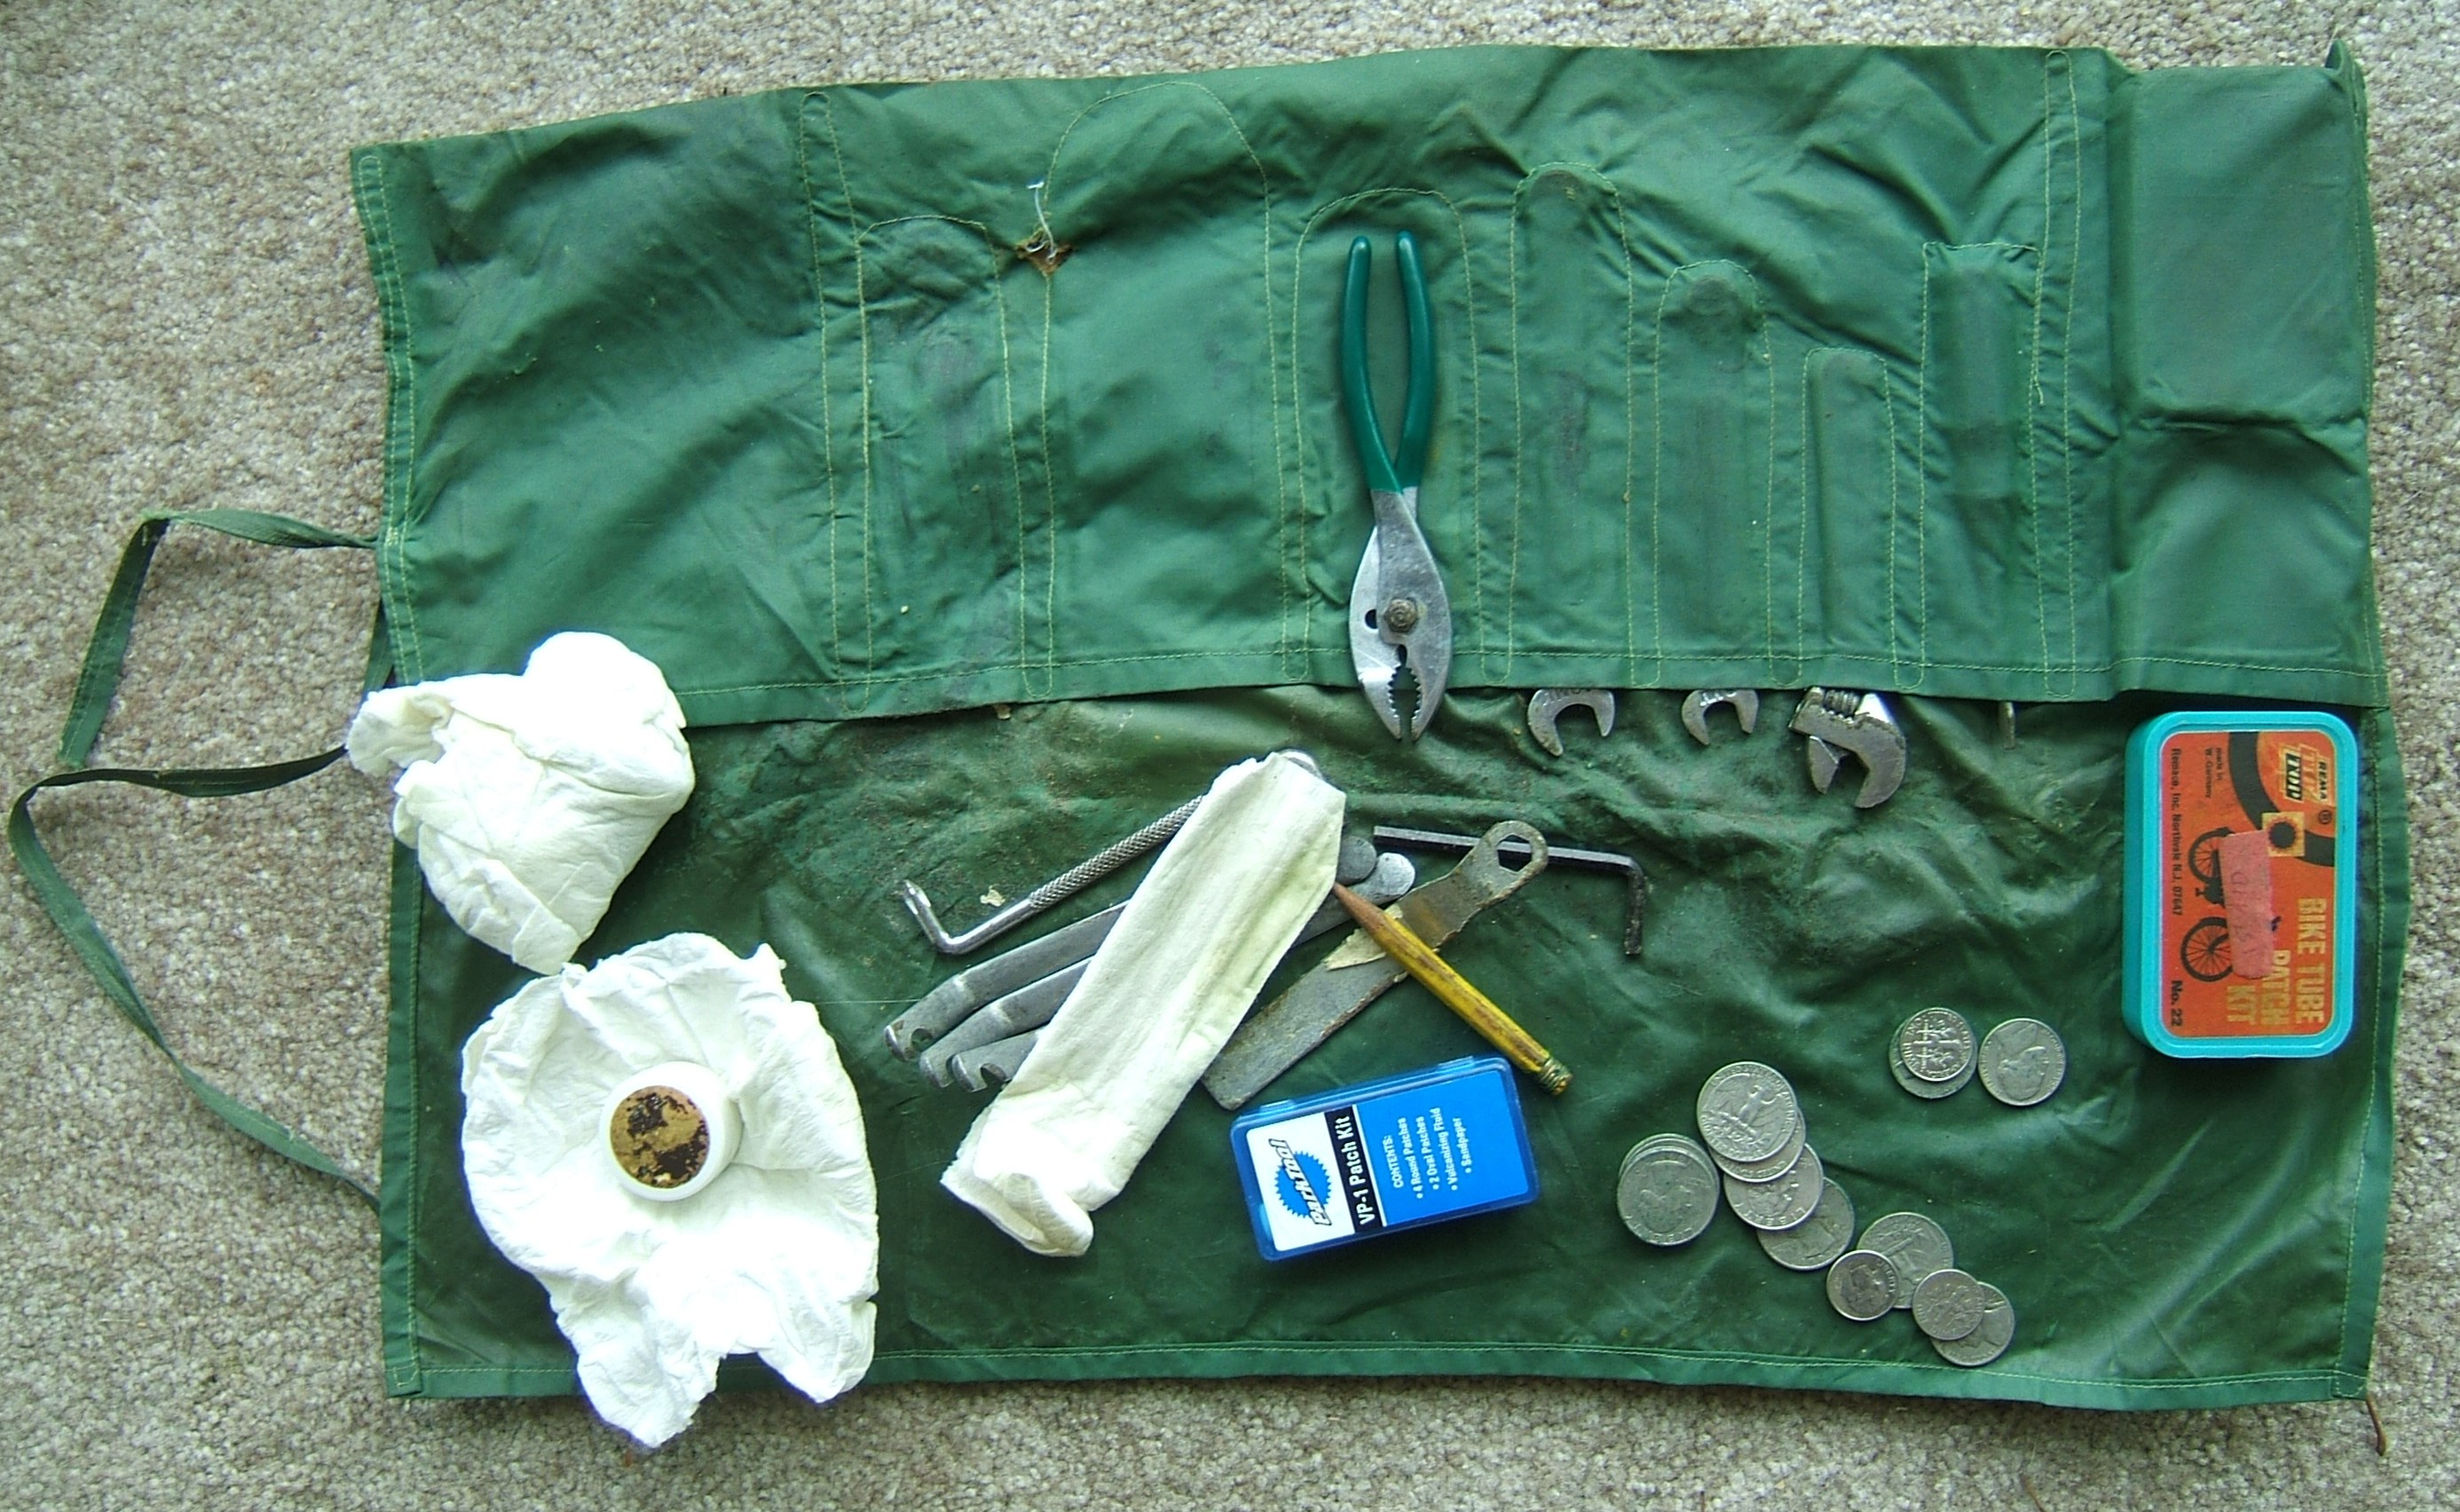
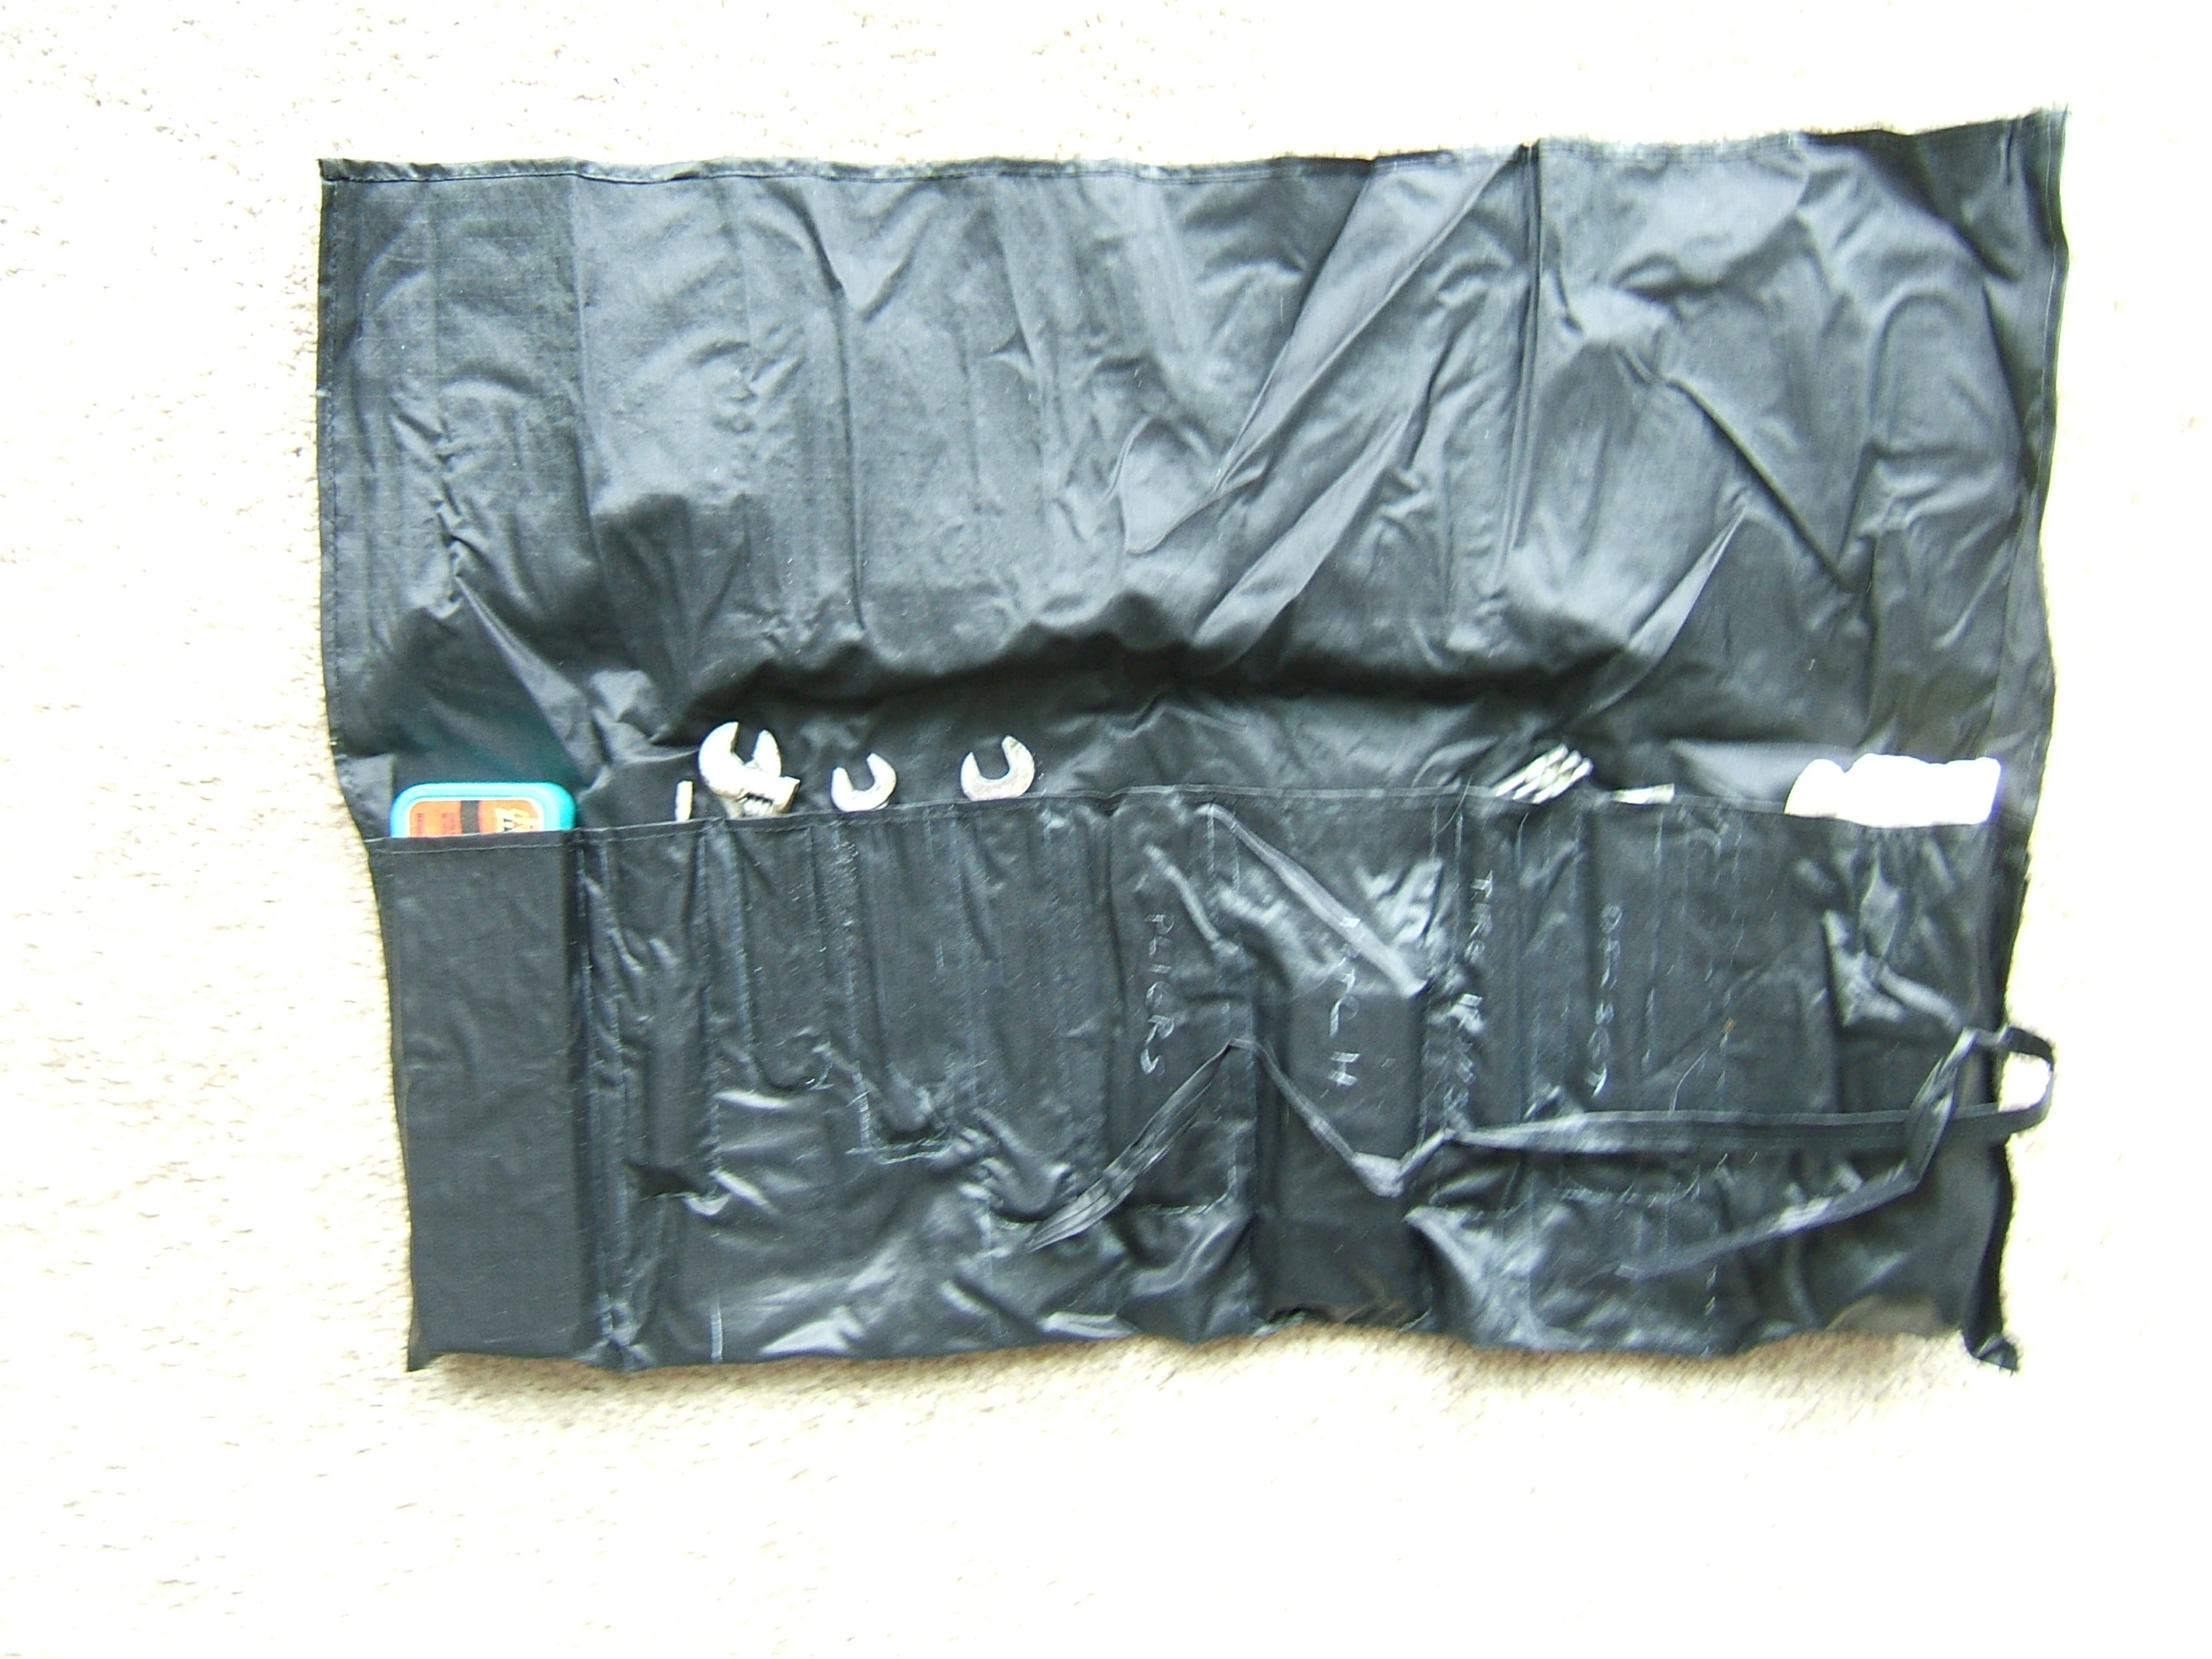
Two of the pockets on my roll kit fit their contents only approximately. I wonder what was originally in them?
I sewed the ends of the pocket strip on the new one, just so I could say I'd taken a stitch today. I have remembered that I have a "nonce" pencil that might show on black synthetic.
In emptying the pockets so that I could measure them, I found two dollars and seventy cents that have long since been listed as "unrecorded expenses" in my bookkeeping program. It's way past time I replaced those coins with a cell phone.
I see that I didn't sew the pockets in one undulating line — the Rema-kit pocket was sewn first, then the undulating line began on one side of that pocket and ended in a similar narrow oval demarking the "leftover space" pocket. I see how to both begin and end with an attached oval, but I think I'll do it the same way again — that way I can have the Rema-kit pocket already sewn when I'm using pins to check the fit of the smaller pockets.
Next step is to make the tie — I knew there was a reason I left that long tail on one of the scraps.
And when I reloaded the file in my browser after making my last edit, it took a while even though the data transmission is strictly local. I've got to get on with trimming down those humongous photographs Real Soon Now. If I divided the length and width by four, as I think I did, you are downloading sixteen times as much picture as I'm letting you see. (Right click and select "view image" to see the whole thing. And click again, if your browser has shrunk it to fit onto the screen.)
But right now, it's nap time. ⁂

When I woke up, I marked the center with my nonce pencil and a Japanese ruler especially made for finding centers. The pencil worked well on the rough side of the ripstop, but I need to mark the shiny side for the undulant stitching.

I cleared off a space on the ironing board and folded one side of the strip to meet the dotted line,

then folded the other side up to meet the raw edge of the first side. I put the pins in diagonally
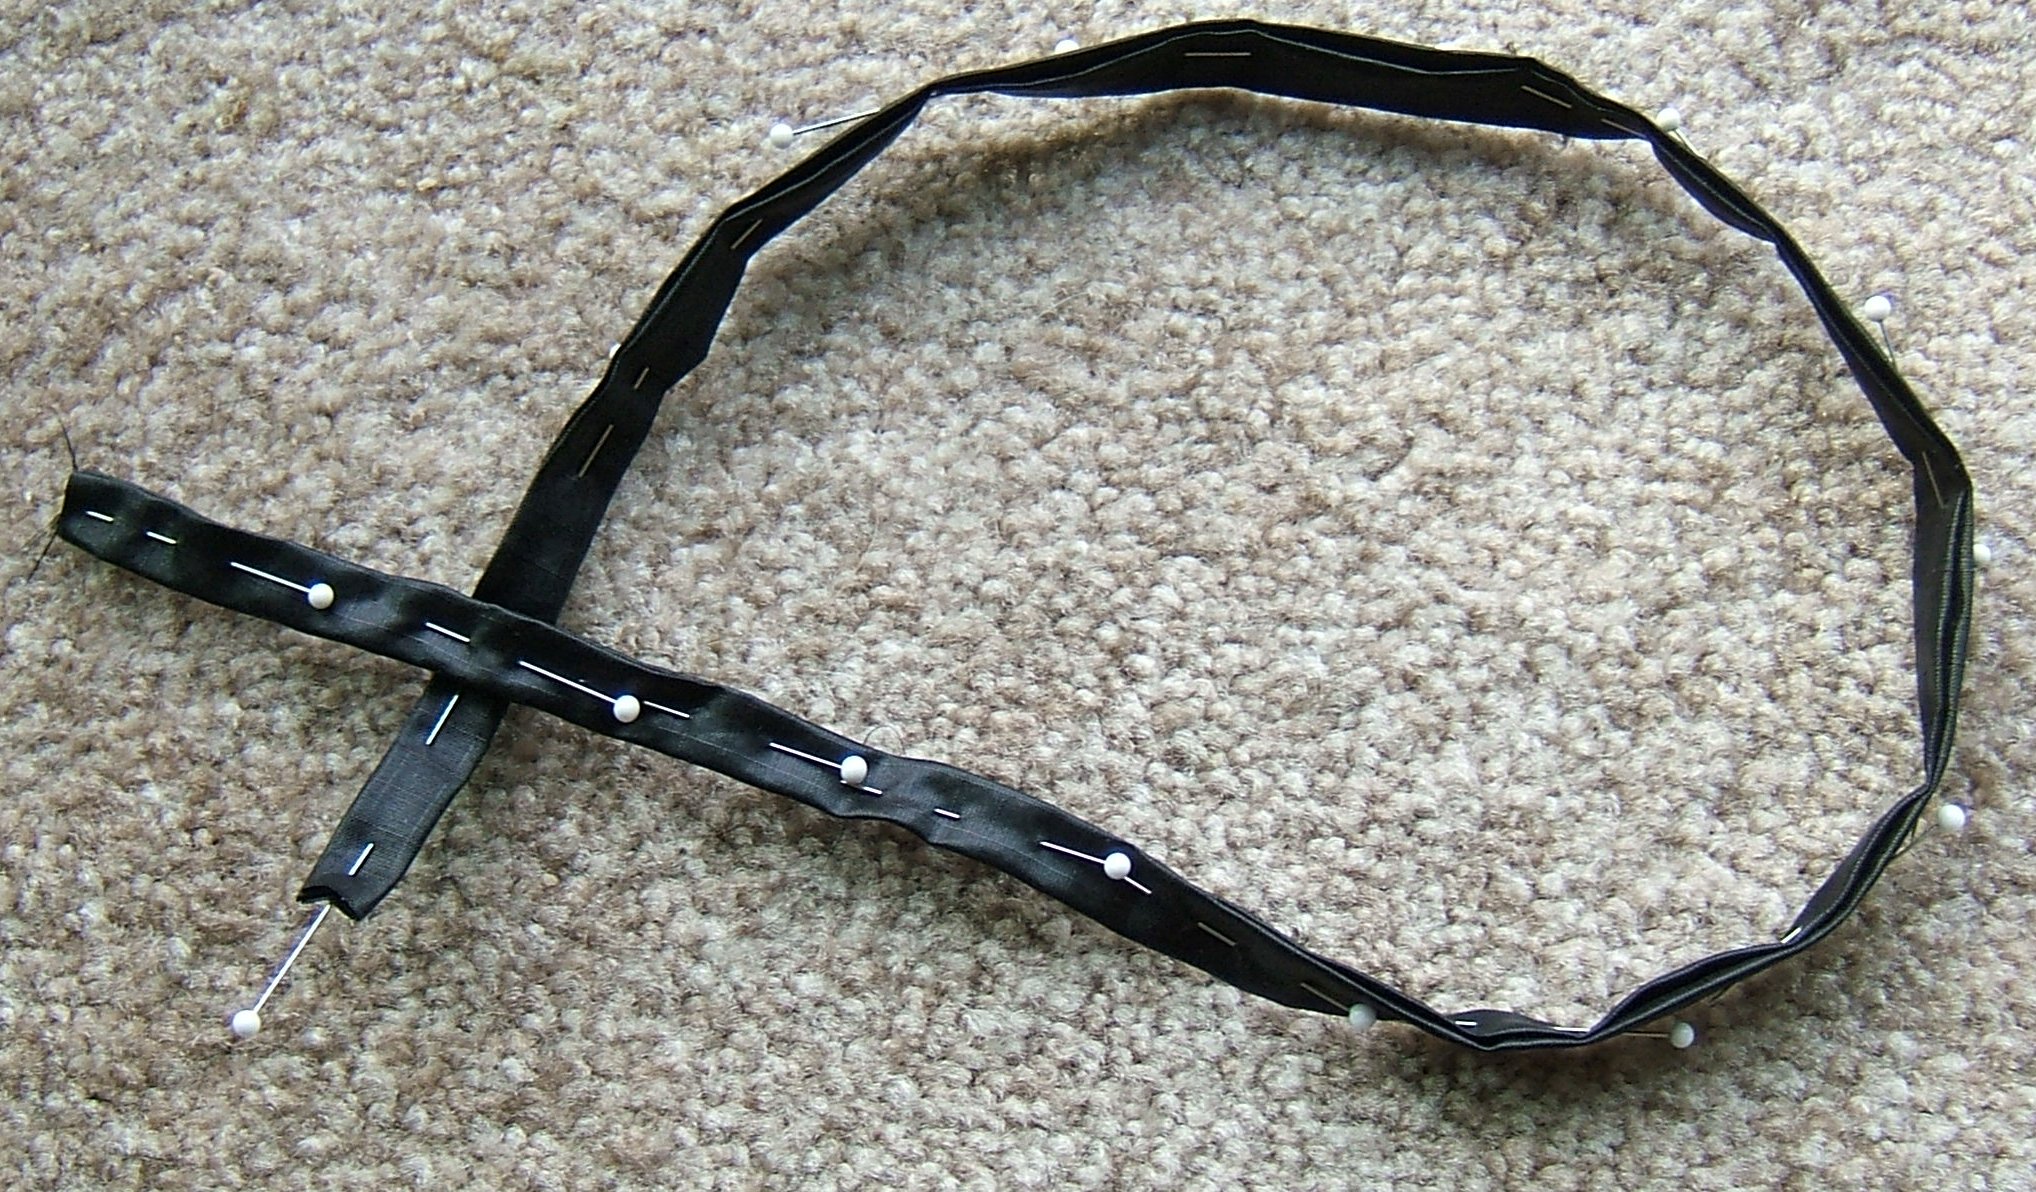
so that they could be removed after I folded the strip in half. Folding was facilitated considerably by pinning one end of the strip to the ironing board.
Then I carried it into the living room to get a picture by natural light. Next: carry this chair into the bedroom and open up the White.
And stitching the tie went without a hitch. I first stitched down the middle to keep everything in place, then edge-stitched on the side with two folds. I didn't finish the ends in any way.
I tested the nonce-ness of my Nonce pencil a tad sooner than I intended: I'd drawn three perfect pockets and was counting to make sure I was drawing the correct pocket for the fourth when I realized that I'd left a gap between the screwdriver pocket and the Rema-kit pocket. If there ever were directions with the pencil, they were lost years ago, but a drop of water on a thick rag worked well, and didn't even leave the hydrophobic fabric wet.
I was able to save some of the lines.
I'd never even heard of a Park Tool patch kit when I made the fifth pocket, but it fits. I extended it to the fold so misc. could be put in there too, and I narrowed the sixth pocket to fit the tire irons. It was probably meant for the tire irons in the first place, but side-by-side and not piled up the way they naturally lie.
Oh grumbly gripe. I was chortling that I had exactly enough time to finish pinning, try the things into the pockets, and get a picture in natural light when I realized that I'd left out the hinge between the patch kit and the tire irons. First too much space and now too little!
At least there are only two pockets to re-draw this time.
I shall re-draw them tomorrow; evening is for playing with the computer. Or maybe I'll put the tools back into the old kit and go for a ride.
I briefly considered adding a pocket for a refueling implement, but if I carry a spoon, it would be much more convenient to put it into my candy pocket. And it's possible to eat yogurt with a pocket knife. (And places that sell yogurt usually also sell crackers that one can use as spoons.)
I'm wearing my newest briefs. I think that I would like them slightly better with elastic in the leg hems, but don't think I'll bother. Perhaps I'll put elastic in the first pair when I cut out a batch, to check whether the drawbacks outweigh the benefits.
It's too late in the morning to start a ride, so I'd better get on with my sewing.
It worked! I opened Z-tree, logged drive E, got a list of what was on the camera, tagged the two new pictures, clicked "copy these to where I copied stuff last time", and there they are! This is so much easier than dragging with Explorer!
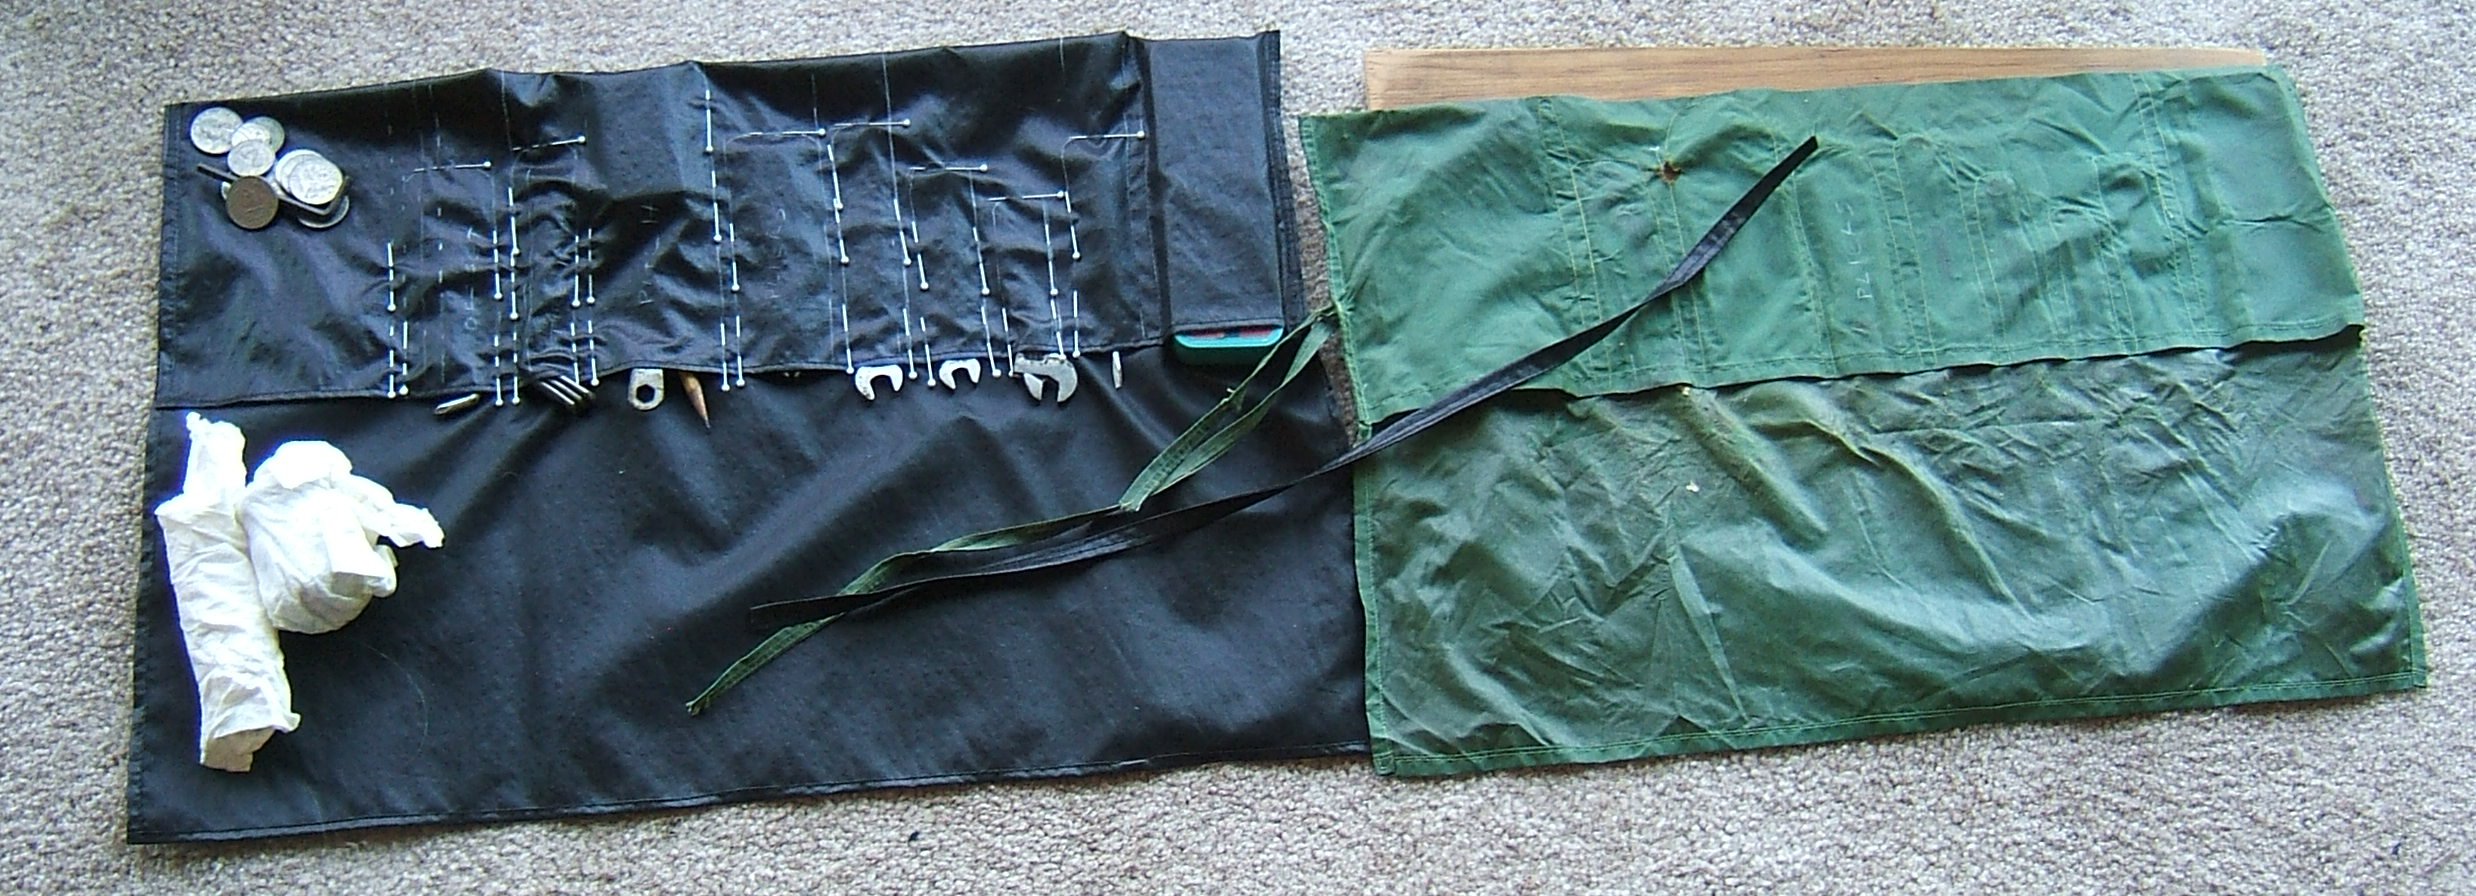
The plywood under the old roll pouch was handy when I needed to move the pouch with a bunch of loose tools on it.

And the pin-fitting shows that I got all the lines in the right place. Almost all; the 8mm wrench pocket was a tad too deep. I moved the pin, and will re-draw that part.
I plan to leave each pin in until it gets in my way; that will help me to remember which lines to stitch along.
The pencil poking out of the patch-kit pocket belongs Somewhere Else —perhaps beside the Rema boxes— and the shoe wrench beside it doesn't belong in the tool kit at all; I finished adjusting those cleats decades ago. The allen key among the coins doesn't belong either, but you never know when you might need an allen key.
The two blobs of paper towel contain a lip-salve box of hand cleaner and a film-can sewing kit.
When the job is finished, I intend to put the coins in the bottom of the Park-Tool patch-kit pocket, but didn't want to have to get them out again. Not to mention that at the moment, that pocket leaks a little.
All done! I turned it over to inspect the side where I'm not confused by the Nonce lines, and my stitching isn't all that wobbly. Of course, I did use magnifying glasses all the way, and turn the handwheel at every curve. I put the pencil in with the Park-Tool kit, coins, and allen key.
The new tie is slicker than the old one. I may have to resort to using a surgeon's knot when I'm not closing the roll-kit on a table. I sewed it on by stitching back and forth, going well beyond its edges so there wouldn't be any strain on the turning places.
And I've scaled two of the pictures, and made them into links to the merely-cropped versions — I was disappointed that making them into links doesn't put a blue border on them, but the mouse pointer does turn into a hand when it's pointing at them.
Clicking on the first revealed that it's badly out of focus, which I somehow didn't notice before cropping and scaling. Ah, well, it doesn't show much in the shrunken version, and this picture is merely decorative.
You can still see the original photographs by copying the filespec out of the alt text and pasting it into the path of the image; all the pictures are in the same directory. I can't imagine why you'd want to, but the information is there.
My back aches a little from leaning over the table, but one really needs to be above this sort of work, so a higher cutting table wouldn't help much. And my impending nap should fix me right up.
Not a bad morning of work: I started by finding a black waistband elastic I'd taken out of some worn-out nether garment, and pinned it into a casing on my worn-out bicycle tights, which I propose to wear as long johns. I plan to stitch it after finishing my half-dozen pairs of white cotton briefs.
Since I can get three linings out of a back and one out of a front, and had two pairs of worn-out hemp-jersey briefs, that should have been eight, but I'd already cut one for the trial briefs, and one of the fronts was worn through in exactly the wrong spot.
I cut six linings and three backs and decided that it was naptime. And later remembered that I hadn't eaten lunch, so the microwave is beeping at me.
I drew around the lining pattern with my blue wash-out marker, which is the only way one can lay out everything before cutting anything when one wants six copies and has only one pattern. This pattern would have been a good one to make of oaktag! I do have a sheet of light card/heavy paper that would do for oaktag, but the job is done now. Besides, the pattern is made of spreadsheet paper, which isn't all that inferior to the light card that I have.
I'm cutting the PFD jersey one piece at a time — it's the easiest way, what with the irregular edges left by previous cuttings, guestimating the grain by measuring over from the selvages, the fabric dangling over the edge of the table, and only one copy of the pattern. Not to mention that running around the pattern with a rotary cutter isn't any harder than running around it with a pencil.
I started out with five yards of PFD jersey. Even with shrinkage and some of it already used, I'm at zero risk of running out.
I measure, not from the selvage, but from the place where I cut the selvage off. (It shrank a bit more than the fabric did when I washed it.) And it isn't a selvage, but a knitted-on non-rolling band to cut through when they opened the tube.
Ah! The name for this sort of thing is "Steek". They did a good job of cutting exactly down the middle of the steek; there must have been a knitted-in mark. I wouldn't mind making shirts out of an all-over fabric like this steek. But I'd want to buy it already dyed.
In the afternoon, I was more careful about standing up straight, taking time out to read the paper, etc., but I feel the need to ride my bike tomorrow, so when it was time to clear off the table for supper, I put everything away.
The length of fabric isn't as hard to fold up as it used to be. I finished cutting out the backs and cut out all but one of the fronts.
My fitted sweatpants are too dirty to wear, even under other sweatpants, but it was too warm for wool and too cool for nothing, so I wore them anyway. Time to move finishing the other pair up a bit on my priority list. I plan to fit that pair a tad looser,
Bra-making also moved up the list — I have exactly enough bras to have a clean one to wear on washday. Most of my linen stash is too coarse, but I think that the black piece is reasonably smooth.
If there's enough jersey left, I might up and make a T-shirt. I've been eschewing white T-shirts because they are underwear, but a white T-shirt that fits would work as a white blouse, and I could use one of those.
Washed in the morning, cut out the final front in the afternoon. Then I drew five of the six remaining pieces on the fabric — I needed a guide line that passed through the first piece to lay out the second copy, and it was easier to sketch around a small piece than to stick pins in it. But I frequently wished I'd thought to cut it out of an old desk calendar that I saved for just such a situation; the spreadsheet paper the pattern piece was made from isn't quite thick enough to guide the pen.
Since we were having left-overs for supper, I intended to work on into meal-prep time and finish the job, but there wasn't quite enough space to lay out the sixth piece without more concentration than I can muster when I'm working to a deadline, so I folded up the project.
One of the scraps I cut off was big enough to make a patch pocket, and I threw it away even though I might make a T-shirt out of the left-over jersey. For me, this is downright profligate.
All cut out at last! I straightened up and walked to the garbage tidy every time I separated a scrap, and walked to the sewing room every time I made the final cut on a piece.
I've been keeping the selvage I cut off intact, thinking that I'll sooner or later want tape like that. There are two yards and ten inches of separated selvage on one side and one yard and twenty-eight inches on the other — and the shorter selvage seems to run higher on the fabric. ?? The puckering from the shrinkage of the selvage seems about the same on each side.
About two yards and fourteen inches of fabric are left. That's plenty for making a short-sleeved T-shirt.
I'll have to shake it out and re-fold it soon — I didn't vacuum the carpet first.
I'm just as pleased that I didn't realize that this was an opportunity to snap some illustrations for ROUGH039.TXT until it was too late.
I got a little sewing done in the afternoon, and because the fabric is white and there is nothing precise about the work, continued by lamp light after supper. (It won't be long before there is daylight after supper!)
I got all the crotches and crotch linings attached to the backs, but when it was time to fetch in the fronts, I didn't feel like doing the thinking involved, so I stitched onto a scrap, cut the string of briefs-in-progress off it, and turned the White back into a cat perch.
The Necchi was already set up with white 100/6 and a stretch needle, but I'd done my practicing with the White. There was an empty bobbin holder on the spool of black polyester I removed from the White, so now I know where the Necchi bobbin of black thread I found under the White came from. But I'm leaving it on the basting-thread spindle because it has lost its provenance.
I put a piece of re-positionable correction tape on the White bobbin and wrote "poly" on it before I put it away. In the White's bobbin rack, since the bobbin holder on the spool doesn't fit White bobbins and I don't need a bagged set of polyester thread. I put the spool into the White's upper-left drawer instead of putting it back on the shelf, to remind me that there is a pre-wound White bobbin to go with it.
When I was pinning the next-to-the-last crotch lining, I realized that I'd been sewing them inside out. When I cut the PFD, I was careful to keep all blue marks on the wrong side, and I forgot that I'd put the marks on the right side while cutting up the old panties.
But if it's that hard to tell, it doesn't matter which side is out, and the linings won't be offered an opportunity to curl. I sewed the remaining two right-side-out, but didn't even consider picking out the others.
I read some Creative Machine mailing-list posts by way of not getting down to work this morning, and found one in which Pam Erny < http://Off-The-Cuff-Style.blogspot.com> announced a new tutorial on how to add a collar to a T-shirt. Exactly what I need to lift a white T-shirt out of the underwear class!
It's the top entry on the blog today, but later on you'll need to search for the "Split Cowl Collar" tutorial.
Eleven O'clock and I'm just now set up to start work. I've arranged things so that I have to get up each time I attach a new piece even though sitting at the treadle doesn't hurt my back the way sitting at the computer does.
And, with the secretarial chair at the machine in the other room, I've discovered that I can type in perfect comfort while kneeling before the keyboard. Perhaps I should make a kneeling pad to use when my back hurts!
Now there was a speedy project. On the way back to the machine, I test-kneeled the old flat pillow we throw on the floor for the cat: perfect!
I found two linings that had been sewn to the wrong side: the first caused much baffling when I just couldn't pin properly to sew the other end.
Both were sewn right-side out. I think there is some sort of conservation of goof.
I've picked them out, re-sewn them, sewn the other ends, and begun on the side seams. It is now half-past noon.
After my nap, I went to the grocery, finished up the first set of side seams, and one of the second set. After supper, I sewed one more side seam, but it wasn't pleasant by lamp light, so I stitched onto a scrap, cut the thread, and closed up the White.
The artificial light in the sewing room is better, so I cut one of the two assembled panties off the string and began to put in hems, intending to complete and wear-test one with elastic in the legs before finishing the others. I was nearly around the third hem when SNAP! I'd hit the presser foot again. (The needle didn't break again, but it's bent and I noticed the burr without even feeling for it.)
I've never had a foot come loose while I was working, and now it's happened twice! I guess I'll have to begin checking the foot before each session. I'll replace the needle tomorrow.
I wanted to wear the elastic test today and wash it tomorrow, but I didn't have any time to sew yesterday.
New project in hand: I need to cut about four inches out of DH's waffle-knit long johns. And soon; it's cold out there.
1 5/8"
Well, that came to a screeching halt!
After breakfast, I fooled around with my e-mail for a while, then set out to get DH's too-longhandled underwear off my ironing board. Cogitated, decided to draw a blue line where the seam should be, draw another line one and five-eighths inches above that, fold on the second line, stitch on the first, have DH try them on, then trim the tuck and make a mock-felled seam out of it.
I had been planning all along to make the tuck on the outside to make sewing and fitting easier, and feebly say "it's to make it smoother on the inside". While getting ready to mark the pants, I found precedent for my plan: the flatlocked seams of the legs are rough and ugly on the outside and nearly invisible on the inside.
So I took the pants, a wash-out marker, a stainless-steel pocket ruler, and my sleeve board to the rocking chair in the living room, and had a good start on marking the third of the four required lines when DH wandered through and I casually said "These have been washed, haven't they?" He didn't know, but suddenly I did: They have been in the house for years, but they don't fit and he hasn't worn them, so they have never gotten dirty.
So they are agitating in hot water at the moment. I plan to dry them clear dry in the dryer in aid of the shrinking, so I might conceivably get at them later in the day.
Meanwhile, after replacing the broken needle there will be only two needles in the packet, so I wrote "90/14 stretch" on my shopping list. I have a full package of Universals.
And, by the way, the old roll-kit wassewn in one undulating line. I'll change that when I edit the comments into a sort of tutorial, if I ever get around to cropping and scaling the rest of the pictures.
Just now thought: in addition to linking to the account from the roll-kit discussion, I should file it under "project blogs".
In the elastic box, I found elastics salvaged from the panties that I cut up for linings, and used some for the elastic-trial panties. The cord elastic is 34", the baby elastics are 19 1/2".
I appear to have plenty of baby elastic, but there isn't enough cord elastic to do five more pairs. Two, maybe three, but not five. Work can't proceed until after washday —unless I have yet another emergency wash— so I'll probably get out that way without making a special trip.
I regarded the gap left when the needle broke as a gap left for inserting elastic. I had to re-insert a couple of pins after putting the elastic in, but this worked reasonably well.
Next was to finish changing the elastic in the old wool tights. Since the elastic was already in the pinned casing, the hardest part was finding my black silk thread. It appears that I neglected to label the bobbins of thread in my bobbin-box sewing kit. Eh? I have a photograph of that box on this Web site, and it clearly shows marked bobbins. The thimble has gone missing too. I haven't used that sewing kit as a sewing kit for a loooooong time. Partly because I don't travel much, partly because a lot of sewing tools have accumulated in my purse. I should photograph my pencil-kit Little Bag of Stuff some time.
Anyhow, one of the bobbins contained thread I couldn't distinguish from the silk thread on the spool, so I used it. There is another black bobbin that I think might be polyester. The plastic #60 bobbin in the photograph is still there, slightly bent. Ah, the other two bobbins of white thread also retain their markings: "40" scratched into nail polish on one, and "20" in cold type on the other.
I think that the spool that looks pale, pale yellow next to the other three is white or natural silk.
I cropped and scaled three more bike-kit pictures, and edited the links in this file.
And in the evening I did the rest of them. Does the file download any faster? It certainly scrolls faster on a slow computer.
Oops. That means that I have no more excuse not to edit that down into a file for the sewing-kits . . . chapter? file? page? section?
Later in the evening, I copied this file to BIKEROLL.HTM and started removing extraneous material, including, I hope, all the stuff that was merely commented out of 2013SEW.HTM. Because I put it into the same directory with the photographs, I had to edit all the image links. Oops. But after I'd done a few I knew how to do it with search and replace. I even edited one sentence!
And now it's definitely Usenet time.
I finished deleting unwanted stuff this morning, and re-wrote some paragraphs. I need to take a picture of the finished product and a picture to put at the top of the blog, and I want to cool it off and re-read it before linking to it — some of the paragraphs that I deleted were downright embarrassing when taken out of context.
I took some pictures this morning. The edited versions will appear only in the project blog — sorry about the download time.
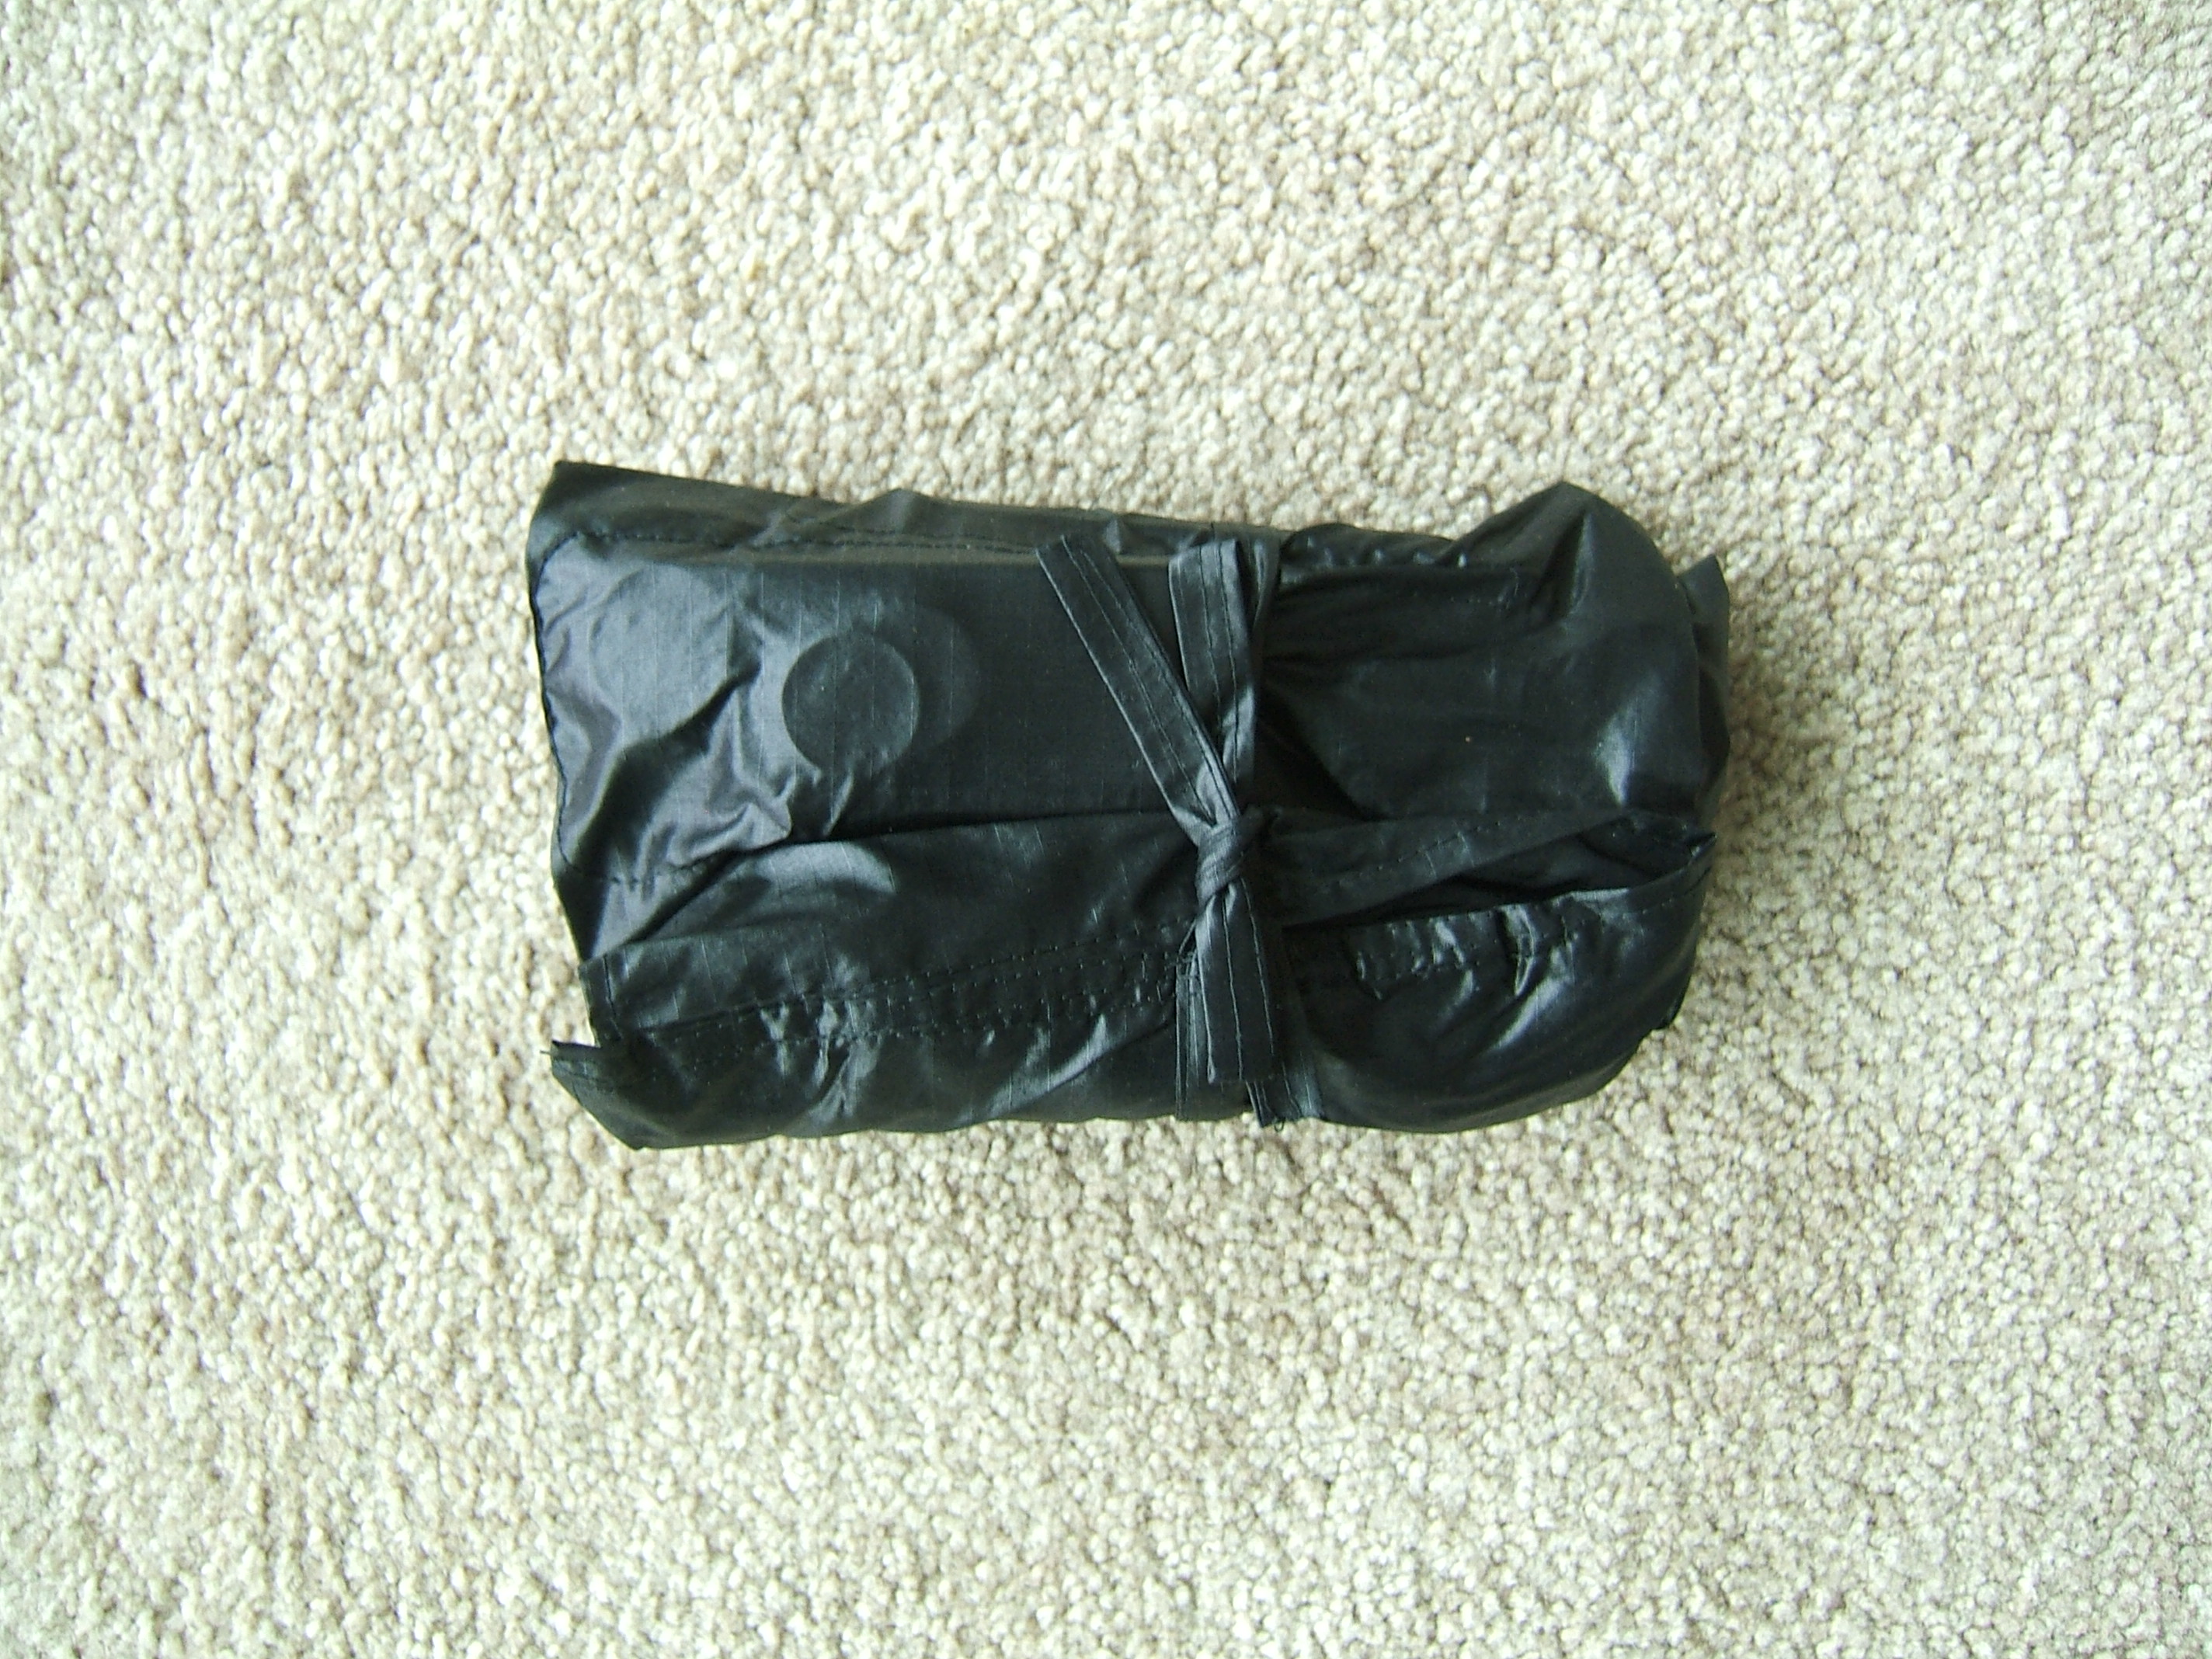
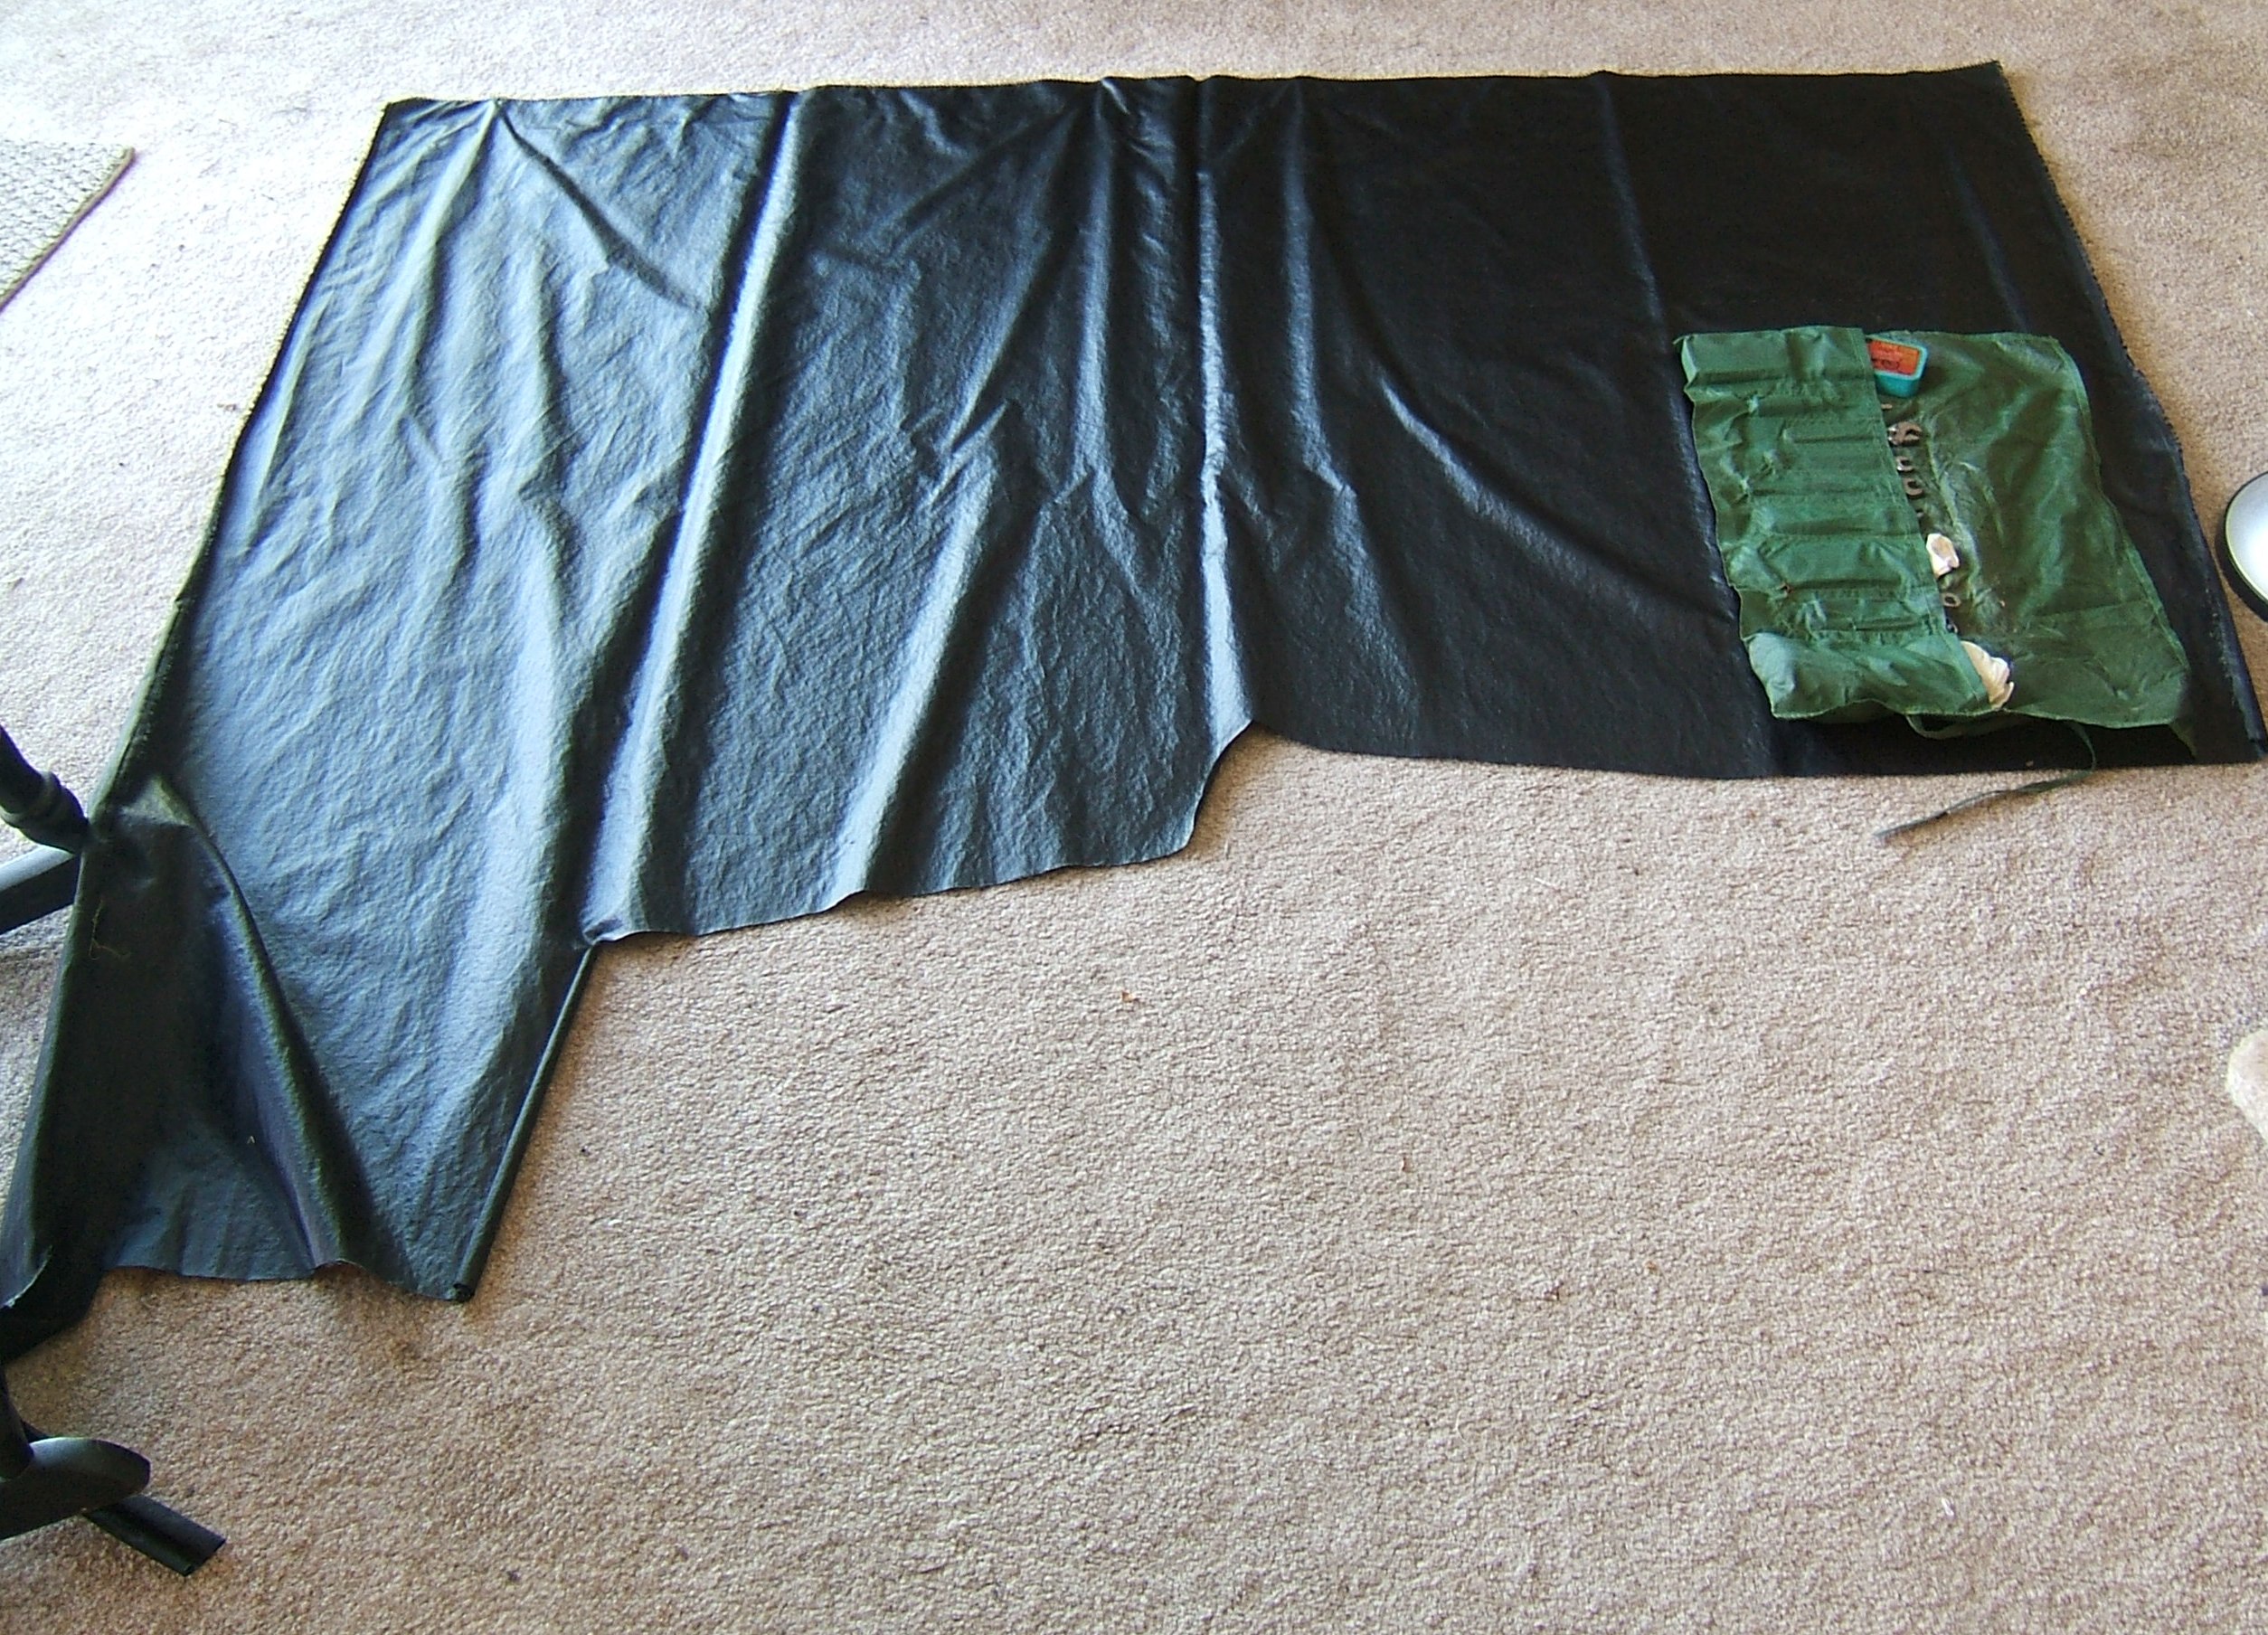
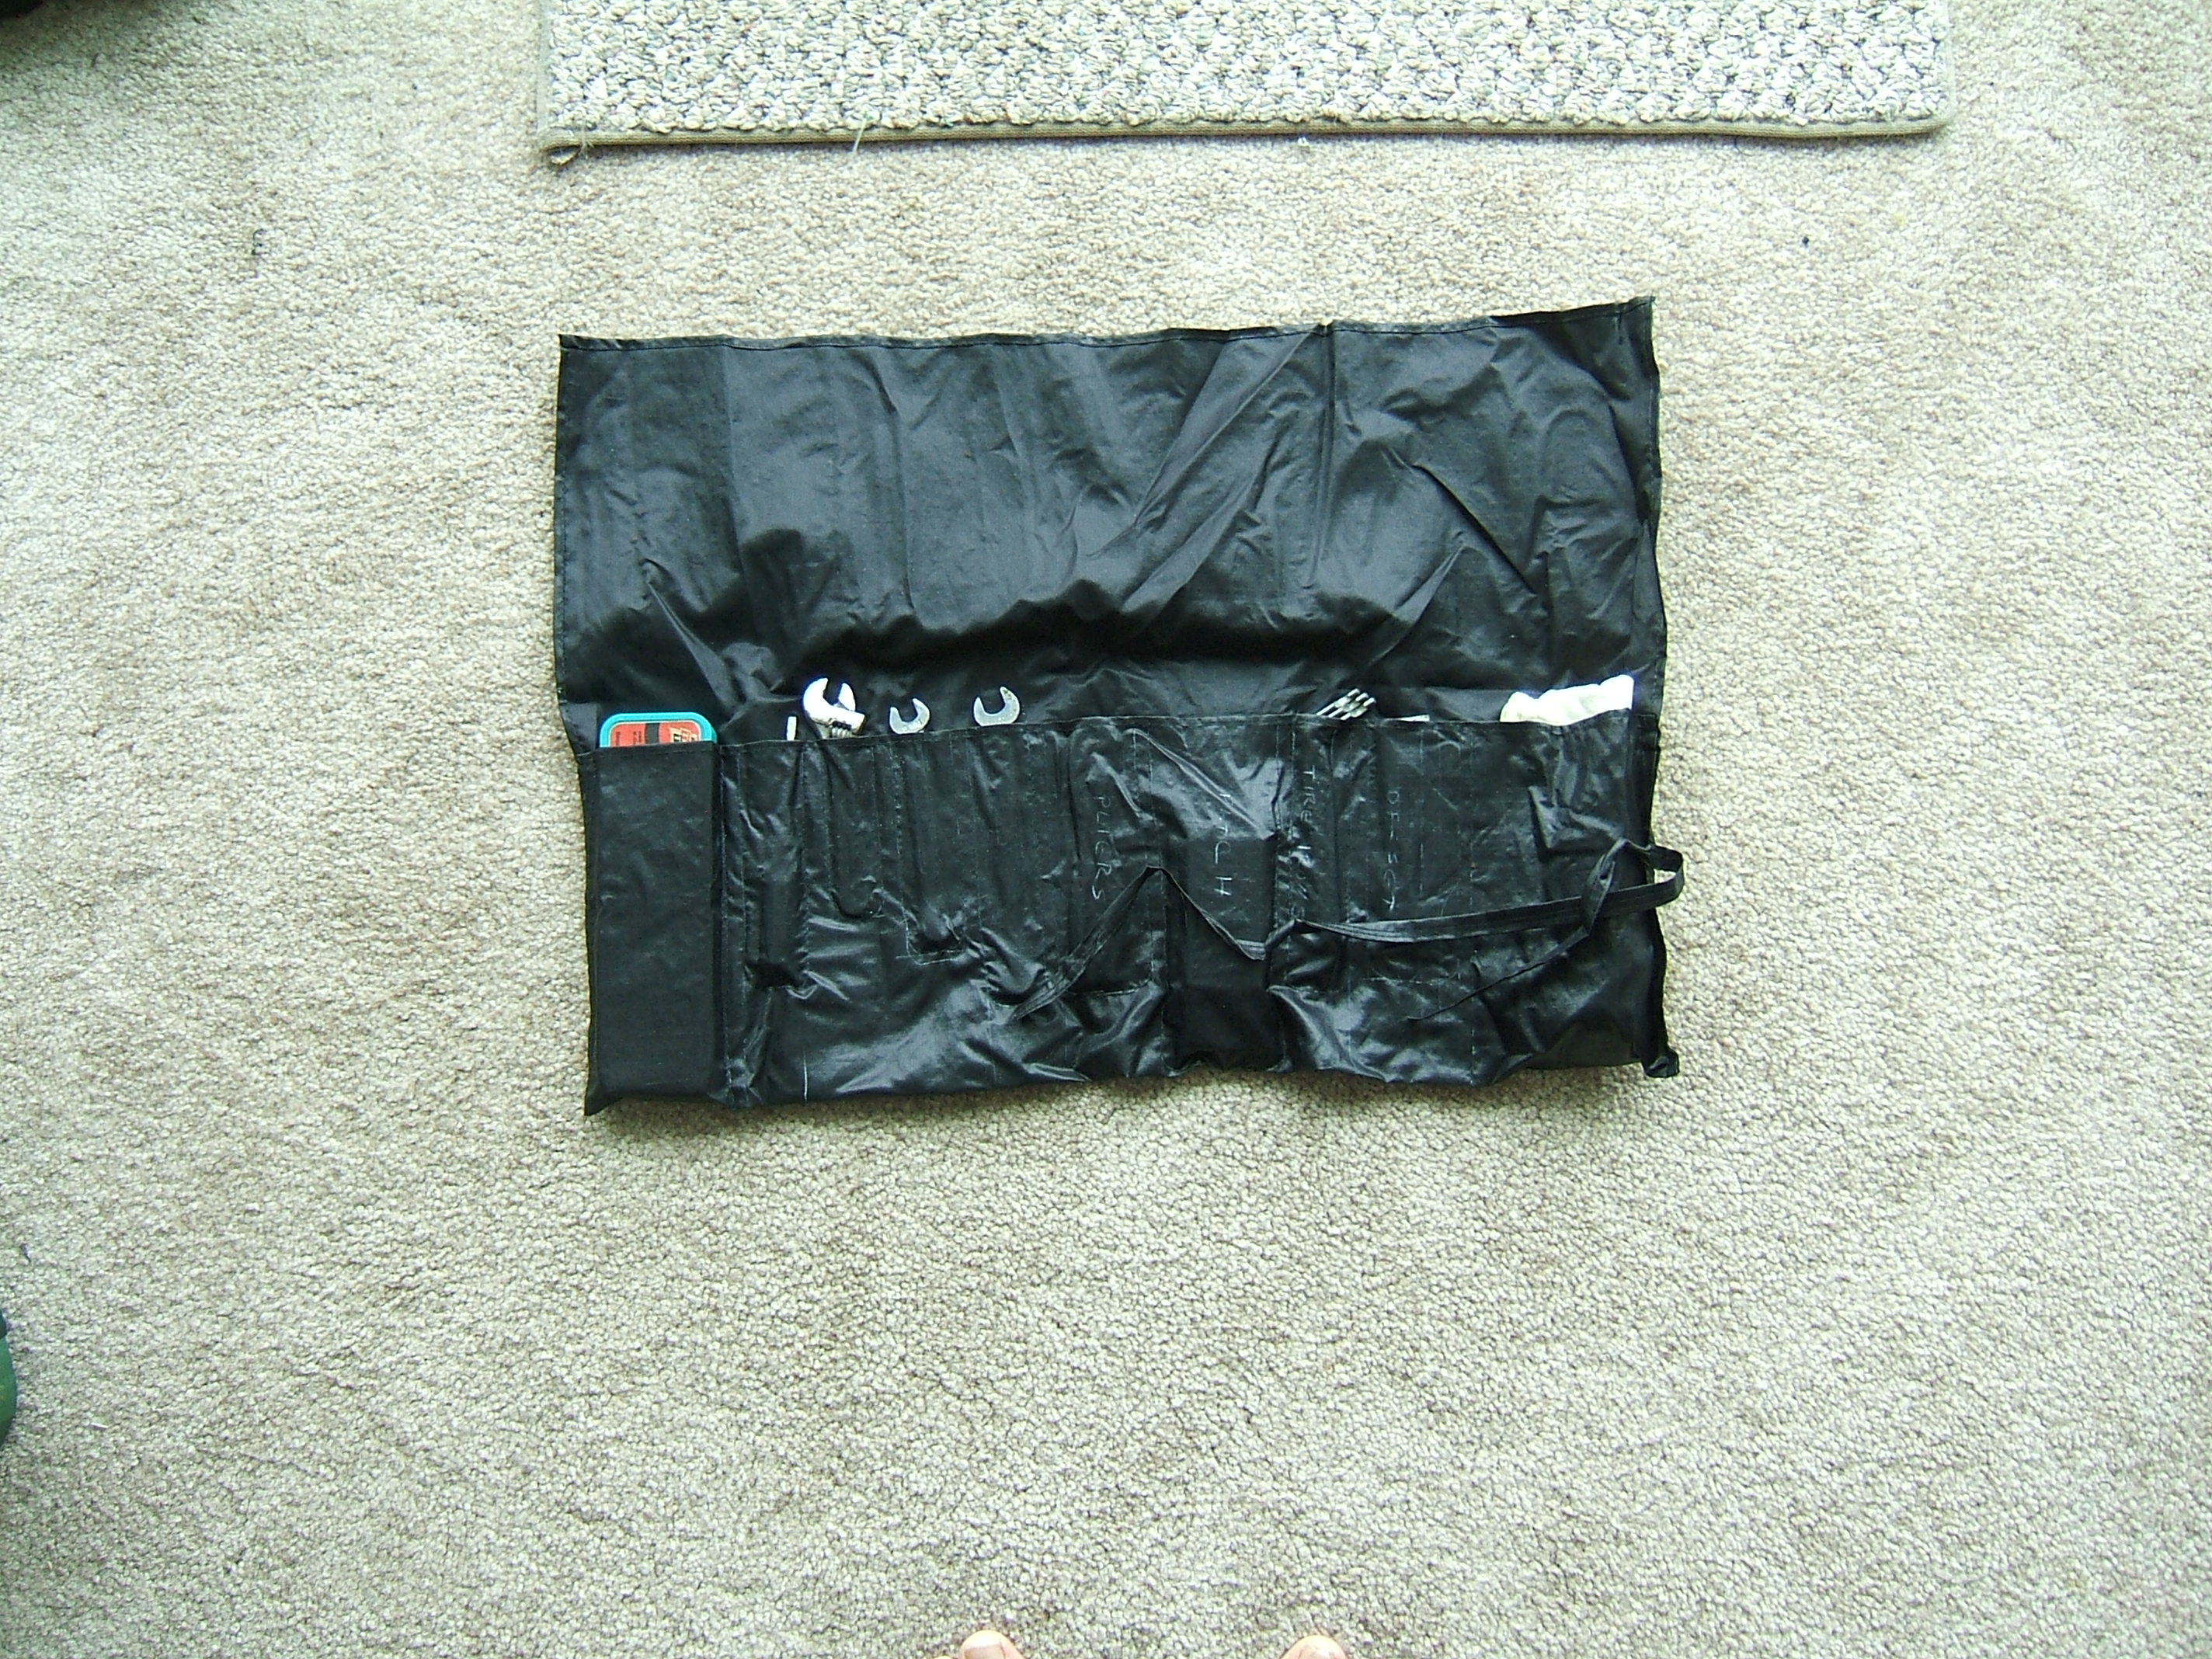
I had decided that I like the folded version of the "before" pictures better even before I noticed that I'd missed my aim a little on the opened version, so it's #87 for the title shot
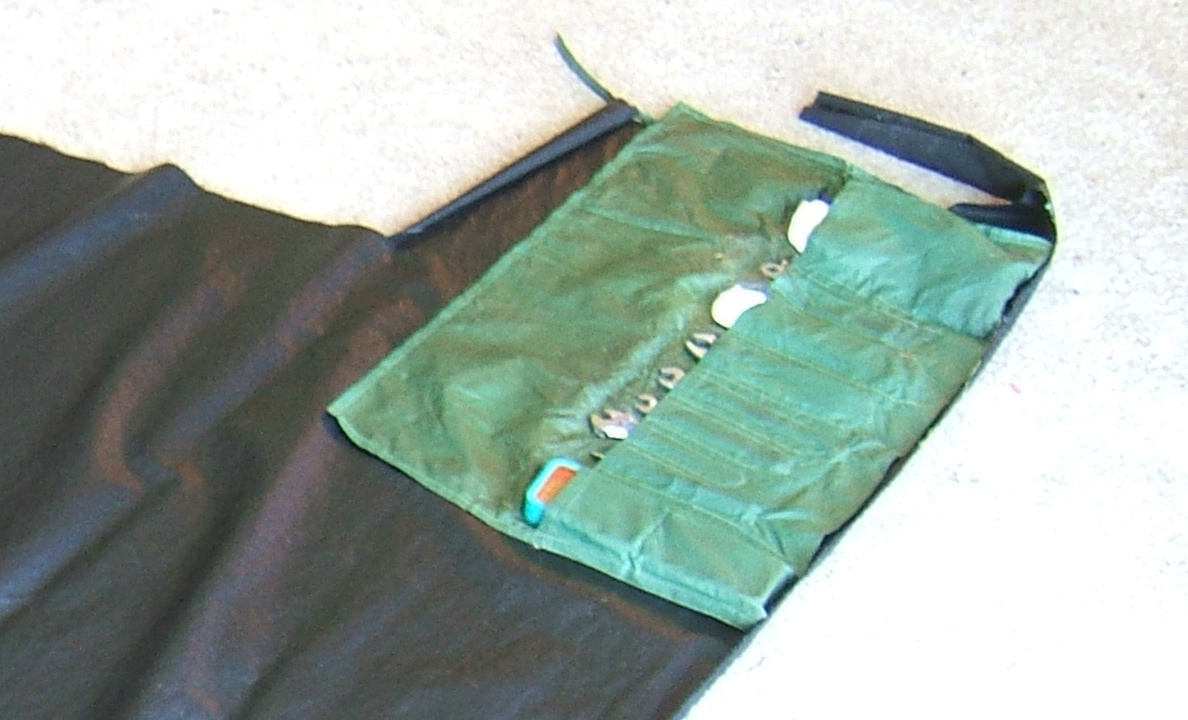
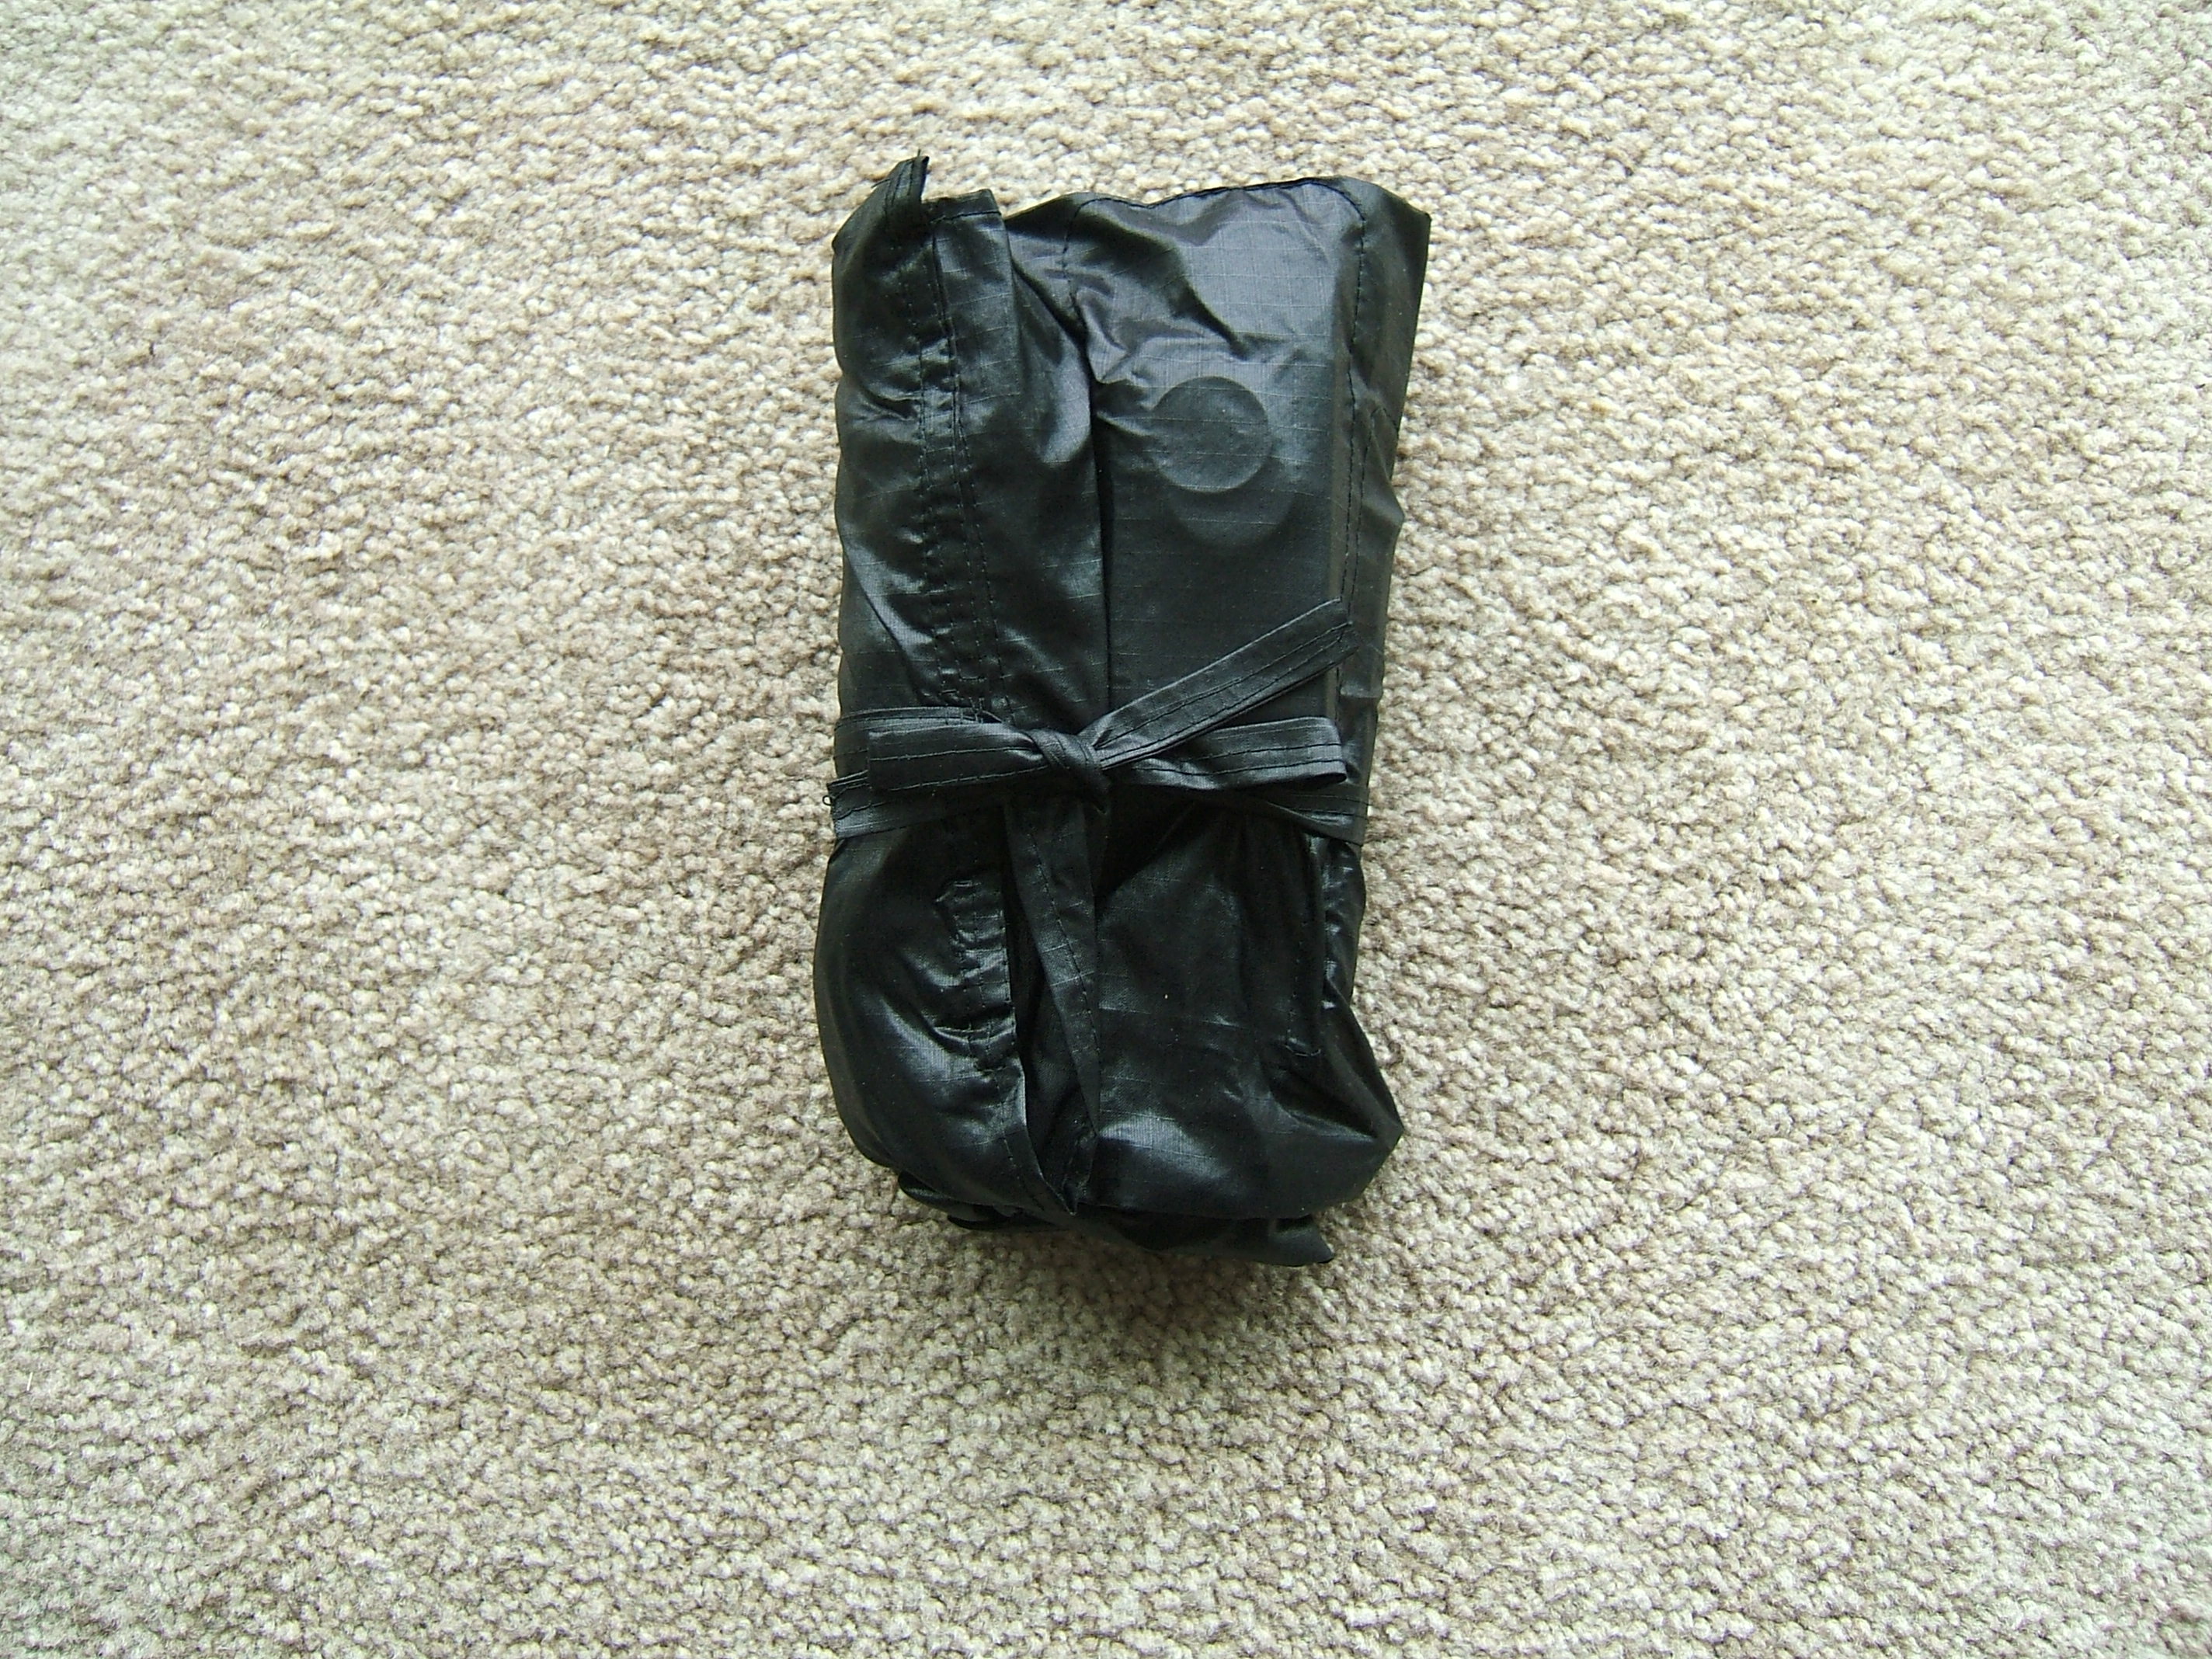
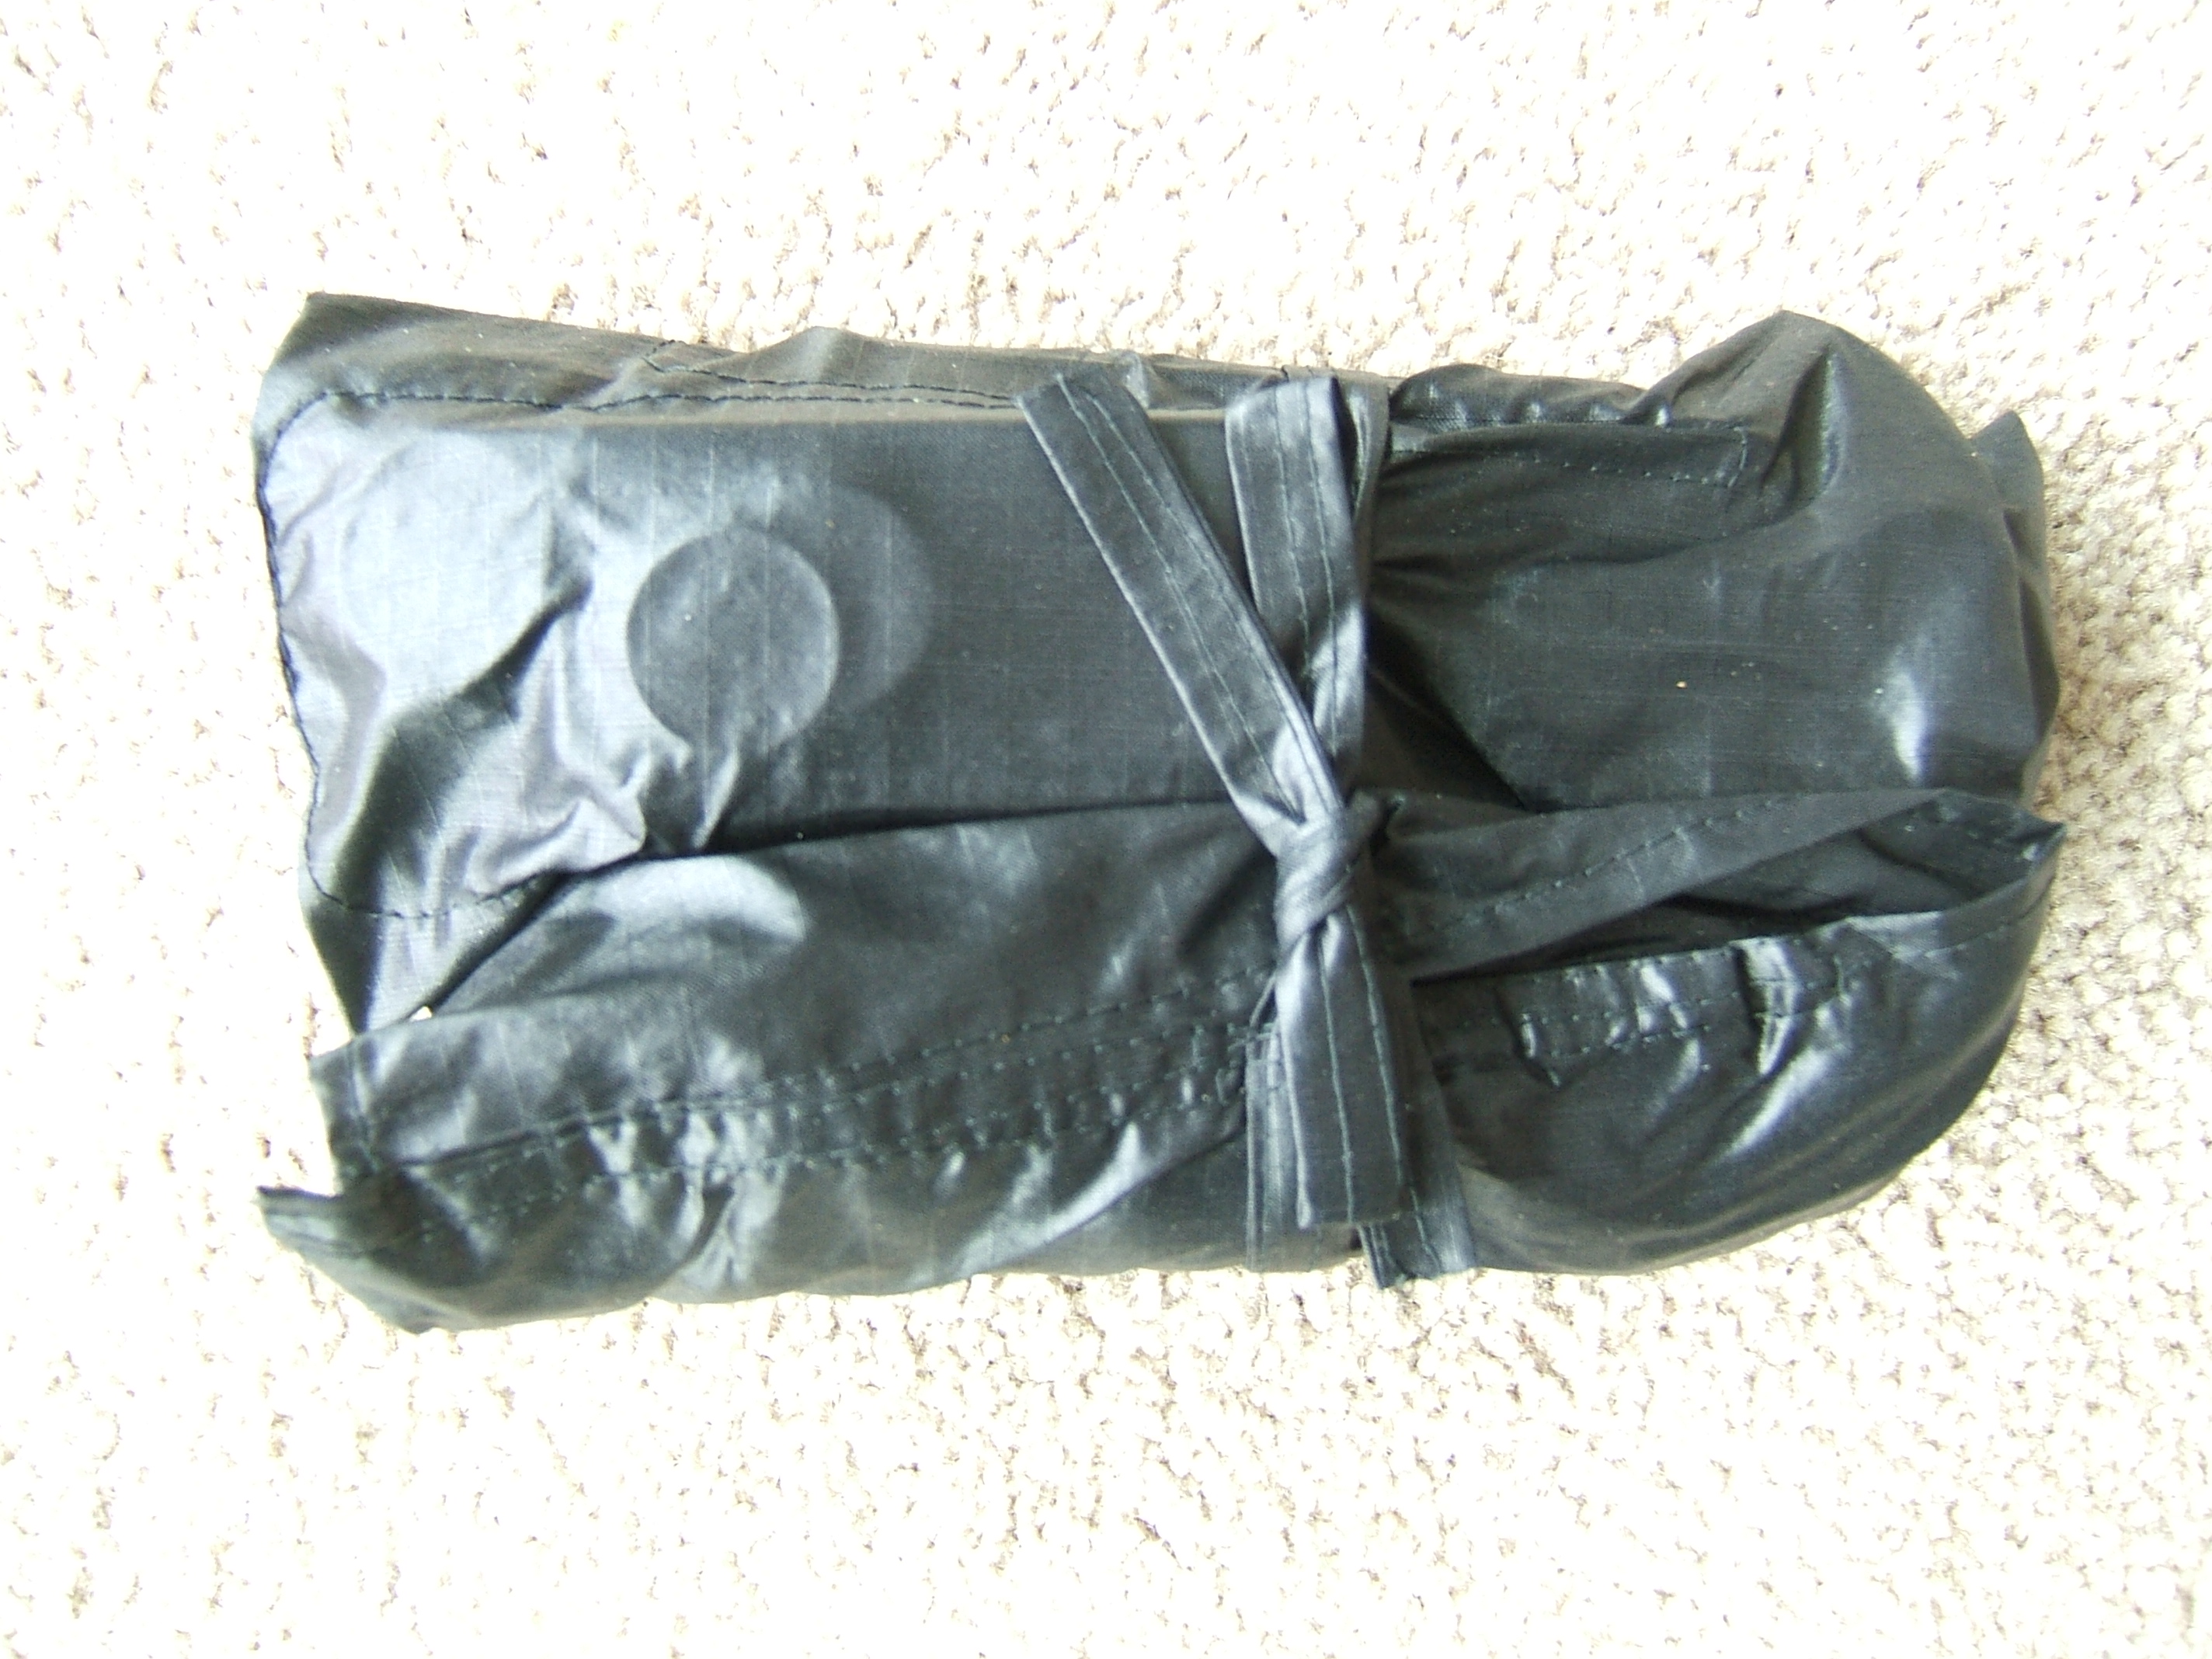
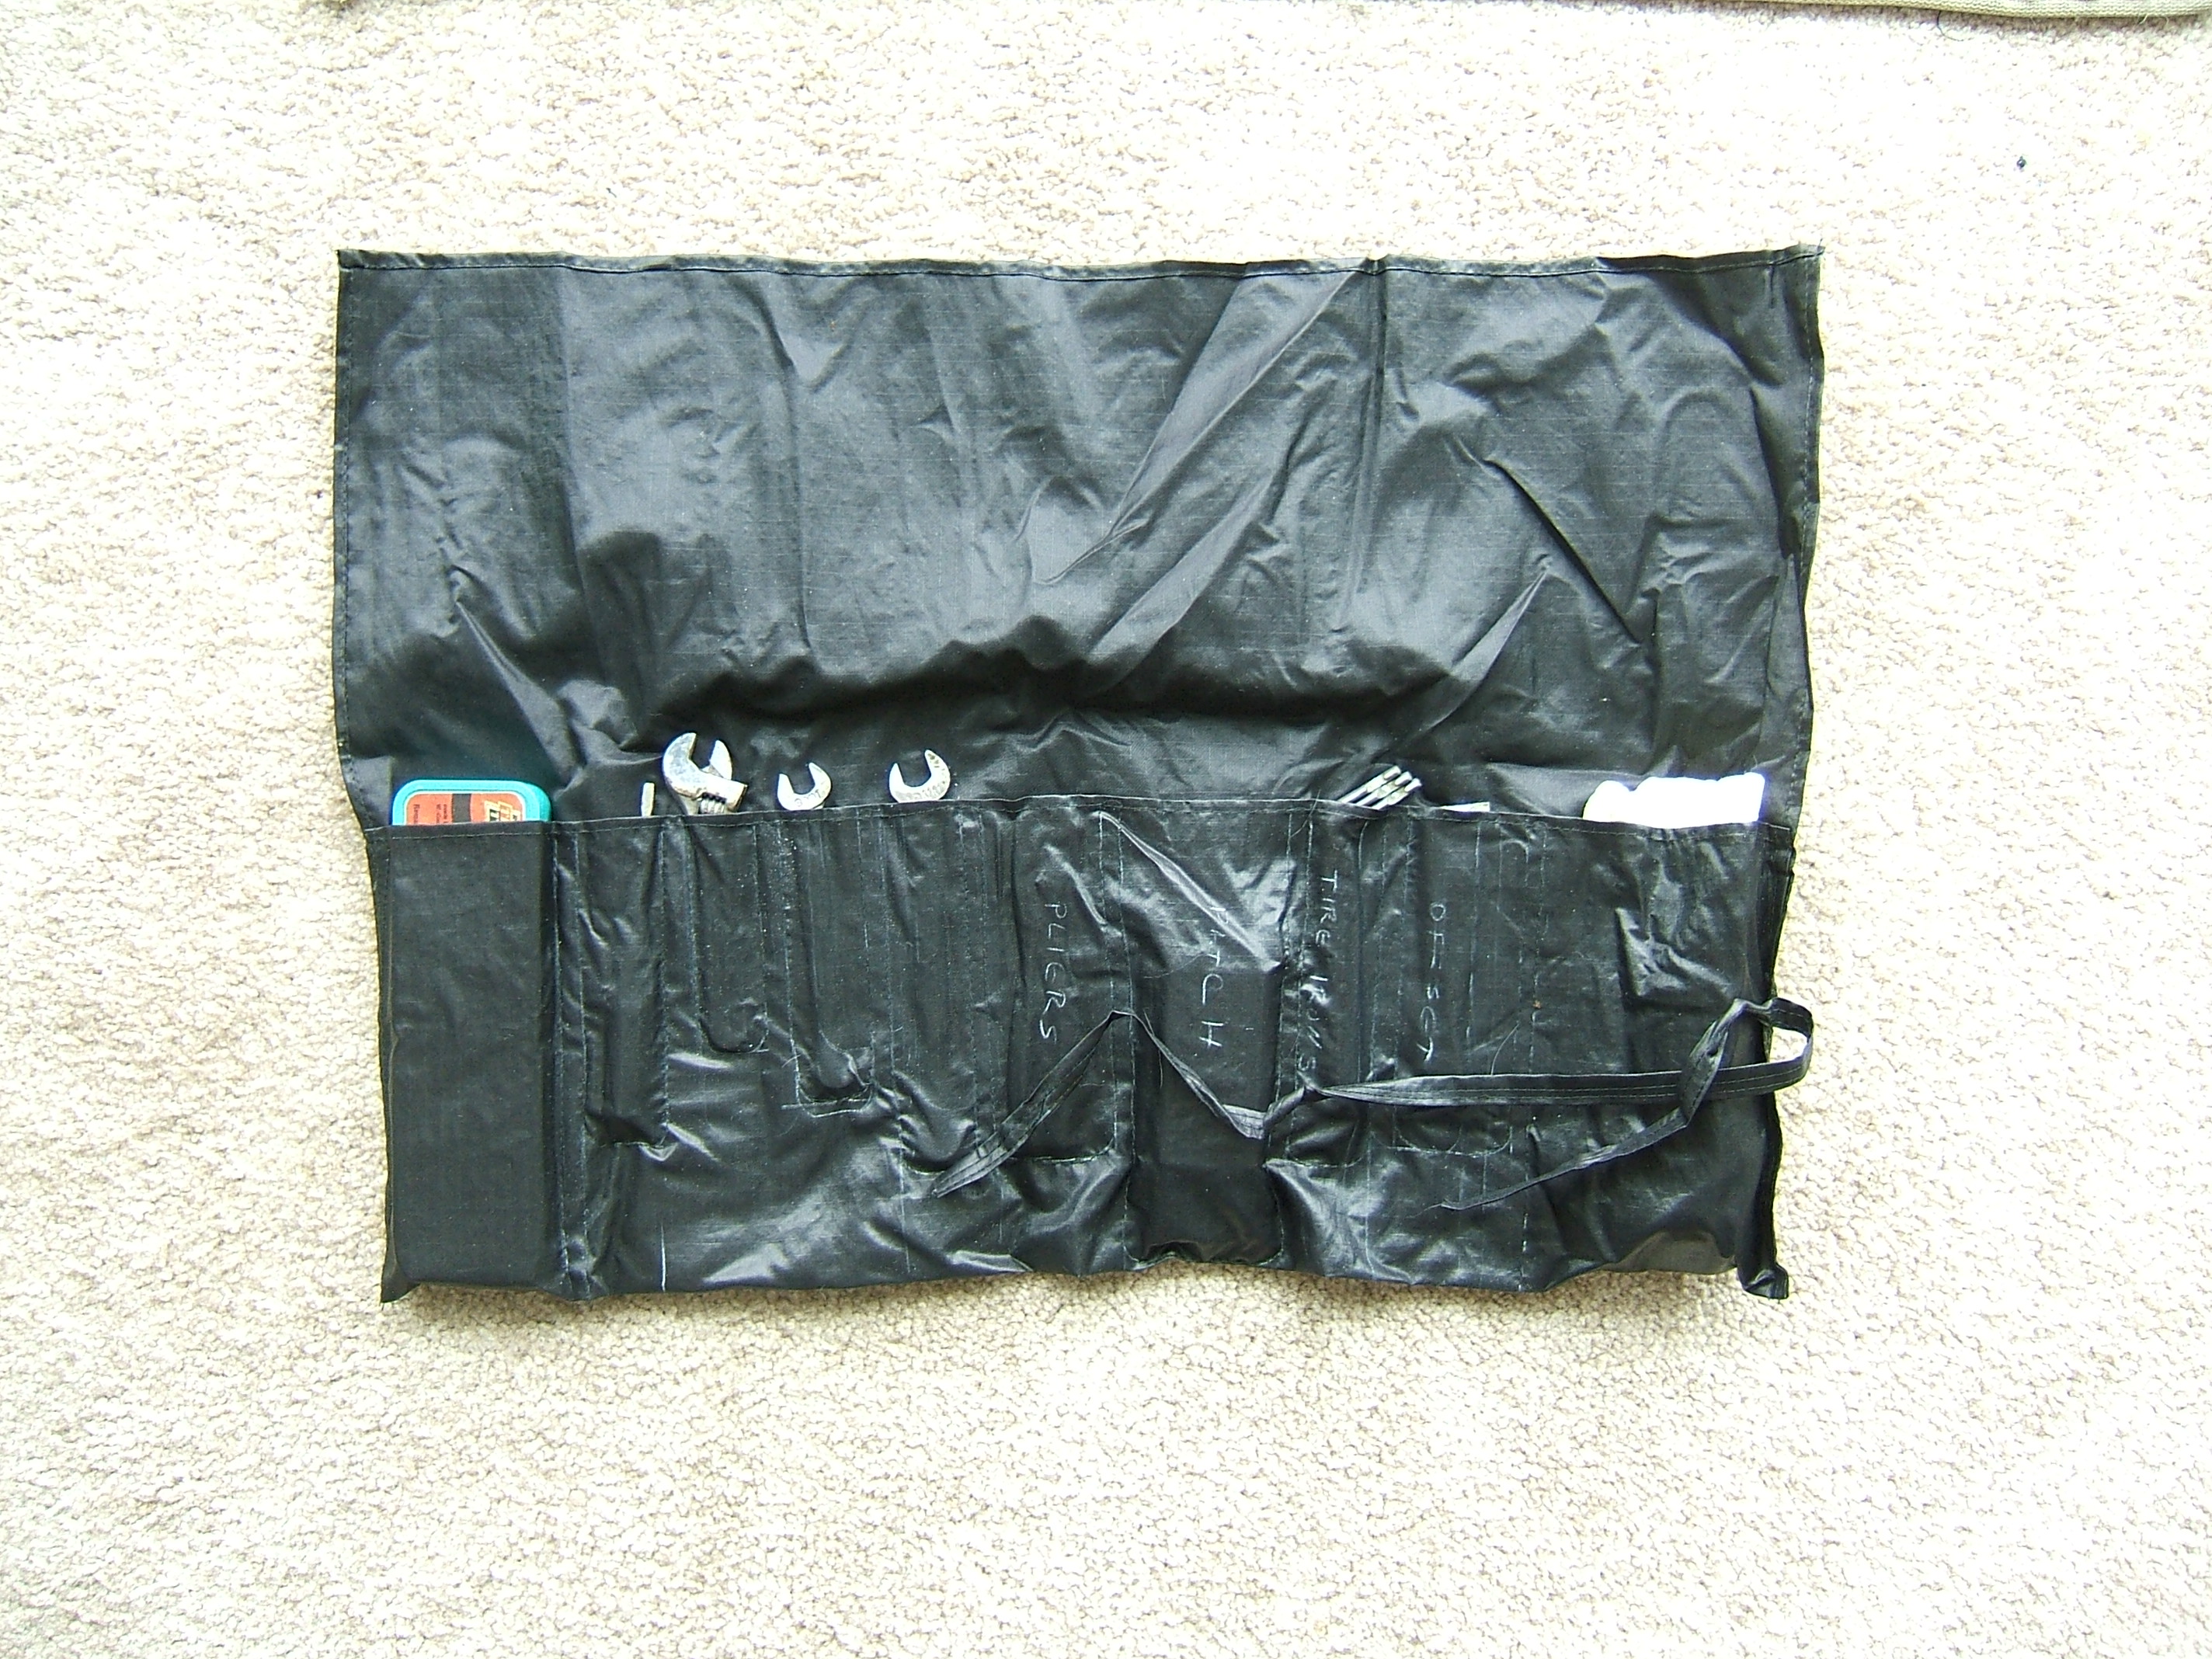
I was minded to use the overexposed-carpet shot of the rolled roll kit, but "view image" reveals that it's a mite out of focus. The black in the image above is exposed enough, and "view image" shows that it is nice and sharp, so it's #84 for the "All done!" shot.
And of course I've no alternative to using #89 for the open shot. But "view image" shows it a tad out of focus. And the roll kit is still in the spot of daylight.

The last one is out of focus, but both of the other two are sharp. I believe I'll go with #91.
And this is a very nice time to have two monitors — I can read this file while editing the other!
Finally got back to work on the underpants today. Sewed the waist casing on one, reached for the next — and discovered that I'd never finished sewing the side seam. I did get all four done and sew another waist casing before I ran out of light. I was nearly done pinning the third waist casing when the clock bing-binged for supper.
The clock just chimed six, and it's still light enough to walk even though it's raining too hard to go. Spring is on its way!
I find that I'm not really using the hem gauge to measure the hem, I'm using it to keep my eye calibrated: I turn down half an inch for the waist hem, then put the gauge on it, and almost never have to shift the fold.
Which makes me feel less careless when I fold the entire leg hole by eyeball. (The sharper curve makes the gauge harder to use.)
All five waist-casings done, and one pair is ready for the elastic. I suspect that I'd best unroll the baby elastic, measure it, and divide by twenty inches before I go to Lowery's to buy cord elastic. The day after tomorrow would ordinarily be my day for outdoor exercise, but the weather isn't going to clear before Sunday.
Pinned another leg casing sometime after the previous entry.
Yesterday I felt up the jersey I made with fabricstore.com's 1L20 and concluded that it wasn't enough finer than the linens on hand to make it worth my while to order some, and it isn't as tightly woven as random "handkerchief-weight" cottonized linens.
Today is washday.
My sewing room was meant to be a bed room, so only half the closet will hold fabric, and that half won't hang anything more than 58" wide. I should have the lower shelf and closet rod taken out of the shirt-and blouse half; then I could hang twice as much fabric, and that side would take fabric up to 68". But in the meanwhile, I hang all the wide wovens in the laundry room. They make it inconvenient to get at the dryer, but I air-dry everything but DH's socks.
Which is why it being laundry day made me notice that my remaining piece of black pure linen is soft and fine, and that having more black underwear would make it easier to sort the wash. I was hoping to save it for something that could make good use of its real selvages, but that isn't going to happen, particularly considering that it's 55" wide.
So why isn't 55" fabric in the closet with the other linens? <gets up to move it><moves red ramie as well>
With the snow on the ground, I didn't need artificial light to sew the remaining hem casings this morning. I used the glary blue headlight anyway. Woke up from my nap barely in time to dress for a committee meeting, so no elastic installed yet.
I intend to take the black linen to the church and mark true-bias lines all over it the first chance I get, but I think my front-burner project will be a white T-shirt with a split-cowl collar. <http://Off-The-Cuff-Style.blogspot.com> The T-shirt I'm wearing and my black T-shirt are all the presentable short-sleeved T-shirts I've got. And this will get the PFD jersey off the piano. (I'm not sure that stuff is really PFD — it lights up like neon when I shine the UV flashlight on it.) (I suppose it could have picked that up from laundry detergent, though.)
The table was available; so before putting elastic in my new briefs, I should cut out my white T-shirt. First, find and modify the pattern — the beta shirt made with my Fashion Incubator sleeve is a tad tight across the chest when I'm not reaching forward, so some ease needs to be added.
Finding the pattern entailed re-organizing the entire shirt-and-dress end of my pattern wall. The wovens were sorted from the knits pretty well, but the jerseys and the interlocks were thoroughly scrambled together. When everything was on its proper nail, I took some yellow squares of paper from one of the memo pads beside the phone and made labels to help them stay sorted. I punched a hole in each label and hung it on the corresponding nail; it makes the wall look quite neat. Helps, perhaps, that I drove two more nails — teeny little copper brads that I have to hold with pliers while pounding. The pliers make a handy gauge to show how much nail to leave sticking out.
Having selected the pattern, I tore two pieces of newsprint off the roll, but when I thought about it I realized that all the change needed to be in front, so I'm using the back that I intended to use as guide for drafting the new back. I wrote a reference to it on the new pattern.
The new pattern is all drawn and I've walked the sleeve pattern on it — had a "walking guide" (a copy of the pattern with no seam allowances) left over from last time, so that wouldn't have taken long if I'd remembered that the stitching line wasn't drawn on one of the seams of the back. Considerable consternation when I appeared to have negative ease in the sleeve cap! I've got only a quarter inch of ease, but with this shape of sleeve, that's plenty.
The new pattern isn't cut out, but it's time for my nap. I drew it on folded paper, but forgot to put carbon under when drawing the cutting line. Actually, it's easier to re-trace than to fiddle with those letter-size sheets while I'm creating the line.
Theoretically, I can just cut through both layers at once, but I'd have to pin them together or something to keep them from shifting; re-tracing and cutting twice is less trouble.
In the event, I put a lot of books on it and used my older rotary cutter.
Now to draft a collar pattern. I was minded to use the wider of the range given, on the ground that it's much easier to cut some off than to add some, but upon checking back with the blog (after reading the review of a shirt pattern posted since my previous visit) I see that the range is eight to twelve inches. For a high neck, three-and-a-half inches is a lot of collar! I calculated that I need a twelve-inch piece of paper to draft my pattern on — cut a square for a collar? And the actual pattern will be a couple of inches shorter.
Reality check: my neck is fourteen inches. Could I have used an interlock pattern by mistake? No, both said "striped" plain as day, and that's jersey. And in addition to including seam allowances when I measured to see whether the pattern would fit on the paper, I need to ease an inch out of the back of the neck to make up for leaving out two dowager-hump darts, and also ease a suspicion (I don't know the HTML codes needed to say "suspicion" in French) out in the front.
Which is why I need a pattern: the collars in the examples are sewn on one-to-one with no easing.
I think I'll do what I always do: stretch the fabric around my head to see what is the shortest length that I can pull on, and then make the neckline fit it. But instead of sewing a narrow band into a ring, I'll sew a wide band in half.
When the neck is stretched to fit over my head, there will be a lot of strain between the ends of the collar.
I've been thinking about this for days, and have concluded that the best solution is to appliqué half an inch of white quarter-inch cotton tape to the seam allowance at center front. And up to this very minute I was thinking of sewing it to the right side, because of the route by which I came to that conclusion, but inside would mean no fiddling around to be sure it doesn't show. <checks> Yes I have quite a lot of thin, tightly-woven, white cotton twill tape. A note on the reel says that I've had it since 1976, so don't ask me where to buy some.
DH finally tried on his long johns yesterday, so today I cut the tuck and flat-felled the seam.
I think it counts as flat-fell, rather than mock fell, when you zig-zag the edge down. I've decided to use only one round of top stitching; the tuck seam will hold by itself, and this way I don't get zig-zag over zig-zag on the right side.
When I changed the white thread for ecru there was exactly enough white thread on the bobbin to engage the tension device. I'd have gotten a surprise if I'd done more white stitches first!
According to my tape measure, my yardstick is thirty-six and a quarter inches long. I should get down all the yardsticks and compare them to each other.
Found six; there is no more difference among them than could be accounted for by wear. So I guess my tape measure is a little short. Usually a tape measure stretches.
For a while, my ambition was to put a yardstick over every doorway so that I wouldn't have to remember where I put my yardstick — or remember where to put it back.
I threaded all the waist elastics this morning, and got a good start on the legs. I'd been meaning to sew the eighth-inch elastics, but when I was measuring the first one I thought of doing it twelve times, and reflected that the knots in my current undies don't bother me a bit.
I'm much inclined to do things that don't need doing, such as buttonholing both sides of a buttonholed bar tack, and tearing cleaning rags instead of cutting them slightly off grain, but there are limits.
Yesterday, I inserted elastic in the rest of the underpants and two pairs that had been in service. It was harder to run the fat needle through hems that had been washed and worn — and really hard to open the hems on the first pair. I appear to have had trouble starting the machine; each of the first two hems began with an unintended bar tack. And, of course, I had stitched the end over the bar tack, so that had to be picked out —thread that had been washed and worn— before I could get at the jumbled stitches.
If I've counted correctly, this makes eight pairs of new white panties, which is exactly enough to get through a week, and I have way more than enough of the old shabby panties that refuse to finish wearing out, so the drawer is pretty crowded. But after I make black bras, I'm going to have to make some black panties.
Sudden thought: all of the old shabby panties were made from the scraps from making shirts. If I make a white T-shirt, I will have made a shirt from the scraps from making panties.
I sewed up gaps today and all my new panties are in my underwear drawer. (I have my drawers in a drawer?) I forgot that the two on top of the pile were retrofitted, and experienced a little cognitive dissonance when I couldn't find a gap in the stitching of the casing around the waist.
When sorting the wash, I noticed that half an inch of seam at the base of the placket on one of Dave's Henly shirts had come unstitched. (Which was a relief; at first I thought the fabric had torn.) To the thread shelf: there's not only a spool of dark brown, it's vintage ONT six-cord thread!
But it's a bright brown that shows up brilliantly against the dull brown of the shirt, and shiny besides — ONT was mercerized. Luckily, it shows only on the wrong side
Meanwhile the slit where a stitch broke in the seam in the patch on the knee of my dirty-work jeans —on the frog on the log at the bottom of the seeeeeea— is twice a long as it was when I first noticed it. Gone be difficult to baseball-stitch the broadcloth without catching the denim underneath. I reinforced the jeans with black broadcloth because it was handy, not thick enough to tear the worn-out fabric, and appearance no longer matters.
DuckDuckGo reminds me that the log is in a hole at the bottom of the sea.
Remember all that fuss I made about drafting a new front pattern for the white T-shirt? Today I punched a hole in it and hung it on the rejected-and-outdated nail. I tried "inctest villa olive" on and decided that the original pattern is what I wanted all along.
Some baby elastic in its neckbinding wouldn't hurt anything, and the neck of my wool jersey definitely needs some elastic.
Another slit is opening in the seam in the patch on my knee. Should have used better thread to piece it even though good cotton thread doesn't come in black. (The ads I get from Superior Threads *say* their dyed cotton threads are good, but it will be ages before I want enough stuff from them to send in an order. I don't think any of them say "six ply".)
Speaking of bad thread, when I reached for my red bra yesterday morning, I noticed highly-visible elastic. Inspection showed that the red thread was breaking all around the casing, and also all around the top-stitching of the bias facings on the armholes. The top-stitching on the seams and darts is also wearing off, but those are all stitched flat-fell style, so they can lose a lot of stitches without failing.
So I picked it up this morning: Would hand or machine stitching be less trouble, and should I use the bad red thread again, or good white thread? Decision made when I noticed that the Necchi is set up with 100/6, but I may change to red for repairing the armholes.
I'm not sure what's on the White, but its bobbin of white 100/6 is in its drawer.
I don't think the White has a bobbin of ecru 100/6.
Decision re-made when I realized that ecru 100/6 would be better for repairing the elastic casing — so I'm using red. It will probably hold until the fabric wears out, and quite a few stitches can break before it needs to be mended again.
Choosing red proved wise: in stitching the first division, I caught the elastic at one point — if that turns out to be a problem, I can count on the weak thread to break.
When the second division got past the biggest hole, I said "that's enough"; too much danger of catching the elastic again, there won't be much stress on it once the edge is secured, and small gaps won't matter.
When I realized that I couldn't stretch the fabric completely, I put a slight wobble into the stitching, and for the edge, I used a narrow zig-zag, zags in one layer, zigs in the binding.
It turned out well; the faded fabric is the main indication that this is an old ratty bra.
I was reflecting that I had set the stitch length for 2.5 mm, therefore the zigs were five millimeters apart, and that sounded like an awful lot, so I borrowed a metric ruler from DH — three millimeters apart. So what does 2.5 on the stitch dial mean?
Whatever, it's time to shake out the three worn-out sheets and select one to turn into pillow cases.
So I cranked the stitch-length up to four, pulled the thread out of the needle, left it on zig-zag, and sewed a piece of paper. The holes are eight millimeters apart. Duh! Fabric stretches!
The biscuits I baked for lunch have come out of the oven —a tad browner than I prefer— and I'm not yet completely dressed.
I threw my black fleece pants into the wash last night, and this morning didn't find any reasonable alternatives in the closet, so I finished altering the other pair of black fleece pants.
I had two pairs of sweat pants for slopping around the house, to quickly pull a pair of jeans over when I wanted to go out into the cold. But it was a little awkward to get them inside jeans that weren't much wider in the leg, so I decided to put darts where the side-seams weren't to take them in a little. I think there's a blow-by-blow in last year's sewing diary. When I had a pair finished, I lost interest in the other pair, and it's been hanging in the closet with the darts sticking out like wings all this time.
So today is the day to slice out the excess fabric and turn those darts into flat-felled seams.
But in the meanwhile, I'd found that I'd overfitted the other pair, turning them into tights. That's all very well and good for wearing under other pants —particularly on the bike— but having to peel off my slopping-around pants got old really fast.
So first I made a mark one inch from the stitching at the hem, and drew a line through this mark tangent to the stitching, to duplicate a change I'd made in the other pants to allow for a smaller dart in the inseam. I started to mark the smaller dart, then remembered that I had pressed this dart open, so I needed the marks on the inside. I settled for making a Nonce mark to show how long the dark should be.
Then I re-stitched the seam with the middle of the left toe of the Necchi running down the old stitching, then took out the old stitching. This added about half an inch of ease to each leg.
The old stitching was straight-stitch; I used a wide zig-zag for the new stitching.
Then I trimmed out the excess fabric. It was very difficult to slip the point of my bent-handle trimmers between two fuzzy layers without catching the wrong one, so I put them down and fetched my straight operating scissors. The blunt point slid through as slick as grease. I switched to the shears to trim the upper layer.
Then I gathered the leg up on the free arm and stitched it off, a couple of inches at a time. An aluminum bodkin my grandfather made for my grandmother was a great help in this process.
And at this point I was done, because at some point in the procedure I'd tried the pants on and decided that I could do without the inseam dart very nicely, thank you.
But now that I have the Necchi set up, it's time to re-stitch all the broken seams and hems in my twinkle-twinkle beta shirts. I'd meant to use black cotton thread, but the black polyester I can buy is of much higher quality than the black cotton I can buy, and fiber content doesn't matter in this application.
The flannel shirt I'm wearing instead of one of my beta shirts needs washing, and there's a tear in it that needs patching before I put it into the wash. I'm pretty sure that I have matching scraps around here someplace.
And those biscuits are probably *too* cool by now. But this recipe is good entirely cold, if you don't wait too many hours before eating them.
When I sat down to work, I discovered that I'd left my battery-powered LED lamp on all during my nap.
But I'm dressed now. I repaired a "twinkle twinkle" shirt and put it on, repaired the short-sleeved twinkle-twinkle shirt and hung it in the closet, then pulled a stinky twinkle-twinkle shirt out of the laundry basket and repaired that. I thought I had four of these — perhaps I've managed to wear one out.
There is still quite a lot of twinkle-twinkle jersey in the closet. Twinkle-twinkle is a very striking print to have yards and yards of!
Oh closer inspection, the tail of the flannel shirt is worn thin, which makes patching it harder to do and less worth doing.
No further progress on the pillowcase project.
21 1/2 "
2 yards 33" = 105"
-: 44 = 2.38
2 yards 17 1/2 " = 89.5"
-: 44 = 2.03
So I can get a maximum of four pillowcases out of this sheet, and it doesn't matter whether I arrange them lengthwise or crosswise.
Hmmm . . . maybe five, if I tear 22.5" off the side and make one pillowcase from that strip, then tear the remaining 82.5" x 89.6" into quarters.
I'm ignoring the location of the hole, which is small. It seems to be torn rather than worn, so it can be patched.
Found that the false hems had to come off. Finished ripping off the last bit yesterday, while Warsaw Geek was re-doing our network. The razor-blade bit works well: pin hem or sheet to the Lazy Boy, pull on the other with the left hand, touch a single-edged blade in my right hand to the tensest thread. DH wanted to sit in the Lazy Boy, so I did the last four inches with the sheet pinned to my knee. Which worked so well that I see why the vintage sewing books have to yell so loudly that PINNING YOUR WORK TO YOUR KNEE WILL GIVE YOU A CRICK IN THE NECK.
With only a few inches to go, I wasn't much concerned with neck-cricking.
I had already washed previously-removed hems in hot water and bleach, and mopped skillets with some of them and thrown them into the bag of greasy paper I use for starting fires. (This is NOT kept in the house!)
Today I darned up the silk thread attached to my wool jersey and cut off and rinsed a new piece, which is now draped over a lamp shade and probably quite dry. Noticed while doing so that the size label is still attached to the label I removed from my silk tights and bagged with the thread so I'd know what it was. Re-sewing the elastic casing of the tights used hardly any of the thread I'd saved when taking out the too-tight elastic, and it turns out that this silk thread is a good size, when doubled, to darn my wool jersey.
So now I'm confident that the old tights are size L, so I can order two new pairs — if my virtual credit-card number hasn't expired. I'd better read the catalog today.
Tights are ordered, only a few days before the one-use number would have expired.
Did a little sewing this morning: before I could dress, I had to tear an old pillowcase into a bra rag and a stack of skillet wipes. The case was so badly worn that I could get only one bra rag out of it.
And one cat toy, but he lost interest when I broke the strip of seam allowance off and it quit twitching. I did flap it around for him a little later on.
Yesterday I decided that it was time to cut out my new shirt and get that stack of jersey and pattern off the rocking chair (where I put it to get it out of the piano-tuner's way.) I got about halfway through clearing off the table.
Hey, I've been sick: that's my story and I'm sticking to it. My throat wasn't as sore this morning as it was yesterday. Aside from one spell of being tired, the throat has been the only symptom. [It developed into a full-blown cold later on.]
Unexpected sewing: last Monday, DH regretted that he hadn't thrown his armrest cover into the wash.
To start at the beginning, yea many years ago, one arm of his computer chair was irritating his arm, so I pinned a piece of old cotton-wadding mattress pad around it. When he mentioned it, I saw that it had become quite black.
Today I roodled around and found that despite having re-covered the ironing board once or twice, I still have a substantial piece of the mattress pad.
So I drew around the old cover with a self-removing marker, threw the old cover into the laundry room, and fetched my bent-handle trimmers.
The self-removing marker had already removed itself. But one trace near the bound edge remained, and that sufficed to cut it by guess and by golly and by not-very-useful quilting lines. (It is an irregular criss-cross in which it is difficult to discern the repeat.) Changed the thread in the Necchi, zig-zagged around with the edge of the foot following the cut edge (cutting one corner), flipped and zig-zagged back with the zigs just falling off the cut edge, trimmed off ravels and the corner that I'd rounded on the fly, pinned it to the arm, DH is pleased and comfortable.
I ego-scanned one day and found two people discussing Rough Sewing. Ever since, I've been thinking wouldn't it be cool if people could discuss my site on my site. Alas, creating a blog or any other kind of forum is far outside my competence. So I've been giving serious thought to creating a Live Journal "community" and linking to it. But asking someone to do something for you and getting it to come out the way you want it to can take up more time and skill than doing it yourself.
I could at least read the instructions.
Breakfast and playing with computers over, the first order of business today is to re-thread the Necchi, take the needle out, verify that it's a knit needle, and sew the shoulder seams of my T-shirt in progress. I must sew the bust darts before sewing the shoulder seams, to pin the darts I need a clear space on the table, if I'm moving the garbage I might as well carry it out to the compost heap, hey there's the limp shell of the missing potato set — better put it into its appointed place and bury it in bagged topsoil just in case there's some life left, as long as I've got the cart out here, this is a good time to put duck mulch near my multipliers, but I need a knife to get the cable tie off the bag, so I go inside for my knife and my lipstick, lipstick? I haven't put sunscreen on today! While putting on the sunscreen I notice a rough spot on a fingernail and I've already torn my thumbnail today; better emery-board this one before I tear it too, somehow back to something I was doing before: egad is this knife ever dull!
I couldn't put an actual edge on the knife —what do you expect of a fifty-cent knife with a stainless blade— but I did get it sharp enough to grunt through the cable tie, so I mulched the multipliers, the mulch at a careful distance lest it disagree with them. I put an oval around the short row; if everything I've mulched flourishes, I'll also put mulch between the multipliers in the row.
The sight of the topsoil has reminded me that I'd planned to dig a flower pot and fill it with topsoil when I planted the cinnamon basil, so I dragged the cart over to the Joe Rickets bed and planted the cinnamon basil where the parsley was last year, and mulched a couple of strawberries in the north-west corner, planning to gradually cover the entire bed, if these plants like the mulch.
Yesterday I bought four ground-cherry plants in the fond hope that the deer wouldn't recognize them as tomatoes. Those need planting too; they are already pot bound. There is plenty of space in the Joe Rickets bed, but the deer come here to eat the strawberries <http://www.debeeson.net/IPCamPhotos/DeerOnIPCam.jpg> so there is no way they'd overlook a ground cherry. I put one in the commercial-strawberry bed, careful not to clear a space around it. The deer haven't paid much attention to that bed since we took the bird feeder down. Then I put one in the herb bed and the remaining two in the fern bed, all potted in bagged topsoil. I ringed the one closest to the lawn with duck mulch to keep it from being mistaken for a weed.
It hasn't rained since we put out the rain barrels, so I'd better change into shorts and fetch a couple of buckets of water from the creek. But on the way into the house, I noticed the bucket of rain water, so I used half of that and here I am back at the sewing project. But my stomach is telling me that it's time for lunch. And after that, I think I need a nap. It's almost one o'clock.
Briefly considered pinning the darts before going to bed, but I intend to mark the stitching lines with self-removing marker, which works only if one goes straight from the marking table to the sewing machine.
I once read a very pained essay written by a woman who bought a self-removing marker and spent a whole evening very carefully marking precise and artistic locations for the sequins or whatever that she meant to sew on the next day.
Resumed darning my wool bicycle jersey today. It had been so long I couldn't find my tools even though they were right there in plain sight, and I forgot to put my thimble on. By the time I noticed, I was accustomed to working without it, so instead of looking for the thimble (in the baggie with the silk thread), I put a square of adhesive tape on my finger. It works! And it is, indeed necessary to overlap the nail; a corner overlapped, and when I stopped to re-thread the needle, I noticed it and snipped it off — and the tape didn't work as well thereafter. One incident makes me think that I should try putting moleskin on a fingernail to render it non-skid. I don't think moleskin would resist penetration; it's knitted rather loosely to make it stretchy. On the other hand, the adhesive on moleskin is even more aggressive than the adhesive on adhesive tape.
After two needlefuls of silk, I declared the darn finished. There are at least two more holes, one of them in a pocket — though it's a pocket that never contains anything but the large wallet it was designed to fit, so there won't be any stress that tends to enlarge the hole. (Probably a moth hole, rather than wear. My wool suit is ruined; there are small holes all over the seat of the pants.)
The previous entry was 16 April. I haven't been quite that lazy; when I'm feeling more energetic, I'll frisk the April and May banners for accounts of sewing and paste them in.
After all that fuss, I don't like to wear my salwarish kameezish. The print is louder made up than it was before I cut it, and the hooks on the shoulders are a pain to fasten.
Sewed the bust darts and shoulder seams of my white T-shirt today. Used a zig-zag on length 2, width 2 for both the darts and the seams. Because of the zig-zag, I plan to press the seam instead of the first row of top-stitching, so things came to a screeching halt at that point.
I've also got a pillowcase that has been waiting for weeks for me to get around to heating up the iron and pressing the seam open so I can hem it. And we seriously need pillowcases.
Pressed and top-stitched the shoulder seams, and pressed the pillowcase. I could sew the sleeves in now, but I think I'd rather read Usenet.
Yesterday I frittered the whole morning playing with computers, and didn't even update anything. But in the afternoon, I hemmed the pillowcase, tore the rest of the sheet into four more, and sewed the seams.
Rode my bike to the grocery three days in a row, on Monday in the tights I made out of sweat pants, on Tuesday in in my older linen knickers, and the third in my better pair. I put the older pair back into the back of the closet, after pinning on a note to say I should keep it as back-up through the summer and convert it to underwear when the weather gets cold.
I need to patch some weak places on the better pair when I remember where I stashed the worn-to-rags pair. <checks> They are right where I thought they were, and they are sufficiently disassembled to make it easy to select the parts to be taken for patches. Might make a black spectacle-cleaning rag while I'm at it.
My bra was soaked in sweat when I came back, so I washed it in a bucket. I need *fewer* bras in hot weather, even though I'm more likely to wear two a day.
Now what was the other chore I thought should be added to my list of things to do?
Never did remember; it can't have been too important.
It's time for my nap, and both sleeve-seams are top-stitched, the collar is attached, and the pockets are cut out.
Cutting the pockets took a while. The first time I sewed a knit, I drew a thread to mark where to cut and the fabric fell into two pieces. I was very impressed with this feat, but I have never again succeeded in drawing a thread in a knit.
But I was cutting the pockets out of a narrow strip that had been between two pieces cut earlier, probably the front and back of the shirt; since it wasn't very far across, I determined to give it a serious try. So I laid the pocket pattern on the piece to determine the lowest place where the scrap was wide enough, marked it with a wash-out pen, and dotted a line where I eyeballed the crossgrain. The I took a seam ripper, a pair of scissors, and a pair of magnifying glasses out to the picnic table and set to work. I managed to pull up a thread, but it wouldn't draw. So I picked out stitch after stitch as one would cut a hand knit, snipping the picked-out thread when it threatened to become difficult to draw through the stitch, and now and again breaking it to verify that it still wouldn't draw.
The pick-cut line was gratifyingly close to the first few dots, but I could see that the last few were going to veer off from it. Or it was going to veer off from them; whatever.
I got a little more than a quarter of the way across before I went inside and drew a cutting line by lining up a ruler with what was already cut. Then I used the pocket pattern to mark the end points of more cutting lines. Cut along all with my smaller cutting mat and rotary cutter, pinned them together to keep them the same way up — I don't know whether they will match the shirt, but they will match each other.
Now to cut the collar.
The collar is loosely-inspired by a split-cowl collar I learned about on Creative Machine mailing list; it was one of Pat Erny's tutorials. The cowl collar was designed for a scooped neck and I want a high one, and the ends overlap to give an asymmetrical draped effect, which I thought a bit overpowering for a T-shirt. I decided to have the ends meet exactly at center front, giving a sort of shirt-collar effect.
And the very latest style; the points are splayed extremely wide. Should I make another shirt from the remaining PDF jersey, I'll cut the ends of the collar slanted to make them look more square.
In the end, I cut the collar exactly the way I cut a neckband, except that I cut it six inches wide, and instead of sewing the ends together, I folded it lengthwise with right sides together and sewed across the ends (using the same 2mmX2mm zig-zag I've been assembling the shirt with), making the seam as narrow as possible.
I got the length by folding the fabric, wrapping it around my head stretched, and pinning it. Then I laid it on my cutting board and measured from fold to pin: eleven inches. Double thick, twenty-two. Add seam allowance: 22 1/2". I checked my yardstick against the cutting board to make sure they agreed before marking the fabric.
Later on I measured the cut edge of the neck: also 22 12". The teensy amount allowed for seams does not give me enough easing to make up for the dowager's-hump darts not sewn at the back of the neck, and though I'm not a dowager (my spouse is very much alive), I do need those darts.
So I marked a cutting line by putting my big draftsman's triangle on the edge where I'd cut off the selvage and using it to line up a yardstick, then I measured the rest of the rectangle with reference to this line.
Forthwith to sew the ends of the collar. The first end was very easy and neat, the second gave me fits. I puzzled a bit, then realized that the first end was from the edge where I'd cut off the selvage, and to keep it from curling, I'd starched it to who-tied it.
Should I make another shirt from this scrap, I'll lay it out flat —it will fit on the picnic table now, I think— and spray the whole thing with starch.
The un-starched end of the collar turned right-side-out almost as neatly as the starched end, so I proceeded to sewing it on without heating up the iron.
Leaving the ends of the collar unattached to each other would provide the same effect as snipping the edge of fabric before you tear it. I'd been considering this problem for some time before today, and concluded that bar-tacking the seam allowances together would not have the desired effect, so I cut off a tad more than an inch of white cotton quarter-inch twill tape, and basted it to the inside of the front of the neck, with just a little of the tape showing on the right side. As I had hoped, this made the zig-zagging of a narrowest-possible seam run right along the other edge of the tape, making for a neat fold.
Then I tried it on in front of the hall mirror, and I do believe it is going to work.
This is probably it for the day, because I want to go on the Fat And Skinny Tire Fest mass ride this evening — and because I'm so late for my nap that there isn't going to be any afternoon.
Unexpectedly, there was a little afternoon. I measured the hems of the pockets, stitched the ends, and basted the turn-unders. In the evening I reflected on how much easier the starched areas were to sew, mixed some starch in a spray bottle, saturated the pockets thoroughly, and laid them on a stool in front of the air filter. The wetting caused the edge of the hem to curl, but that should undo when I press the pockets before stitching.
Went out to supper instead of going on the ride. Watched the ride start, and was glad I wasn't in that mass.
Got some sewing in before breakfast: For some months, my older pair of slopping-around jeans has been lying on the sofa waiting for me to tighten two of the hooks, one of which was staying with the garment only by virtue of being stuck in its eye. This morning I could no longer wear the other pair, which is actually stiff with dirt. What I got into to starch . . . Starch! Probably sprayed the front of that thigh along with the pocket for my white T-shirt. But it also felt damp or greasy.
I hope that the hole in the knee doesn't open up too much in the wash; I don't want to patch it in its current condition.
So anyhow, I overhanded the slit in the patch with un-labeled black thread, probably silk. Hey, pants this old? No bleach or even rubbing with soap unless I plan to tear it up for mop rags; silk will hold as well as cotton that I had to get up and hunt for.
Oops, just found another slit in the patch. Well, the needle is still threaded. Hope I remember to use it when I take the pants off at naptime.
The I re-sewed the hooks with filament polyester upholstery thread, not so many stitches as to stick up and solicit abrasion.
Then I put them on and found that one of the eyes is broken. I adjusted the waistband half an inch looser.
When I patch the newer pair of jeans, I'm definitely not piecing any of the patches!
Put corned beef and cabbage on to poach —inadvertently letting it come to a boil; hope it doesn't make the beef tough— made a half-patty of left-over thawed hamburger into soup for breakfast, finally got around to the T-shirt.
First I must clear off the ironing board, starting with a pair of cheap yellow gloves I wanted to mark before washing. I put them on the same hands every time to keep the backs yellow for signalling turns; all winter I've been accomplishing that by putting the dirtier side of the glove on my palm, but with any luck that will get a lot harder after I've washed them to put them away for the summer. It would be nice to mark them by sewing retro-reflective buttons on the backs, but I don't think there is any such thing, and I don't go out after dark now anyway. (Dark is too late at night in double-daylight season, and too cold during daylight season.) I took down the box of synthetic tapes, pulled out the bag of reflective tapes, stared at it blankly, put it back on the shelf, and dug out the box of embroidery floss. There was a stray strand of dark red on the top tray; I used that and a #11 crochet hook to put a little tuft of floss on the wrist of each glove, like the tufts Mom put on the toes of our socks so I could tell mine from Mary's. (I think that mine were blue and hers were red.)
Then I frittered away some time writing this entry. Now to clear off the ironing board, starting by rolling up the crochet-hook pouch.
'Twar all ironing-board clearing from then on, but I had some more time to sew in the evening, and this morning the collar had been finished, the sleeves pressed and basted, and the pockets hemmed and pressed.
First to attach the pockets. The first pocket, I left the ends of the stitching a little short of the top, planning to put in bar tacks by hand, but when beginning the second pocket, the machine stalled and put in a bar tack, so I pushed down the feed-dog button at the end to make another machine bar tack. I suspect that I should also make a hand bar tack to take the strain off it; two millimeters is very narrow.
I forgot to pull out the basting on the folds until I'd stitched over a couple of inches of dark-brown thread, but with the aid of 3.5 reading glasses, I got it out without leaving lint.
On the other hand, the stitching lettuced, and I'm not sure that will press out. Two millimeters is a very short stitch; there may not be room for the fabric to contract.
I'd planned to only press the fells of the sleeve seams in place before the second row of stitching, but the ease kept shifting around, so I basted. I was tempted to stitch the fell down without further pressing, but I've moved the ham to the ironing board (where it accompanies two books, one lampshade, one Dharma catalog, four pressed-but-not-hemmed pillowcases, and a sleeve board) and I plan to warm up the iron Real Soon Now. Will finally remember to press the darts this time, too. Hey, those should also be done on the ham. The well-padded corner of the ironing board works, but when you've got it, use it (as my driving instructor said while teaching me how to make a three-point turn).
Ham did fine for the darts, but it turned out that the sleeve board was a better choice for the sleeves. Perhaps a full-size ham would have worked, but the problem was that the fabric expands in both directions from the seam — perhaps a seam roll would have been the best tool.
I was afraid the sleeve seams would lettuce like the pockets, particularly since there were places where I had to actually stretch the seam to make everything lie together, but they appear to be neat. At one point in stitching the first sleeve, the thread broke the way the White breaks it when I absent-mindedly treadle backward. I don't know what's up with that, but I stopped in the very stitch where it broke, and backing up one stitch to resume didn't leave a conspicuous loop of bobbin thread on the right side — indeed, now that I've clipped the loose end, I'm not sure I could find the place.
On to basting the folds to flat-fell the side seams. With liberal applications of starch, I could press these folds, but it's easier to hand-baste. And no danger of stretching the fabric.
Whenever I say "flat fell", you may assume the pre-graded method unless I specify. It would be nice to have a official name for this seam; I can't be the first person to unvent it — it's a very slight variation on the seams David Coffin suggests in Shirtmaking— but I haven't been able to find any prior art. Perhaps because I don't know what name to search for.
Grump. I struggled around with an awkward fabric shift, heard a noise, looked all around for something that had fallen to the floor, checked that the tools that had been on the machine were still on the machine, and proceeded to sew nearly eight inches of seam with teeny-tiny straight stitches.
I just put the zig-zag lever back where it belonged and finished the seam. Taking out the errant stitches would be very tedious, and more likely than not I'd damage the fabric. I'll wait until they pop and then mend the seam.
Since the sleeves are very short, I'm going to try to do the top-stitching with the flat-bed plate on.
Fine for the first side seam, but the other one needed to be sewn sleeve first, since I wanted it to be symmetrical with the first one. Cogitate. I'll sew it flat-bed from the armscye down, then do the sleeve on the free arm. But when getting the shirt into position, I discovered that it was quite easy to get all of the sleeve seam into position too, and all went as slick as grease.
Except that when I was done, I discovered that the bobbin thread had run out three inches in. Yes, I did notice that something was odd, but I was concentrating so hard on making this perfect, perfect seam that I didn't pay any attention,
I opened my last ball of 100/6 to re-fill the bobbin. So I'm going to have to get another virtual credit-card number. I wonder which lace supplier to use this time? Be nice if I could buy some King Tut to try out, as long as I'm paying shipping charges, but I don't think anyone sells both.
Now the shirt lacks nothing but three hems, so I tried it on: yes indeed, the collar makes all the difference; nothing underwear-like about this white T-shirt at all — until one notices that it glaringly highlights all the slight bulges made by nipples and the edges of underwear. So I guess that I'll still be saving back my last Villa Olive T-shirt, and wearing this one for walks etc.
But at least now I do have something other than my very best T-shirt to wear when I don't want to wear old rags in warm weather.
And it didn't take all that long, for me. I can plan on having another before the end of hot weather. But a quick glance at the knits shelf suggests that I've finally used up all my Villa Olive jersey and all my brown-striped jersey, I already have a short-sleeved black T-shirt, the flowered jersey is also white, and it's thinner than the PDF; the flowers might not be enough to compensate. I don't think that Lowery's sells jersey; there isn't much market around here for anything but quilting cottons.
My next project had better be to cut out two pairs of jeans. I'd been thinking herringbone, but upon checking the pants-weight pile, I see that I also have some black bull denim.
All done and hung up in the closet. Well, I need to rub a damp washrag on some blue marks, and it would look better if pressed. Oddly, it seems a smidge longer than the villa olive shirt it's hanging next to even though both were cut from the same pattern and the white one has a wider hem.
When I was halfway through pinning the hem, and it was just getting easy by reason of not having a bunch of rumples under the Dharma catalog that I was using to keep the pins from catching layers I didn't want to pin, my hem gauge vanished.
I'm noted for mislaying things, but a card vanishing right out of my hand takes the cake. What's worse, I had no idea what width had been marked on it; I just pulled it out of the snack bag, thought it looked good, and used it without measuring it. I found that my point turner was about as wide as the hem that had been already pinned, and used it to mark another card — but not as nice a card; the missing one had come out of a box of chocolates and was a little bit shorter than a standard business card.
I pinned the sleeves with the same card even though I usually make sleeve hems narrower than bottom hems, and this bottom hem was wider than usual. This meant that the raw edge was detectably shorter than the fabric I was sewing it to. Before hemming the sleeves, I increased the zig-zag from 2mmX2mm to 3mmX3mm so that I could stretch the hems a little without lettucing, and that worked well. I wish I had done the same for the bottom hem.
Just took the bull denim down and put it where it will annoy me, hoping that I'll remember to unfold and inspect it when the thunderstorms stop and I can use the picnic table. If I recall correctly, this denim was a bear to straighten and I washed it several times before giving up and cutting a little crooked. The pants didn't wear as well as I'd hoped, which is why I never cut the rest of it, but I still remembered work denim back then, and it's got to be more durable than what I've been using lately. At least it isn't woven as loosely as my oakwood-color cotton-linen twill and my "russia drill" hemp.
Still raining, so I put the clothes-drying rack away and used the parlor floor. It's all one piece, no scraps folded up inside it. The piece is almost sixty inches wide, and well over five yards long.
Four yards and forty-two inches, to be semi-exact. Folded in half, it measured one six-foot folding rule plus twenty-one inches.
Needs ironing.
There might be some more in the box marked "heavy cotton", but that's the bottom box in a stack of five on the top shelf.
The neck on the white shirt is scooped, which should not have been a surprise: The band not only fills in some of the hole, it draws in the raw edge. The collar stands up more than a narrow band can in the back, but it fills in less and less until it reaches zero at center front, and actually stretches the hole some in the front. This plunging-V effect is fine and dandy for a summer shirt, but I'd like to use the same finish on a long-sleeved shirt. It would be easy enough to raise the neckline a couple of inches, but it's just barely big enough to pass over my head the way it is.
I guess I now know why polo shirts always have plackets. Just examined Dave's Carhart henly shirt and one of his polo shirts. I'm not at all inclined to go to that much trouble, and I don't think I'd like that wad of fabric on my chest either. A minimum of four layers of fashion fabric and two layers of interfacing is not T-shirt compatible.
But a faced slit could be as little as three layers, ignoring the pile-up at the seams. Close it with a hook and loop at the top, finish the inside neatly so that it could be worn open. Hard to make a hook look nice on both sides: perhaps a pair of buttonholes and a cuff link?
Yesterday I scanned some pages of Jessup to revise "Hand Sewing Stitches with. Just noticed the icons on my desktop while shutting down for the night. And it's after midnight, so read that date as the day before yesterday. This entry belongs on the site-maintenance blog, but I'm too sleepy to correct.
draft new waistbands; the old ones don't fit
Got some sewing done today after all — when I was undressing into the washing machine after my bike ride, I noticed that my spectacle-cleaning rag was fraying at two corners, and ought to be zig-zagged before it was washed. So I put it on the counter, dipped my finger in bottle starch, and soaked the fraying corners thoroughly. They were slick on one side when I peeled them off the counter at supper time. And after supper, I zig-zagged them. Used 100/6 because I didn't want to bother changing the thread; the mend is a little coarse. But quite, quite flat; the zig-zagging didn't scrunch the stiffened fabric at all. I don't know how it will look when it comes out of the washer.
I hope to cut out my new pants tomorrow. And get two sessions of thistle-pulling in; weeding as long as I dare doesn't take long. Need to put more mulch on the strawberry bed, too.
Pulled some thistles, but little sewing done — I did pin a couple of pillow-case hems, and there is now only one to go. Also overhanded the slit in my jeans patch, and re-ironed the iron-on patches inside. One of them refused to stick, so I peeled it off when I dressed this morning. The edge of the stiff fabric had been irritating my knee. (I know enough to always zig-zag the edges of iron-on patches! But I did get away with it on the other one. And the iron-ons were mainly for keeping things in shape while I applied a sew-on patch.)
I seriously want the picnic table for cutting out my new pants —there isn't enough room on the parlor floor, and the living-room carpet is soft and cushy— but the Weather Service says that I can't have it until Monday.
Unfolding the carpenter's rule yet again, I find that the picnic table is two yards and two feet long and thirty inches wide. The fabric is four yards and forty-four inches long and about sixty inches wide. But an experiment on the parlor floor this morning showed that I can get two pairs of jeans out of half the piece, and our forty-inch diameter patio table is almost exactly the same height as the picnic table, so it should do nicely to keep the excess fabric from pulling on what's on the picnic table.
After I spend quite a while scouring dirt and mold off the glass, but with the Fourth of July coming up soon, I'd be wanting to do that anyway.
Trouble is, the experiment showed that there is *exactly* enough fabric; when I lay it out for real with due attention the grain, it may be close but no cigar. In which case I'd need to lay it out on a single layer.
In which case I'd probably make just one pair of pants and ignore the nap, since I have only two copies of the pattern and don't care to make two more, and sketching around a piece with a Nonce pencil and moving it is almost as much work as making an extra copy — more work if you need to shift the pieces around for best fit.
I'm pretty sure bull denim doesn't have nap, and if the fronts and backs are slightly different shades of black, hardly anybody is going to see both at once. It isn't like having one panel in a gored skirt the wrong way up.
Sometime during the composition of the above, I put the denim into the washer, filled it with hot water, and left it to soak during my nap. Now it's in the dryer. Neither washer nor dryer is honestly up to the job; I'm re-arranging the denim every five minutes. Or thereabouts.
Or forgetting about it until it's rolled up into a neat cylinder with a dry flap hanging off it.
I put it back in for a while, then draped it over the bed to finish drying, figuring that it had been hot and steamy long enough; now it's loosely folded on the parlor floor. Hope to have clear weather for cutting out —and drying laundry— tomorrow.
The last time I went to Zales, I found a six-compartment pill box just a little longer and wider than a four-compartment bobbin box and thought that it might do for making a sewing kit. Alas, there not only isn't space inside the lid for a needlebook and scissors, it closes down tight enough to keep small pills from jumping the partitions. The box is also shallower than the bobbin box, so that the lid won't close if I put two bobbins into a compartment. It does close with a thimble in one of the compartments, but just barely. And the thimble I found to test it with is made of thin metal, has no rim at the lower edge like most of them, and it's one of those I squeezed in a vise to make them fit better. (Or maybe I stepped on that one; I don't remember how long I've had it.)
And the square compartments aren't wide enough to put pins in, let alone needles. Looks as though there won't be any new photograph for the sewkits page.
That section is more than one page: it's a main page and a few pages linked from it. Is that a quire?
Finally, a bright sunny day and I can cut on the picnic table. Oops, there are a few things I should have done on those rainy days.
So I pulled the overcasting off the thread-straight end of the bull denim and cleared off the ironing board. Best way to get those pillowcases off the ironing board is permanently; I opened up the White and began to sew the hems. While sewing the first pillowcase, a dramatic squeak started; been ages since I oiled this thing. Dug out the instructions and oiled all the holes on top, then took a lamp and looked for holes underneath — the manual I downloaded doesn't mention those, or (if I recall correctly) even tell you how to unlatch the machine and tip it back. (I'd better look for a better manual.) Wiped up excess oil, sewed the second case: squeak still dramatic, seems to be in time with the treadle, not the handwheel. Egad, I don't think I've ever oiled down there. Waved lamp here and there, but could find only one oil hole. Sewed the third case, that wasn't it.
While typing the above paragraph, I went hunting and found a scan of the original manual. Has no more information about oiling, but the pictures are sharper, and there are pages about sewing techniques, so I saved a copy to my desktop.
Aha! I've found a picture of the bottom of the machine, and with sufficient magnification, one can see a whole bunch of oiling points. I wonder whether a jpg posing as a pdf page can be edited with Gimp? I'd need to crop it quite a bit to print a readable picture on one sheet of paper.
The same page advises that the "iron stand" should be oiled at the "treadle centers, upper and lower end of pit man and the balance wheel hub bearings"; I should also print out the page explaining what those words mean.
The page above the oiling page demonstrates a really clever way to make bound buttonholes for everyday garments. One of these years I must steal it for Rough Sewing; would have to make my own illustrations even though the book is long out of copyright. There is enough wear on the original that the PDF owner could tell that I was stealing his scan.
Meanwhile, back at the pants project: I draped the last pillowcase over the White and ironed the denim. I had to starch the thread-straight edge to make it lie flat; it had been curled in storage, and washing and drying only set it more firmly.
Well, strictly speaking I didn't have to starch it, but I had put starch in my water sprayer and didn't remember having bought a sprayer top. Which I just fetched and tried on a bottled-water bottle: it works! Now I should switch the bottles, as the sprayer top sprays finer. Or, rather, I should buy another sprayer top and throw out the Clean Shower bottle.
I did put more water in the starch before using it to soften the edge of the denim.
So I ironed the denim and draped it back and forth over the ironing board so it wouldn't get mussed again, and that's as much use as I got out of the sunny day. (Though I did pull enough thistles that the next weeding session should get all of them.)
When I stand on the ammo box to pull the plug out of the ceiling fixture, it is my habit to set the iron flat on its piece of plywood and lean on the handle to keep my balance. The denim was all wadded up where I usually put the ammo box, so I set it on the other side of the board. Of course, a hot iron will scorch the plywood if left setting there, so I tip it over just before using it.
Like a durn fool, I felt for the handle of the iron without looking — and the iron was the other way around. You'd be amazed at how much one uses a left hand.
This made it difficult to fold the coarse, harsh denim back and forth, but only one finger was sensitive when I got up from my nap and now the only sign is that two fingers are slightly in-sensitive while they decide that no, they aren't going to blister after all.
Later on I calculated that one width of the fabric was enough to cut four broadfall pockets, and I think that when I do put the project on the picnic table, a fresh edge will be easier to line up than the much-mauled thread-straight edge, so I measured the pattern on the piece and tore off a strip. To my surprise and delight, it tore neatly crosswise. Though not requiring enough force to distort the fabric is an ominous portent for the durability. More spraying to insure that the torn edges aren't stretched.
The diluted starch dried before I got around to pressing the edges, so I tried my new spray bottle on them in intervals of typing this entry, and pressed them. Had to stop with the iron plugged in to take my blood pressure. It was up from yesterday; I wonder why?
I also sprayed the much-mangled thread-straight edge before ironing, and it curled again. But after I cut the pockets, I will fold them in half and it can't curl both ways, so I don't have to take that into account.
????????????????????????????????????????????????!!
There was most definitely an embroidered arrow in the selvage of the denim when I took it down off the shelf. There is most definitely no arrow anywhere on the fabric now.
Ah, well, I'm not planning to use the marked scraps from previous iterations anyhow — I'm not 100% sure that I have the scraps from previous iterations — the box marked "heavy cottons" is on the bottom of a stack on the highest shelf, and I haven't yet been curious enough to climb up and wrestle it down.
I settled for sweeping both tables, hosing the glass one, then wiping both with two old diapers. I figure anything that doesn't come off on a wet cloth won't come off on dry cloth — and the denim is, after all, black.
And now, Nonce pencil and blue marker in pocket, back to the picnic table. I hope the denim isn't too off-grain to fold in half lengthwise.
Back again to put the blue marker away; it doesn't show on the wrong side at all, and the nonce pencil does.
I didn't try the blue marker on the black side of
the cloth.
(I wonder whether Wing-Dings includes a smirk
symbol? But I've sworn off specifying
fonts.)
Denim adamantly refuses to fold in half. I return to house for scissors, intending to tear it into manageable pieces.
The sun is too bright, and has touched off the bright spot in my bad eye. It's also very warm. I may open out the eating table to cut the manageable pieces.
Everything is inside now, but I decided to use the eating table for eating, and left stuff piled up on the rocking chair. And after my nap, it's a lovely day for a ride and we need some stuff from the grocery store.
Pulled thistles instead.
After putting in all the extension leaves, I noticed that just raising the drop leaves would have made it big enough for the manageable pieces. Alas, the "manageable" pieces are no more inclined to straighten up and lie right than the entire piece was.
I may just lay the pieces out flat and cut at right angles to the selvage — I do have two copies of the pattern. I'm sure I put the denim through the washer more than once when I made the previous pants, and this last washing left it a little gray. If it were going to untwist after making up, it would have done so by now.
It is now lunch time.
⁂
Ate lunch on the picnic table. With the kitchen/dining room table out of service, there is a surprising shortage of places in this house where one can eat with a knife and fork while sitting down.
To lay the fabric out single, I do need the extension leaves in. The pieces go, but just barely — there isn't going to be a scrap big enough to cut a hip pocket. A watch pocket, maybe. Left pinning for after my nap. On my way to the bedroom I went back to the kitchen to fret over getting one left and one right of each piece — Duh! Just put the other "manageable piece" under this one, the other way up, and cut as if on the fold!
⁂
Double duh. The only way one can make two rhombuses match is to lay them the same way up.
But all I have to do to get two lefts and two rights is to notice which sides of the patterns are up, and put the other side up when cutting the other piece.
I am *not* going to measure over from the selvages, but just eyeball everything. The grain on this is going to be *terrible*. But it can't come out any worse than department-store pants, and at least I'll have pockets.
⁂
I did measure from the selvages for the two outside pieces, then lined the inner two up with those. So at least the long grain will be running up and down.
I had another bright idea: after cutting the lefts (or maybe the rights, or maybe two of each) with the fabric right-side up, I put the other piece on the table wrong side up, and as I un-pinned each pattern, put it on the fabric the same way it had been. So whatever else I've got, I've got four pairs of mirror images.
Now I need to cut out four waistbands and a bunch of pockets. I think I'll tear a crosswise strip two inches wide for the waistbands, tear an inch-and-a-half strip of Super Crisp and iron it on, sew it to the pants with a half-inch seam, turn the top down so that the torn edges overlap, and line it with a strip of twill tape. I hope I have some closely-woven black twill tape.
Still have to measure my waist and make a new waistband pattern.
Cut the broadfall pockets and the watch pockets this morning, then tore off a strip to be a waistband. Then measured the strip against the patterns and tore off another one: I've got a sixty-inch waist?
Got the heavy scraps down to find something to cut the hip pockets from, hey, I could have saved some work! One of the scraps was a broadfall pocket, already hemmed. I measured out that I could get three hip pockets out of it, then noticed that it wasn't the *same* black bull denim. And the other scrap was a third kind. So where are those scraps? Looked hither and yon without finding any, but did find a big pile of a fourth black bull denim. No wonder I have such a clear memory of bull denim not wearing as it should!
The just-found piece had some scraps folded in it, and I suspect that it's the piece that I thought I was using. I'm pretty sure that I remember bull denim not tearing well, the piece I'm using tears beautifully, and there was enough of it to make four pairs, so the piece I'm using may be a piece that never was cut, and that's why I can't find the scraps. But then, how does one account for the thread-straight end? I suppose I could have straightened one end before washing it.
Now I need to tear off a hip-pocket-wide strip, but I think I'll take a nap first. Then decide how to cut the passport pockets. I'm thinking of using black twill for those; it would probably be more durable than broadcloth.
⁂
Woke up just in time to get dressed for First Friday. When we got back, I tore a strip for the hip pockets and folded up the left-over fabric. Only enough to make one pair of jeans. Really must cut them and get the sewing stuff off the breakfast table before bedtime. [I took care of it when DH rousted me out to take my eight-o'clock medication.]
By the way, I found the White manual at http://www.ismacs.net/white/manuals/white-rotary.pdf, and the buttonholes are on page 26.
The new white T-shirt is being washed for the first time, and today is a whiskbroom-the-pockets washday. I suddenly realize that there's a *reason* for most of the pockets on my knit clothing to have rounded bottom corners.
Pieces of the new pants are still stacked on the ironing board. Instead of pinning the patterns to the stacks of four pockets, I shoved a pin straight through from the bottom, creating the effect of the once-ubiquitous filing spike.
Which brings fond memories. When I was in school and there was only one phone to a dorm, telephone messages were impaled on a spike, and every time one returned to the dorm, one always stopped at the desk to riffle through the spike and see whether any of the slips of paper had one's name on it.
I wonder whether programmers still call last-in-first-out stacks of information "spikes".
While looking at the black twill with the passport-pocket pattern in one hand, I noticed that the passport pocket that wore off entirely was made of sheath lining, not broadcloth. No wonder it washed out! While looking to see whether I had some small pieces of broadcloth or needed to tear into the roll, I found yet more black bull denim, hiding in the sewing-room closet behind worn-out jeans being kept as patch donors.
Could be some broadcloth scraps in the "solids and woven-ins" box, but I'll tear a strip off the roll and know where I'm at.
⁂
Oh, my, the dust just flew when I tore that fabric! It was cut pretty crooked, too. This was the first piece taken off this roll and I thought I'd be profligate —it's cheap fabric, after all. I have to keep reminding myself that nowadays there is such a thing as cheap fabric— and tear off more than two inches, just to be sure the tear ran all the way across. After ten inches, it snagged on the overcasting from having washed the fabric.
So I snipped about the same distance in again, and this time it did run all the way across. Then I tore off a strip as wide as the length of my passport-pocket pattern, hesitated, tore off the perfect selvage at the end, snipped by the width of the passport-pocket pattern, put the scrap inside the roll, wrapped the strip around the roll, and put it back on the shelf. As I was about to put the pocket and the pattern on the ironing board while plotting to shrink the torn edges later, I realized that it would be easier to block the pocket than to iron it, so I took it to the kitchen ran water on it, started to pat it square on the counter. . .
Wasn't I supposed to make four of these?
A few snips later, I put three more wet rectangles on the counter. I lined up the end pocket in the corner of the counter, lined up each of the others with one edge on the edge of the counter and one edge against the previous pocket, which kept them all square.
Had trouble patting the air bubbles out, so I got out a glass mustard jar I sometimes use as a miniature rolling pin and mangled the pockets.
"Mangle" is an old word for flattening wet fabric by passing a roller over it, which word was later transferred to roller wringers such as those on non-automatic washing machines, and to ironing machines that draw the fabric between a padded roller and a hot plate, and careless use of these machines let to the figurative use of "mangle" that is the most-common meaning today.
Mangling not only got the air bubbles out, it squeezed out some of the water, and it left the top of the fabric about as smooth as that next to the counter. I must mangle more often!
I also pressed towels against the pockets, and now they are nearly dry enough to move.
The first load of wash is on a rack in the garage, since it's been raining and threatens to do so again, and the second is set to soak during my nap. I may put the blacks in with it when I wake up; none of them require a prolonged soaking.
I need new cycling knickers, but where do I buy the fabric? "Medium" linen is canvas-like, and "light" is too sheer. I have a piece of unbleached linen that is just right —I meant to make jeans when I bought it, but it's a tad thin for long pants— but any cycling pants that aren't black to start with pretty soon look dirty in the saddle area. Light gray would look as though I had bowel problems after the first ride.
Cotton twill absolutely positootly won't do; I might as well buy the "wicking" fabric that comes already made into shorts.
But I can remember when I insisted on wool jersey. It's still being made, you can buy wool cycling jerseys in men's sizes, but nobody sells wool jersey by the yard. Linen may go from "doesn't come in safety yellow" to "doesn't come".
Pockets today. I don't feel like spending a couple of hours of deferred maintenance on the White, so I'm setting up the Necchi. Now *which* black thread? The polyester I've got is spun polyester, and all the seams are mock felled, so I guess 50/3 cotton will do.
Considered interfacing the slanting pocket openings on the fronts, but decided that a wide hem tape would do.
I've sorted out all the tapes I might want to use an put them into a shallow box for the duration. I remember the roll of gray mystery tape as being about twice that diameter; I must have been using it more often than I thought. I'd better get a bit of it into water, because I think maybe that will be best for the front pockets. Something narrower on the hip pockets and watch pockets, I think.
Advantage to the asymmetric pattern for the watch pockets: I no longer have to worry about turning under the wrong side.
⁂
Reeled off three yards of the mystery tape, and basted across at one-yard intervals so I could see whether it shrank, and also so I could see that the left-overs, if any, have already been shrunk. Brought a little water to a boil in my glass saucepan, turned off the fire, and put the end of the tape in. Then DH took me for a walk (which we shortened, it's hot and steamy out there), so I could iron it dry now, but I think I'll wait until the water is cold, then blot it and hang it to dry.
I'm planning to use it for the front-pocket openings, the hip pockets, and the watch pockets, which should add up to about two yards.
The chapter on pockets needs revision; I don't think it's clear that when you aren't using tape to cover the raw edge, the edge of the hem should be pressed under before you sew the ends of the hems. And some pictures would be useful. Probably just as well I didn't think of taking pictures of these pockets in progress. Black is hard for professionals to depict clearly, and photography is not one of my strong points.
Also need to revise links on every page to reflect Rough Sewing's bilocation. Both sites are insecure; hope they don't go down simultaneously. I keep the local copy backed up, so it's not likely to be lost entirely even if I lose both off-site copies.
It's good that this file is scheduled to be closed out soon — when viewed in a browser, it takes a long time to load. Perhaps it's the fault of the pictures.
I was starting to say, making four copies of each patch pocket made it easy to arrange it so that when I stitched off a fold, I stitched onto a fold. This felt very efficient.
I suspect that I should have folded the hem of the pocket opening a little wider, but the width of my stainless-steel ruler was convenient. I made a special gauge for the watch pockets, measuring a business card against the pattern and using another business card as a ruler. And I labeled it "watch pocket".
Then I used it for the hip pockets too.
Not a lot of progress today, but some even though I frittered away the whole morning reading the Creative Machine mailing list.
Asterisms separate e-mail messages.
⁂
Today I spent the whole morning trying to back up Thunderbird before downloading my mail. MozBackup took to crashing the computer, frequently hard enough that "restart" wouldn't work and I had to reboot with the power switch. So I defragged, and when that finished tried to scan disk — seems to be working now that I've finally thought of unplugging the machine from the network. And its now more than halfway through; when I get up from my nap it will either be finished, or displaying a dialog that says "ready when you are, JR".
I managed to sew the hem-ends on all four passport pockets and start taping the hems on the broadfall pockets. I've turned the broadfall-pocket hems to the right side since that will be the inside, but I think that the stitching on the wrong side is more conspicuous than a streak of black tape would have been. I decided to zig-zag the first round, to be sure of catching everything, and to flatten the edge I brush over when reaching into the pocket. I had to turn the upper tension way up to get the zig-zag to work right.
In #40 thread, a widest zig-zag at 2.5 stitches/inch is quite dramatic.
⁂
It was "ready when you are, JR" — or, rather, "I've been interrupted and started over ten times, do you want to give up?"
So I rebooted and before I'd gotten my icons unscrambled, DH came in to attempt to start Spybot — *nothing* was running that could have interrupted the scan, and I'd unplugged from the net after the first failure. So I went off to cut up vegetables and make a relish plate for supper. When I came back, he was still attempting to start Spybot, which meant my sewing-machine chair was operating in computer-chair mode, so I pinned tape to the next broadfall pocket. By the time I finished that, Spybot was finally running, so I sat down at the machine and discovered that the pocket that was almost stitched had enough tape dangling to do another pocket. I'd already cut off from the reel by then, so I have three kinds of tape on the pockets and a little scrap rattling around in my tape box.
I'm thinking of changing the labels on my cotton-tapes boxes from "narrow" and "not narrow" to "black" and "everything else". But the gray mystery tape ought to go into the black box. But some of the tapes are ecru, so I can't divide into "white" and "everything else". Make a third box for selvages? Jumble everything together again?
Then I fetched the gray mystery tape that I'd left draped over a drying rack in the garage. It had shrunk between an inch and a half and two inches in each yard. I was surprised that the first yard had shrunk nearly as much as the other two, then remembered that I'd cut off a yard or three for cycling garters without shrinking it first. Which explains why there were no basted marks on the tape.
I considered using a piece of quarter-inch tape to cover the raw edge of the end of the hem and re-inforce the hinge, but decided to just put the hem tape close enough to the edge to insure that all would be covered in the seam allowance. The hem tape will keep the pocket from tearing, and in everyday jeans it won't matter if there is a little visible wear at that point; by the time it appears, they will be a notch or two down the path to dirty-work clothes anyhow.
Pity I'm ready to continue work now: typing was interrupted twice by "acknowledge that there is stuff in the error log you need to look at when I'm finished so I can get back to work" dialogs. I must remember to look at the other computer now and again.
Make that three times.
⁂
A weird chore interrupted my reflection that the fronts are now ready for the broadfall pockets to be basted to them: I hemmed the last front, looked around for the scrap to stitch off onto (which scrap has evaporated) and found a snipped of red wool flannel for sticking needles into when I give them away. (It's been years since I caught somebody to give lessons to, but I like to be prepared.) Since it had been kicking around on the floor, I thought it should be washed — but if I throw it into the laundry bin, it will never be seen again.
So I basted it to my red bra.
Now to see what I can do before warming up the iron again. The watch pockets and hip pockets aren't pressed — I may need to baste at least the corners — but they are pressed enough that I can sew on the tapes. I hesitated over the watch pockets because the mystery tape is overkill, but decided that I wanted all pockets to match.
⁂
I used just over two yards of mystery tape. Two yards measured before shrinking, that is.
The hip pockets and the watch pockets are hemmed, but the passport pockets need to be pressed before I stitch the hems. The job took longer than expected, because I ran out of bobbin thread and began to worry about running out of the Super Sheen before getting to the part where it mattered, so I re-threaded with Guetermann quilting cotton.
Then upon inspecting the passport pockets, I realized that finger-pressing would do just fine. So tomorrow I can assemble the broadfall pockets and attach the hip pockets, and then pants assembly can begin.
[But instead I rode my bike.]
Yesterday I was dealing with an infestation in my main computer all day and until four in the morning, so I couldn't update. Sent some e-mails from the back-up computer, and will paste them in later. Rode my bike all day today — though I rode back from supper in DH's truck, having eaten too much after meeting him at Mad Anthony's. Man, I needed that iced tea. (I'm still not comfortable, not to mention that the tea has worn off, which is why I'll do the pasting tomorrow.)
I've moved patching the knees of my cycling knickers to the top of my priority list. They need to be rinsed and dried first to flatten the knees; I plan to do that when I undress into the washing machine tomorrow. (I'm wearing the back-up knickers, lest the patches move from "re-enforce" to "repair".) Saturday is Farmer's Market day, so I may not sew tomorrow either.
Also need to mend my white linen do-rag before it's washed, and it's very dirty.
Washday, so I threaded a #10 embroidery needle with #60 cotton thread, put on my magnifying glasses, and worked fine buttonhole around the corner where the hem was starting to give. The sweat stain didn't come out, nor did the mysterious blue stain on the band, but the sweat stain is, of course, on the inside and the mystery stain is behind the knot — perhaps I had some fruit juice on my hands when I put the do-rag on once? I do tend to take it off when I take off my helmet, and I'm very likely to take the helmet off when I stop to eat.
The whole thing is usually under my helmet, so nobody can see stains on it anyway.
Also tore a large rag into two bra rags and a whole bunch of skillet wipes. To compensate for the two new rags, I pronounced one of the old ones too far gone and tore it into four skillet wipes.
And that should hold me for a while, since I haven't been cooking much. Also the pile is teetering, so I need to wait until I've used a few before making more.
Moved the knickers that need patching from the drying rack to the ironing board.
⁂
Pasted in the e-mails from the Day of Malware this evening, which reminded me to find and remove the red snippet basted to my red bra. I pinned it to the curtain.
Tomorrow is scheduled for a major trip to the grocery store, so probably no sewing. When I was first married, I would walk to the grocery after breakfast and just be starting my day when I got back.
And this supermarket is only about twice as far from the house as the one I used to walk to. Ah, well, back then I didn't even think I'd be alive in 2013, let alone in such good condition. I can still do everything I did then; I just can't do it all in one day.
Basted the creases in the pockets yesterday — sitting at the picnic table, watching diseased trees being taken down. ("Taken down" rather than "cut down" because each was close to things that must not have trees dropped on them.)
This morning, I pressed the pockets, the to-be-patched areas of my knickers, the rags I mean to cut patches from, and my new white T-shirt. Then I was out of time, though far from out of things that needed ironing, but managed to select a guide and pin one of the watch pockets to its broadfall pocket. And remembered to turn the magnetic pin cushion up-side down so that the cat couldn't eat the pins.
I tried to do it all in one day today: sewing, an appointment to be measured for new glasses, and a bike ride to Pierceton. And the tree-cutters were still around. Took a long nap.
Pinned the three remaining watch pockets tonight. As long as the project is moving, it will eventually get there.
Had to wash my jersey, shower, and wash my hair after a very short bike ride. It's hot out there, and predicted to be worse tomorrow.
The brown-print sateen muumuu I made in Hawaii sometime in the sixties gave up the ghost today. When it wore out at the top, I recut the lower part as a sleeveless slopping-around gown, and as I was sitting down to type earlier today, it tore up the back. So it went into the lower bin of the laundry sorter, to be torn into skillet wipes after the next time I do a hot-with-bleach load.
Fortunately, I also have a sleeveless seersucker slopping-around gown, and this one has pockets. Underpatch pockets in the side seam; I think that that was the only time I have used that technique.
This appears to be the last of my summer daygowns; I haven't made any on purpose since I realized that I'm more comfortable in hot weather with drawers on, and if I'm going to wear pants, I might as well wear a shirt. But I need at least one summer-weight dressing gown.
I've worn out all the drawers that I made while drafting my Injoo Kim pants, and my ragged jeans are getting *too* ragged, not to mention that they are warmer than pants made of cotton-and-linen shirting; I may have to make some pedal pushers on purpose.
I still have lots and lots of that blue-plaid cotton-linen shirting — and I already have a blue plaid shirt to wear with them.
On the project-in-motion front: I moved a handkerchief from the sewing machine to the pile of stuff to be taken care of when I change the thread, but decided that the light was too poor to sew black on black.
Broadfall pockets are now ready to baste to the fronts.
Oh, the joys of black-on-black! I was starting to stitch the second side of the last passport pocket before I noticed that it had been pinned to the broadfall pocket wrong side out. A hasty check showed that the other three pockets were correct.
I closed the bottoms of the pockets with three rows of straight stitch —one for each needle position— and one row of zig-zag close to the edge.
Grump. Pockets basted to two right-fronts, one up one down. That leaves me with two left-front pockets, one up, one down, and two left fronts. But even though I carried them into daylight and examined them very carefully, I can't find any trace of any arrow on either left front. I grabbed one front and one pocket randomly and hoped for the best. I've got a fifty-fifty chance of being right.
And with bull denim it probably doesn't matter.
Did I ever mention that when I cut them out, I nested pieces economically by turning one pair of jeans one way and the other pair the other? Then all I had to do was to sew the up-arrow parts to up-arrow parts and down-arrow parts to down-arrow parts to have all pieces in one pair with the same "nap". But somehow these two pieces lost all their arrows.
⁂
Hip pockets attached —extra arrows drawn!— and it's time to change back to Super Sheen for the construction seams. So I changed to that cone of two-ply cotton that I bought at a garage sale yea many years ago and have been using for basting thread ever since, and zig-zagged the frayed corner of a spectacle-cleaning rag, the one that I finger-painted with undiluted starch a few weeks back, and got that off the ironing board. It didn't take near as long as re-threading the sewing machine. The starch worked so well that I had to feel for the stiffness to be sure that this was the one with the frayed corner. I will, of course, wash it before cleaning my glasses with it again.
Then I hunted out my spools of black Guetermann 50/3, which were in a small zippered plastic bag in the drawer of the White, since there's a White bobbin in the bag. But all I did with it was to lay it on the Necchi as a reminder to patch my cycling knickers tomorrow.
I gave brief thought to darning the knee of the back-up knickers while I had the 50/3 on, but machine darning would irritate my knee and the picked places don't seem inclined to spread. Particularly since these knickers will go back on the hanger marked "convert into drawers in the fall" as soon as I get the newer pair patched.
Made the patches today. It was difficult to find a large piece of fabric that wasn't worn transparent in spots. And cutting along a thread in worn black cottonized linen had its moments.
I considered also making some black spectacle-cleaning rags while the 50/3 was on the machine, but that would put a very low-priority project ahead of two highest-priority projects — and I remembered that I have a little left of a black cotton thread that is even weaker. I bought it on a cardboard tube, and some time or the other wound it off onto one of my SubSilk spools for easier use. That thread probably followed me from Indianapolis to Hawaii, back to Indianapolis, to South Bethlehem, to Voorheesville, and back home to Indiana. Amazing that it's still around! (Especially considering that we moved twice a year during our stays in Indianapolis.)
I used the rewound thread to miter the corners of the patches so that I could take wee little nips to the right side and not have to take it out later on. I needed a few all-through stitches to keep the turn-unders folded coming into and out of the miters.
I pinned the first patch to the right leg along a Nonce line indicating the straight of grain, pinned the rest of the patch all flat and smooth, realized that the second side I'd pinned didn't follow the grain, took out three sides of pins and pinned flat and smooth, then took out all the pins and moved the patch a quarter inch. My leg board was a major help during all this.
So now it's ready to baste and it's time for my nap. I need to baste because pins don't hold when you are wallering the leg around on the free arm — and I'm so glad that I have a free arm!
Basted one patch, pinned and basted the other. The second one was much easier than the first. Which is the eternal cry of home sewing: by the time you figure out how to make one, you have all you need.
There was one moment in the basting when I (awk! skrickle!) saw my finger through the fabric of the pants — but that, when I looked at it, turned out to be a chalk mark.
I paused after pinning the second patch to take the pants off the leg board and hold them up to make sure the patches looked alike. (The main reason for two patches is symmetry, since only the right knee gets rubbed when I mound the bike, but the left patch does cover a flaw in the goods that wants to develop into a hole.)
Then once they were basted, I put them on and did a mirror check. Sewing the patches on is going to be anticlimactic.
⁂
And it was. The normal way to sew a patch on a knee on a free-arm machine . . .
<interruption> I've no experience with mending on a flat bed. When I was using my mother's machine, I tended to outgrow my clothes instead of wearing them out — and I quite certainly wasn't invited to hikes or weenie roasts often enough that I put significant wear on my jeans. And as soon as I was married, I bought a free-arm machine. </interruption>
is to put it on the free arm in position to sew the easiest side, then back down the adjacent side as far as you reasonably can. (In this case, it was all the way.) Then you sew from there, across the easiest side, and as far down the other adjacent side as you can. Then switch ends, and stitch from where you began to where you left off in the same manner.
Well, I also stitched all the way on the other adjacent side, and I can turn that corner too — hey, I can stitch all the way across, and turn the final corner! So each patch was sewn on in a single pass. And that final corner was only a couple of inches from the knee opening, which made it easy to cut off from the machine.
Now I'm going out to the garage to Do Something about the bolt-head that has been snagging my knickers. Then, I think, lunch, a walk, and a nap.
On to part two
Back to Rough Sewing
Back to the writing page
Back to the links page